
True water resistance isn’t in the tile itself, but in the complete waterproofing system protecting your home’s structure from silent failure.
- Porcelain’s density, confirmed by an absorption rate of less than 0.5%, makes it the only viable choice for high-moisture floors.
- A flawless waterproofing membrane, installed behind the tile, is more critical than any other component in preventing subfloor rot.
Recommendation: Always perform a 24-hour flood test on your shower pan membrane before a single tile is laid to guarantee its integrity.
The fear of water damage is a familiar anxiety for any renovator. A small, persistent leak or a single waterproofing failure can lead to thousands of dollars in repairs, battling hidden mold, and compromising the structural integrity of your home. Many believe the solution is as simple as choosing a “waterproof” tile. They spend weeks selecting the perfect style, focusing only on the surface aesthetic while overlooking the critical system that lies beneath.
While the right tile is important, it’s merely the visible finish line of a much more complex race against moisture. The real battle is won or lost in the unseen layers: the integrity of the waterproofing membrane, the slip-resistance rating of the floor, the porosity of the grout, and the material science of the tile itself. A beautiful tile laid over a flawed foundation is a ticking time bomb.
This guide moves beyond superficial style choices. We will approach your wet-area renovation from the perspective of a technical tiler, focusing on the principles of durability, safety, and long-term performance. We’ll dissect the complete system, layer by layer, to ensure your beautiful new bathroom is engineered to last a lifetime.
This article provides a comprehensive breakdown of the critical decisions you’ll face. From understanding mandatory safety ratings to choosing materials that offer decades of performance, the following sections will equip you with the knowledge to build a truly waterproof and durable space.
Summary: A Tiler’s Blueprint for Bulletproof Bathroom Surfaces
- R-rating explained: which slip resistance rating is mandatory for family showers?
- Large format vs. Mosaic: which tile size reduces cleaning time by 50%?
- Porcelain vs. Ceramic: why is porcelain the only choice for heavy water zones?
- The waterproofing error behind the tile that rots your subfloor silently
- White vs. Grey grout: which color hides grime better over 5 years?
- The cold tile shock and how heated floors change your morning mood
- Shiplap vs. plaster: which wall finish offers better long-term value?
- Ample Vanity Storage: Organizing Your Morning Routine to Save Time
R-rating explained: which slip resistance rating is mandatory for family showers?
In a wet environment, aesthetics always come second to safety. The single most important factor for any floor surface exposed to water is its slip resistance. Vague terms like “textured” or “matte” are meaningless; the industry standard is a quantifiable metric called the Dynamic Coefficient of Friction (DCOF). This test measures how much force is required to move an object across the tile surface when it’s wet. For any interior space that will be walked upon when wet, such as a bathroom floor, standards like the Americans with Disabilities Act (ADA) are clear. According to tile industry guidelines, ADA-compliant tiles require a minimum DCOF rating of 0.42. This is not a suggestion; it’s a baseline for preventing dangerous falls.
However, not all wet areas are created equal. The DCOF rating you need depends on the specific application, as the risk level changes. For areas like shower floors or pool decks, where surfaces are perpetually wet and often soapy, a higher level of safety is required.
| Area Type | DCOF Rating | Safety Level | Typical Applications |
|---|---|---|---|
| Dry Interior | < 0.42 | Standard | Bedrooms, offices |
| Wet Interior | 0.42 – 0.59 | Enhanced | Bathrooms, kitchens |
| High-Risk Wet | ≥ 0.60 | Maximum | Showers, pool decks |
This data clarifies that for a family shower floor, you should be looking for a tile with a DCOF rating of 0.60 or greater. This is a non-negotiable specification for minimizing slip-and-fall accidents. The evolution of this standard, particularly the ANSI A326.3 update in 2017, moved testing to include a soapy water solution, better simulating real-world bathroom conditions and providing a more accurate measure of a tile’s true performance under pressure.
Large format vs. Mosaic: which tile size reduces cleaning time by 50%?
The choice between small mosaic tiles and large format tiles (LFT) is often seen as purely stylistic, but it has profound functional consequences for both maintenance and safety. The answer to which is “better” depends entirely on where it’s being installed. For shower floors, mosaic tiles (typically 2×2 inches or smaller) are the superior choice for a crucial reason: drainage. A shower floor must be sloped from all directions toward the drain to prevent water from pooling. Small mosaic sheets are flexible and conform easily to these compound slopes, ensuring proper water flow. Furthermore, the sheer number of grout lines in a mosaic installation provides additional, built-in traction, helping to meet the high DCOF requirements for shower floors.
Conversely, for bathroom walls and floors outside the shower, large format tiles (12×24 inches and up) are the undisputed champions of low maintenance. The logic is simple: the fewer grout lines you have, the less there is to clean. Grout is porous and a prime location for soap scum, mildew, and grime to accumulate. A floor laid with 2×2 inch mosaics can have up to 20% of its surface area composed of grout lines. A floor with 24×48 inch LFT might have as little as 3% grout surface. This drastic reduction directly translates to significantly less time spent scrubbing.
The optimal strategy, therefore, is a hybrid approach. Use mosaics on the shower floor for their superior grip and ability to conform to drainage slopes. Then, use the largest format tile feasible for the walls and the main bathroom floor. This gives you the best of both worlds: maximum safety where it’s most needed and minimal cleaning everywhere else.
Porcelain vs. Ceramic: why is porcelain the only choice for heavy water zones?
On the surface, porcelain and ceramic tiles can look nearly identical, but their performance in wet environments is worlds apart. The difference lies in their composition and manufacturing process. Both are made from clay, but porcelain is made from a finer, denser clay and is fired at much higher temperatures (up to 2,300°F vs. 1,800°F for ceramic). This process, known as vitrification, makes porcelain significantly harder, more durable, and, most importantly, far less porous than ceramic. This isn’t a minor detail; it’s the defining characteristic for any surface in a wet room.
The key performance metric is the water absorption rate. For a tile to be certified as “porcelain,” it must have a water absorption rate of 0.5% or less. This means that when submerged in water, the tile’s weight will increase by no more than half of one percent. Standard ceramic tile, by contrast, can have an absorption rate of 3% or higher. In a shower or on a bathroom floor, a tile that absorbs water is a liability. It can lead to water seeping through to the substrate, promoting mold growth and structural damage. This is why high-quality porcelain tile that has an absorption rate of less than 0.5% is considered the only appropriate choice for shower floors and other heavy water zones.
While a glazed ceramic tile might be acceptable on a shower wall (where water runs off quickly), it should never be used on a floor or in a shower pan where water can sit. Another key advantage of porcelain is the option of a “through-body” or “full-body” composition. This means the color and pattern run through the entire thickness of the tile. If a through-body porcelain tile gets chipped, the color underneath is the same, making the damage far less noticeable than on a ceramic tile where a chip would reveal a different colored clay body beneath the glaze.
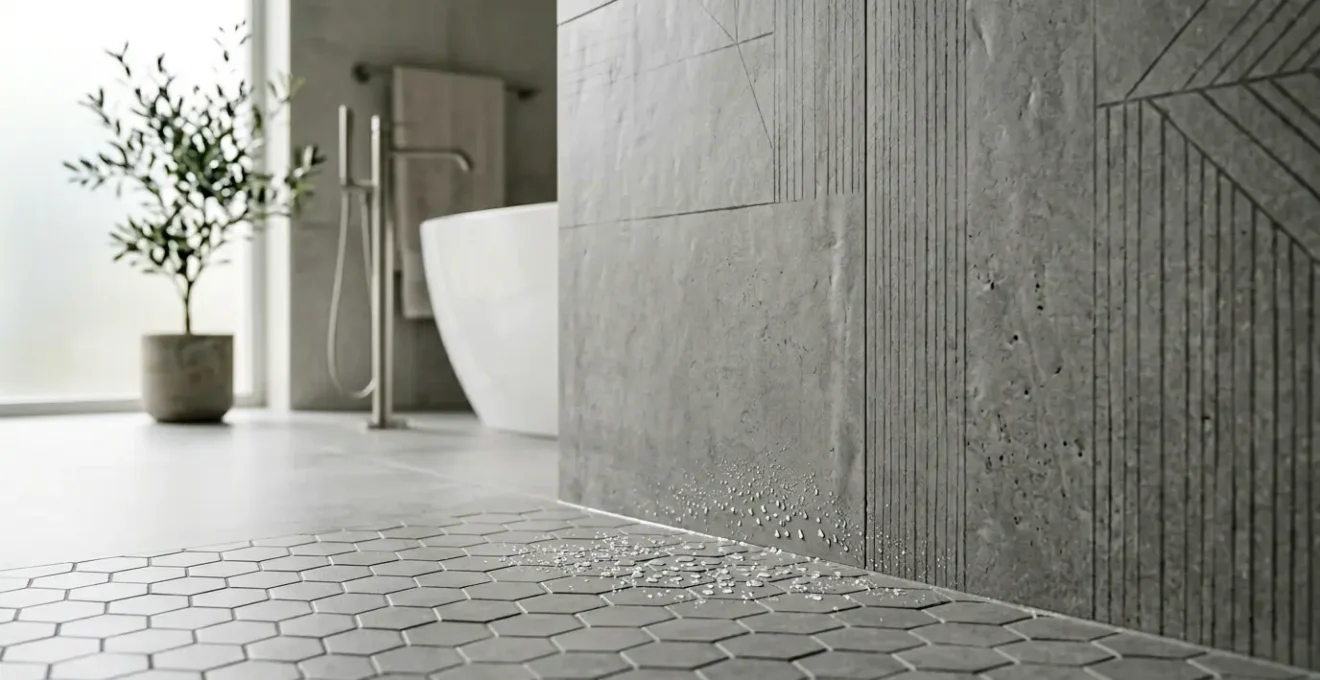
The waterproofing error behind the tile that rots your subfloor silently
Here is the most critical truth of bathroom renovation: the tile and grout are not waterproof. They are water-resistant finishing materials. The real work of keeping water out of your walls and floors happens in the layer behind the tile: the waterproofing membrane. Believing that tile alone will protect your home is the single most catastrophic and common mistake a renovator can make. A failure in this unseen layer allows water to slowly seep into the subfloor and wall cavities, causing silent rot, mold proliferation, and devastating structural damage that may not be discovered for years.
The Tile Council of America (TCA) is unequivocal on this point. As stated in their official guidelines, a robust waterproofing system is not optional. As the authority on tile installation standards, the TCA dictates:
A waterproof membrane or vapor retarder member must be specified to prevent moisture intrusion and protect adjacent building materials.
– Tile Council of America, TCA Handbook 2016 Edition
This membrane can be a liquid-applied product painted onto the backer board, or a sheet membrane like Schluter-KERDI that is installed over it. All seams must be meticulously sealed, and the membrane must be integrated perfectly with the shower drain. Before a single tile is set, this membrane system must be proven to be 100% watertight. The professional standard for this is a 24-hour flood test.
Your Action Plan: The 24-Hour Flood Test Protocol
- Pull the drain cover and securely plug the drain pipe with an expandable rubber test plug.
- Fill the shower base with water until it reaches just below the top of the curb or threshold. Mark the water level with a permanent marker.
- Wait for a full 24 hours. Do not use the shower or disturb the water in any way during this period.
- After 24 hours, check the water level against your mark. Any noticeable drop indicates a leak in your membrane or drain connection.
- Thoroughly inspect all surrounding areas, including the ceiling of the room below, for any signs of moisture, dampness, or discoloration.
Skipping this test is a gamble with the structural integrity of your home. A successful flood test is the only way to have absolute confidence that your waterproofing system is sound before it’s permanently encased behind tile and cement.
White vs. Grey grout: which color hides grime better over 5 years?
Grout is the weakest link in any tiled surface. Traditional cement-based grout is porous, susceptible to staining, and a magnet for dirt and mildew. The color choice, therefore, is not just about aesthetics but also about long-term maintenance and visual longevity. While pristine white grout offers a clean, classic look on day one, it’s notoriously difficult to keep clean. Over time, it’s prone to yellowing, absorbing stains, and highlighting every speck of grime.
A long-term study of grout discoloration patterns reveals a clear winner for practicality. The findings showed that light-to-medium grey grout maintained its appearance best over a five-year period. The logic is simple: the color of grey grout is very similar to the color of common dust and dirt, effectively camouflaging everyday grime. Conversely, pure white grout showed significant yellowing and staining, while very dark grouts (like charcoal or black) had a different problem: they tended to show white mineral deposits (efflorescence) from hard water, making them look chalky and faded.
However, the most effective strategy for grout longevity is to upgrade the material itself. While cementitious grout is cheap, modern alternatives like epoxy or urethane grout offer vastly superior performance. These materials are non-porous, chemically resistant, and virtually stain-proof, eliminating the need for regular sealing. As this Grout Type Performance Comparison shows, the upfront cost is higher, but the maintenance is minimal.
| Grout Type | Porosity | Stain Resistance | Maintenance Frequency | Cost Factor |
|---|---|---|---|---|
| Cementitious | High | Low | Seal every 6-12 months | 1x |
| Epoxy | Zero | Excellent | Minimal | 3x |
| Urethane | Zero | Excellent | Minimal | 2.5x |
For the ultimate durable finish, the choice is clear: an epoxy grout in a light grey color. This combination provides the best of all worlds, offering maximum stain resistance while camouflaging any surface dust that might accumulate between cleanings.
The cold tile shock and how heated floors change your morning mood
Beyond the core requirements of safety and water resistance, we can elevate a bathroom’s function to include comfort. One of the biggest sensory downsides of a tile floor is the “cold tile shock”—that jarring, unpleasant feeling of stepping onto an ice-cold floor on a winter morning. A radiant floor heating system, installed directly beneath the tiles, completely transforms this experience. It turns the floor into a gentle, consistent source of warmth, making the entire room feel more comfortable and luxurious.
This isn’t just about comfort; it also has practical benefits. The warmth from the floor helps to evaporate any standing water more quickly after a shower, reducing ambient humidity and helping to keep the space dry and less prone to mildew. The performance of these systems is directly tied to the flooring material above them. Because porcelain tile is so dense, it’s an excellent thermal conductor. Research shows that when paired with floor heating, thinner porcelain tiles can achieve a 30% faster heat-up time compared to thicker natural stone, making the system more responsive and energy-efficient.
There are two main types of systems to consider:
- Electric systems: These consist of mats or cables installed directly under the tile. They are relatively inexpensive to install and are ideal for retrofitting or for smaller areas like a single bathroom.
- Hydronic systems: These use tubes of hot water running under the floor, heated by a boiler or water heater. They are more complex and costly to install but are more efficient for heating very large areas or an entire home.
For most bathroom renovations (under 200 sq ft), an electric system paired with a programmable thermostat is the most cost-effective solution. A smart thermostat can learn your schedule and warm the floor just before you wake up, maximizing comfort while minimizing energy consumption by as much as 30%.
Shiplap vs. plaster: which wall finish offers better long-term value?
While tile is the default choice for shower surrounds, wall finishes in the rest of the bathroom present an opportunity to introduce different textures and materials. Two popular alternatives are wood shiplap and seamless plaster. However, in a high-humidity environment, their long-term value depends entirely on correct specification and installation. Shiplap can provide a warm, rustic, or coastal aesthetic, but it is fundamentally a wood product and therefore vulnerable to moisture. To be viable, it must be made from a water-resistant wood species and, more importantly, meticulously sealed with a marine-grade varnish or sealant on all six sides of every board *before* installation. Even then, the seams between boards can trap moisture, making it a high-maintenance choice best suited for powder rooms or well-ventilated bathrooms with limited shower use.
Water-resistant plaster, on the other hand, can offer superior performance and a unique, high-end aesthetic. While standard plaster is not suitable for wet areas, specialized systems like Moroccan Tadelakt are designed to be completely waterproof. This ancient technique involves applying a lime-based plaster and then meticulously polishing it with a stone and sealing it with an olive oil soap. The chemical reaction creates a beautiful, seamless, and hydrophobic surface that rivals the performance of tile. While the initial cost is higher ($8-12/sq ft vs $5-8/sq ft for sealed shiplap) and requires a highly skilled artisan for application, its durability and timeless, premium appeal often result in a greater positive impact on resale value compared to the more trendy and polarizing look of shiplap.
Case Study: The Seamless Performance of Tadelakt
In high-end spa and hotel design, Tadelakt plaster has become a go-to finish for creating seamless, grout-free wet rooms and steam showers. When properly applied and polished with the traditional black soap, the surface becomes completely waterproof, allowing for unique designs like integrated sinks and curved walls that are impossible with tile. Its performance rivals that of a solid surface while offering a much richer, more organic aesthetic.
Ultimately, for long-term value in a true family bathroom with high humidity, a properly executed waterproof plaster system like Tadelakt offers superior moisture resistance and a more enduring appeal. Shiplap, even when sealed, remains a riskier, higher-maintenance option.
Key takeaways
- A DCOF rating of 0.42 or higher is the non-negotiable safety minimum for any wet-area floor; shower pans require 0.60+.
- Porcelain’s material density, proven by a water absorption rate under 0.5%, is the key to preventing moisture saturation and damage.
- Your primary defense against catastrophic water damage is the waterproofing membrane installed *behind* the tile, not the tile itself.
Ample Vanity Storage: Organizing Your Morning Routine to Save Time
The final component in a fully functional wet room system is the vanity. In a high-humidity environment, poor material choices can lead to swollen, delaminating particleboard and ruined belongings. The same principles of water resistance that apply to floors and walls must be considered for your cabinetry. The gold standard for bathroom vanity construction is marine-grade plywood. Unlike standard MDF or particleboard, which act like sponges in the presence of moisture, marine-grade plywood is made with waterproof glues that prevent the layers from separating, ensuring structural integrity for decades.
Case Study: Marine-Grade Plywood vs. MDF Longevity
A 10-year observational study of bathroom vanities in high-use family homes revealed a stark difference in performance. Vanities constructed from marine-grade plywood maintained their structural integrity with zero delamination or swelling. In contrast, those made from standard Medium-Density Fiberboard (MDF) showed a 40% failure rate, with noticeable swelling, peeling finishes, and compromised door and drawer function.
Beyond material choice, effective organization within the vanity can protect your belongings and streamline your routine. A “wet vs. dry zone” system is a practical approach. Designate the top drawers or easily accessible areas for daily-use items that can tolerate moisture, such as toothbrushes and face wash. Water-sensitive items, like medications, electronics, or reserve paper products, should be stored in higher cabinets or in sealed containers, away from the immediate splash zone of the sink. A simple rule is to maintain at least a 6-inch clearance from the sink for anything prone to water damage. Installing drawer dividers with built-in drainage slots can also be an effective way to allow wet items like cleaning sponges or brushes to air dry without creating a puddle inside your cabinetry.
To ensure your renovation stands the test of time, the next step is to build a detailed specification sheet for your contractor, covering every critical element discussed, from the DCOF rating of your chosen tile to the brand of waterproofing membrane you require.
Frequently Asked Questions about Water-Resistant Tiles
What makes porcelain more water-resistant than ceramic?
Porcelain is fired at higher temperatures (2,300°F vs 1,800°F), making it denser and less porous than ceramic tiles. This process, called vitrification, results in a water absorption rate of less than 0.5%, compared to 3% or more for many ceramics, making it far superior for wet environments.
Can ceramic tiles be used in showers with proper sealing?
While a well-glazed ceramic tile can be a viable option for shower walls where water runs off quickly, it is not recommended for shower floors. The constant exposure to standing water and higher potential for wear make the superior water resistance and durability of porcelain a much safer and longer-lasting choice for floors.
What is through-body porcelain and why does it matter?
Through-body porcelain, also known as full-body porcelain, has a consistent color and composition throughout its entire thickness. This is a significant durability feature because if the tile gets chipped, the exposed material is the same color as the surface, making damage much less visible. On other tiles, a chip reveals a different colored clay body underneath the glaze.