
In summary:
- Fix sticky drawers by understanding wood movement and using the right lubricant, like simple candle wax, for a smooth glide.
- Permanently eliminate musty “grandma’s attic” odors by deep cleaning and then sealing the raw wood with a shellac-based primer.
- Update hardware without drilling new holes by using decorative backplates or sourcing vintage pulls with identical measurements.
- Preserve a piece’s value by refinishing high-quality wood; only use paint as a last resort to save furniture with irreparable surface damage.
- Successfully mix vintage and modern styles using the 80/20 rule, creating connections through repeated colors or materials.
There’s a certain magic in finding the perfect vintage dresser. You see it tucked away in a thrift store or listed online—a piece with solid wood construction, dovetailed drawers, and a story etched into its grain. You bring it home, filled with visions of how it will add unparalleled character to your bedroom. Then, reality hits. A drawer screeches in protest, refusing to slide. A faint, musty smell you hadn’t noticed before begins to fill the room. The original hardware feels dated, but the thought of drilling into that beautiful old wood feels like a crime.
For many DIY enthusiasts and vintage lovers, this is where the dream falters. The fear of making things worse, of ruining a piece with history, can be paralyzing. Common advice often falls short: “just rub a bar of soap on it” is a temporary fix for a deeper problem, and “just paint it” can erase both the character and the monetary value of a genuine antique. These solutions treat the symptoms but ignore the root cause, failing to respect the nature of the piece itself.
But what if the key wasn’t just to fix these problems, but to understand them? Restoring a vintage dresser is less about following a rigid set of instructions and more about learning the ‘language’ of old wood. It’s about recognizing how it breathes with humidity, how it holds onto scents from its past, and how its original construction can be honored. By adopting a mindset of structural empathy, you can make informed decisions that not only solve the functional issues but also enhance the dresser’s soul, making it a truly functional work of art in your modern home.
This guide will walk you through that very process. We’ll move from the mechanical to the aesthetic, covering the most common challenges you’ll face. You will learn the time-tested tricks of professional restorers and the design principles that allow a century-old piece to sing in a contemporary space.
Summary: A Complete Guide to Reviving Your Vintage Dresser
- The candle wax trick to make 100-year-old wood drawers slide like new
- How to get the “grandma’s attic” smell out of old wood permanently?
- Knobs vs. Pulls: how to change hardware without drilling new holes?
- When is it a crime to paint over wood, and when does it save the piece?
- How to style a Victorian dresser in a mid-century modern room?
- How to mix vintage and modern pieces without it looking messy?
- How to restore plaster cornices that have been painted over 10 times?
- Ceramic Vases: Styling Sculptural Forms With or Without Flowers
The candle wax trick to make 100-year-old wood drawers slide like new
That frustrating, grinding sound of a drawer refusing to open smoothly is the most common complaint about vintage furniture. The cause is rarely a major flaw; it’s simply the language of wood responding to its environment. Wood is a natural, porous material that expands and contracts with changes in humidity. In fact, wood drawers experience swelling from humidity, making sticky drawers a frequent issue, especially in warmer, damper months. Before you reach for a sander or consider replacing the runners, the solution is often much simpler and gentler: lubrication.
The age-old restorer’s secret is a simple, unscented white candle or a block of paraffin wax. Unlike soap, which can attract moisture and become gummy, wax provides a durable, low-friction surface. Turn the drawer over and identify the wooden runners on the drawer itself and the corresponding tracks inside the dresser frame. Rub the candle generously along all points of contact. You’re not just coating the surface; you’re filling the microscopic pores of the wood, creating a slick path. After a few passes, slide the drawer back in. The difference is often immediate and deeply satisfying.
While wax is a fantastic first line of defense, it’s helpful to understand the different options available for taming friction. For a more durable solution, especially on high-use drawers, restorers often turn to specialized products. The choice depends on the desired longevity and the piece’s value.
| Solution Type | Application Method | Durability | Best For |
|---|---|---|---|
| Candle/Paraffin Wax | Rub directly on runners | 3-6 months | Quick fixes, antique preservation |
| Carnauba-Beeswax Blend | Apply thin layer, buff | 6-12 months | High-end furniture, lasting protection |
| Nylon Drawer Tape | Self-adhesive strips | 5+ years | Heavy-use drawers, permanent solution |
| Silicone Spray | Spray and wipe | 2-4 months | Metal slides, moisture resistance |
Ultimately, a well-maintained drawer is part of a dresser’s charm. For high-use pieces, reapplying a coat of wax every six to twelve months is a small ritual that keeps the piece feeling alive and functional, not like a frustrating relic. It’s a simple act of maintenance that respects the material’s nature.
How to get the “grandma’s attic” smell out of old wood permanently?
The second major hurdle for vintage lovers is that unmistakable, musty odor—a scent profile of aged wood, dust, and time itself. While nostalgic for a moment, it’s not something you want perfuming your clean clothes. This smell is often caused by decades of storage in damp environments, allowing mildew and mold spores to embed themselves deep within the wood grain. Surface cleaning alone will not work; the smell will always return. The key to permanent odor removal is a tiered approach, moving from gentle absorption to, if necessary, total odor encapsulation.
Start with the least invasive method: natural absorption. Empty the dresser and place several small bowls inside the drawers and cabinet. You can use activated charcoal, coffee grounds, or white vinegar. These materials are excellent at absorbing ambient odors. Leave them for at least 48 hours in a well-ventilated area. For many pieces with only a light mustiness, this is enough. If the smell persists, it’s time for a deeper clean. A 50/50 solution of rubbing alcohol and water sprayed lightly on the raw interior wood will help kill surface mold spores. Let the piece dry completely, preferably in indirect sunlight, as UV rays are a natural sanitizer.
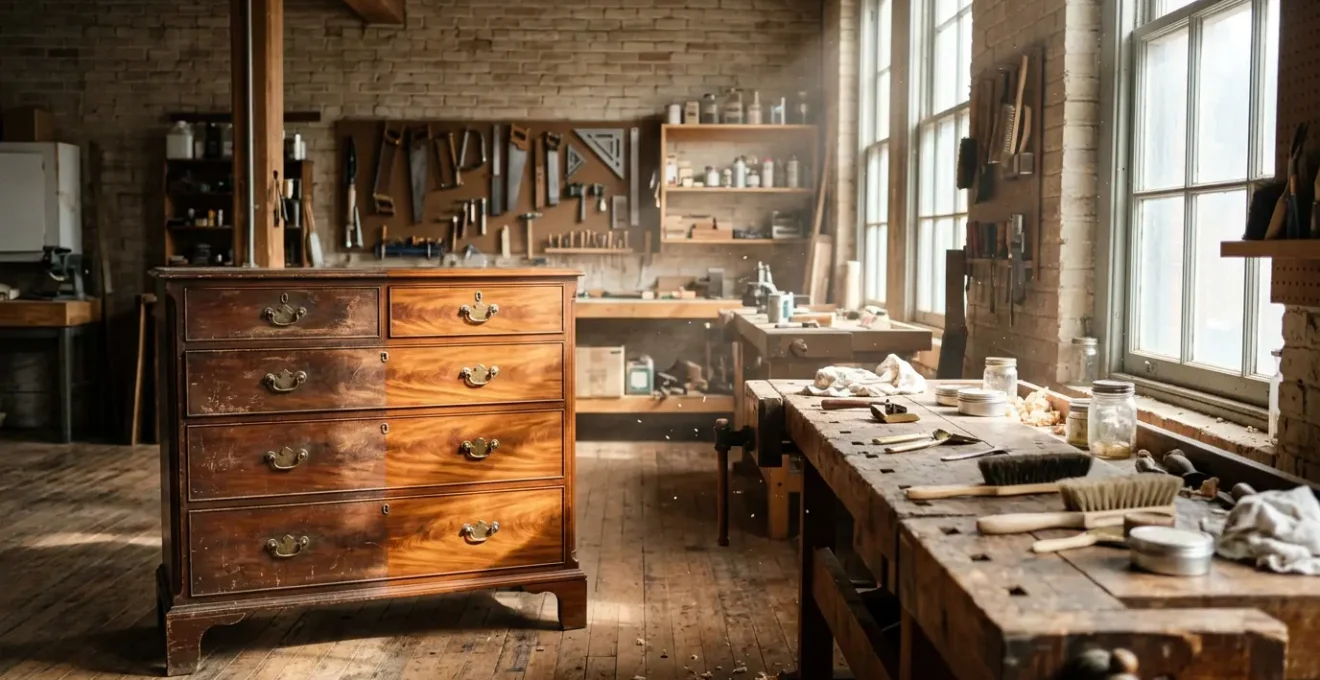
For the most stubborn, deeply embedded odors, you must bring out the “nuclear option” used by museum conservators: sealing the wood. This is where you stop trying to remove the smell and instead trap it forever. After cleaning and thoroughly drying the interior, apply two thin coats of a shellac-based primer like Zinsser B-I-N. This is a critical insight from professional restoration; the Smithsonian Institute’s Museum Conservation Services confirms that conservators use shellac-based products in a significant number of cases to permanently seal odors in historical artifacts. The shellac creates an impermeable barrier, locking the smell molecules into the wood for good.
As this image shows, the shellac not only seals but also revitalizes the look of the old wood, bringing depth to the grain. Once the primer is dry, the interior of your dresser will be fresh, clean, and ready for use. To maintain this freshness, consider adding silica gel packets or cotton balls with a few drops of essential oil for a pleasant, subtle scent going forward.
Knobs vs. Pulls: how to change hardware without drilling new holes?
Hardware is the jewelry of furniture. Changing out dated or broken knobs and pulls can dramatically transform a vintage dresser, but it comes with a terrifying risk: drilling new holes. Creating new holes in a vintage piece is often irreversible and can feel like scarring its history. The good news is that with a little detective work and some clever solutions, you can almost always update your hardware without picking up a drill. The secret lies in precise measurement and knowing where to look.
The most important measurement on a pull is the “center-to-center” distance—the exact space between the center of the two screw holes. Before you fall in love with a new set of pulls, you must measure your existing ones. This will be your guide for sourcing replacements. If you’re switching from a two-hole pull to a single knob, or vice-versa, the challenge is hiding the old holes. This is where decorative backplates (also known as escutcheons) become your best friend. A backplate is a metal plate that sits between the knob/pull and the drawer face, and a well-chosen one can easily cover old holes while adding a new layer of decorative detail.
A furniture restorer, for example, successfully converted a 1920s dresser from two-hole pulls to single knobs by using 4-inch ornate brass backplates to hide the original 3-inch spaced holes. This not only solved the problem but added so much character that the restored piece sold for 40% more than similar dressers without the hardware upgrade. Follow this plan to find your perfect, drill-free solution.
Your Action Plan: Swapping Hardware Without Drilling
- Measure Precisely: Use a ruler to measure the exact center-to-center distance of your existing pull’s screw holes. Common vintage sizes include 2.5″, 3″, 3.75″, and 4″. Write this number down.
- Source Smartly: Begin your search on specialty vintage hardware supplier websites like House of Antique Hardware or Van Dyke’s Restorers. Use their filters to search by your exact center-to-center measurement.
- Use a Backplate Bridge: If you cannot find an exact match or want to switch to single knobs, search for “escutcheon plates” or “furniture backplates” that are large enough to cover the original holes.
- Consider Adjustable Pulls: Some modern pulls are designed with adjustable screw positions on the back, allowing them to fit a range of center-to-center measurements. These can be a versatile, albeit less traditional, solution.
- Fill and Blend: As a last resort, fill the old holes with a high-quality wood filler. Sand it perfectly smooth, then use touch-up markers or a custom-matched stain to conceal the repair before drilling a new hole.
By prioritizing a non-destructive approach, you practice what we call “structural empathy”—working with the piece’s original design rather than forcing a modern standard onto it. It takes more patience, but the result is a seamless upgrade that respects the furniture’s integrity.
When is it a crime to paint over wood, and when does it save the piece?
To paint or not to paint? In the world of furniture restoration, no question is more divisive. On one hand, a coat of paint can modernize a dated piece and hide a multitude of sins. On the other, it can permanently erase the beauty of a rare wood grain and tank the value of a true antique. The decision should never be based on a fleeting trend. It requires an honest assessment of the wood’s condition, rarity, and the piece’s overall structural integrity. In short, you must determine if you are “rescuing” a piece or committing a “crime” against craftsmanship.
The first rule is to identify the wood. Is it a rare, valuable species like mahogany, rosewood, or tiger oak with a beautiful, intact grain? If so, painting is almost always a mistake. According to professional antique appraisers, painting a valuable antique can decrease its value by 70% or more. A piece that might be worth over a thousand dollars with its original finish could be reduced to the value of common used furniture. In these cases, the goal should always be patina preservation or refinishing to enhance the natural wood, not cover it.
However, paint can be a savior. If a dresser is made of a common wood like pine, or if it has significant, irreparable damage—deep water stains, mismatched veneer patches, or severe scratches—paint becomes a tool of redemption. It unifies the damaged surfaces and gives the piece a new, cohesive identity. The same applies to furniture from later eras, particularly post-1970s pieces often made with particle board substrates. Here, paint isn’t hiding value; it’s creating it. This decision matrix can help guide your choice.
| Wood Condition | Age/Rarity | Recommendation | Value Impact |
|---|---|---|---|
| Rare species (mahogany, rosewood) | 100+ years | Never paint – preserve | -70% if painted |
| Common oak/pine, good condition | 1920s-1960s | Refinish or restore | Neutral to +20% |
| Veneer damage beyond repair | Any age | Paint to save piece | +50% vs. discarding |
| Particle board substrate | Post-1970s | Paint freely | +30-50% with paint |
| Water/fire damage | Any age | Paint or professional restore | Salvages 40-60% value |
Think of it like this: if the wood’s story is one of beauty and quality craftsmanship, your job is to be its editor, carefully cleaning and polishing it. If its story is one of damage and neglect, you become its co-author, giving it a new chapter with paint.
How to style a Victorian dresser in a mid-century modern room?
You’ve done the hard work: the drawers glide, the smell is gone, and the finish is perfect. Now comes the final challenge: making a heavily ornate Victorian or Art Nouveau dresser look intentional in a clean, minimalist Mid-Century Modern (MCM) room. The fear is creating a space that looks cluttered or confused, like a historical jumble sale. The secret to success is not to force the styles to match, but to let them have a confident and deliberate conversation. This is where you create a design dialogue.
The core principle is contrast. An ornate piece with carved details and curved lines will stand out most powerfully against the simple, geometric forms of MCM design. Trying to “tone down” the vintage piece is a mistake; instead, you should celebrate its complexity by surrounding it with simplicity. As one interior design expert on modern vintage mixing principles notes, this is about making a bold statement.
The key is not trying to make everything match. Place an ultra-minimalist object like a sleek modern lamp on an ornate Victorian dresser to create a powerful, confident design statement through deliberate contrast.
– Interior Design Expert, Modern vintage mixing principles
To keep this contrast from feeling chaotic, you need a unifying strategy. The most effective is the 80/20 rule, which provides a clear framework for balancing visual weight in a room. This rule helps ensure the space feels cohesive, with the vintage piece acting as a deliberate, powerful accent rather than an awkward outlier.
Case Study: The 80/20 Visual Weight Principle in Practice
A San Francisco designer successfully integrated a heavily carved 1890s Victorian dresser into a minimalist mid-century bedroom by following the 80/20 rule. The room remained 80% mid-century (a clean-lined bed, an Eames chair, a geometric rug), with the Victorian dresser serving as the 20% accent piece. Key “bridging” elements were used to connect the two styles: a large abstract painting above the dresser contained both the organic curves of the Victorian era and the geometric shapes of MCM. Additionally, brass was used as a material echo—present in both the original dresser hardware and the base of a modern lamp. Finally, generous negative space was left around the dresser, allowing it to “breathe” and be appreciated as a sculptural object.
By treating your vintage dresser as the room’s focal point and consciously building a simpler, modern world around it, you create a dynamic tension that is far more interesting than a perfectly matched set. The room tells a story of two eras coexisting in harmony.
How to mix vintage and modern pieces without it looking messy?
Building on the 80/20 rule, creating a harmonious blend of vintage and modern styles requires more than just getting the proportions right. The goal is to make the mix feel intentional and curated, not accidental. This is achieved through subtle but powerful techniques that create a visual thread, or “material echo,” connecting pieces from different eras. These echoes trick the eye into seeing a unified collection rather than a random assortment of furniture.
The most effective method is the repetition of materials, colors, or shapes. For instance, if your vintage dresser has original brass pulls, repeating that brass finish in the base of a modern floor lamp, the frame of a mirror, or a contemporary picture frame creates an instant, sophisticated connection. Similarly, you can create a “color bridge.” Pick out a subtle color from the wood grain or patina of your vintage piece and introduce it into the room through modern textiles like throw pillows, a rug, or a piece of abstract art. This creates a cohesive palette that ties everything together without being overtly matchy-matchy.
This “echo and anchor” principle is about treating your vintage piece as the “anchor” and then having modern elements “echo” its qualities. One homeowner shared their success with this method, demonstrating its power in a real-world setting.
We inherited my grandmother’s ornate 1940s dresser but live in a contemporary loft. Rather than trying to ‘modernize’ the dresser, we embraced its character and used the ‘echo and anchor’ principle. The dresser became our anchor piece, and we echoed its curved legs in a modern chair with similar lines. We chose a minimalist bed frame to give the dresser room to shine, and added a contemporary mirror above it that picks up the brass tones. Friends always comment on how cohesive the room feels despite mixing eras – the key was treating the vintage piece as intentional art, not an afterthought.
– An Oregon Cottage Reader
Finally, control the visual weight by balancing ornate pieces with simple ones. If your dresser is heavily carved and visually “heavy,” pair it with a bed that has a simple, clean-lined headboard and nightstands with minimal hardware. This allows the vintage piece to be the star without overwhelming the space.
How to restore plaster cornices that have been painted over 10 times?
At first glance, restoring plaster cornices seems unrelated to furniture. Yet, the philosophy behind it is identical to the one we’ve been exploring. When a restorer is faced with a historic cornice buried under ten layers of paint, their goal is not to obliterate the past but to carefully reveal it. They don’t take a sledgehammer to the problem; they use patience, the right tools, and an understanding of the material to gently strip away the layers that obscure the original, intricate detail.
This is the exact mindset required for a vintage dresser. A piece that has been painted over multiple times, or has a thick, cracked varnish, is like that plaster cornice. The temptation might be to attack it with a power sander, an aggressive approach that can easily destroy the delicate veneer or round over the sharp, hand-carved details that give the piece its character. Instead, the restorer’s approach is to use a gentle chemical stripper, applying it layer by layer, and using dental picks and soft brushes to clean out the crevices—just as one would with plasterwork.
This concept of “reading the layers” is central to responsible restoration. Before you act, you must investigate. What is the original wood underneath? Is that dark finish a stain or a priceless, aged patina? Is the paint latex or oil-based? Each layer tells a part of the furniture’s story. By adopting the patient, methodical approach of a cornice restorer, you honor that story.
You begin to see the dresser not as a single object, but as an artifact with a timeline. This perspective shifts your goal from simply “making it look new” to “making it whole again.” It’s a profound difference in approach that separates a simple DIY project from a true act of preservation and respect for craftsmanship.
Key Takeaways
- Work With the Wood, Not Against It: Understand that wood expands and contracts. Use simple, reversible fixes like wax for sticky drawers before attempting destructive solutions like sanding.
- Sealing is the Only Permanent Odor Fix: For persistent musty smells, cleaning is not enough. You must permanently encapsulate the odor molecules by sealing the raw interior wood with a shellac-based primer.
- Styling is a Dialogue, Not a Monologue: Successfully mixing vintage and modern pieces is about creating contrast and connection. Use the 80/20 rule and repeat materials or colors to build a bridge between eras.
Ceramic Vases: Styling Sculptural Forms With or Without Flowers
Your vintage dresser is now restored and perfectly placed in your room, a testament to the dialogue between past and present. The final act is to style its surface. This is your opportunity to complete the story, and nothing does so more effectively than a carefully chosen decorative object. While photos or books are lovely, a sculptural ceramic vase offers a unique way to reinforce your design choices, whether it holds a floral arrangement or stands alone as a piece of art.
The choice of vase is a micro-version of mixing vintage and modern styles. To complement an ornate Victorian or Art Deco dresser with intricate carvings, select a vase with a simple, minimalist silhouette. A smooth, matte-white ceramic vase or a simple cylindrical form will provide a moment of quiet simplicity atop the dresser’s visual complexity. This contrast highlights the beauty of both the vase’s form and the dresser’s detail without competing.
Conversely, if your vintage piece is from the Mid-Century Modern era—characterized by clean lines and unadorned surfaces—you can afford to be more expressive with your vase. Choose a piece with an organic, sculptural shape, a textured glaze, or a bold color that picks up another accent in the room. Here, the vase adds the layer of texture and personality that the simple furniture form invites. This creates a balanced composition where the dresser provides the structure and the vase provides the artful flourish.
Don’t feel pressured to always fill the vase. A beautifully crafted ceramic piece has enough presence to stand on its own. Treating it as a sculpture allows its form and finish to become part of the room’s decor. This final touch is the punctuation mark on your design statement, the last word in the conversation between the old and the new that you have so carefully orchestrated in your space.
Now that you are equipped with the knowledge of a seasoned restorer, it’s time to confidently find that perfect vintage piece and begin the rewarding process of bringing its unique story into your home.