
In summary:
- Shifting focus from floor space to a room’s total volume is the key to unlocking massive storage potential.
- Properly anchored, tall storage units not only add capacity but can make a room feel larger and more intentional.
- Understanding weight distribution and load limits is non-negotiable to prevent dangerous shelf collapse.
- Built-in storage offers maximum efficiency and boosts home value, while freestanding units provide flexibility.
- Even awkward spaces, like those above doors or around plumbing, can be transformed into highly efficient storage zones.
When floor space vanishes under a growing collection, the conventional wisdom is to simply “go vertical.” This advice, while well-intentioned, often leads to a precarious stack of boxes or a collection of small, mismatched shelves that only add to the visual clutter. For collectors and enthusiasts, the problem isn’t just about finding more space; it’s about creating a system that honors their collection, ensures safety, and reclaims a sense of order and spaciousness in their home. The cycle of buying more small containers or low-profile furniture only seems to shrink the room further, turning a cherished hoard into a source of stress.
But what if the solution wasn’t just to stack higher, but to think differently about the very geometry of your room? The true breakthrough comes from ceasing to see your room as a two-dimensional floor plan and starting to view it as a three-dimensional volume. This is the mindset of a storage architect. It involves using height not as a last resort, but as a primary design element to guide the eye, create intentionality, and fundamentally reshape the perception of a space. It’s about making storage a deliberate part of your home’s architecture, rather than a temporary fix.
This guide will walk you through the architectural principles of vertical storage. We will explore the psychology of why going tall makes a room feel bigger, detail the non-negotiable safety protocols for securing tall units, and analyze the financial and spatial return on investment between built-in and freestanding options. We will also uncover the common but dangerous mistakes that lead to system failure and reveal clever hacks for exploiting every last pocket of unused space, transforming your home from a container of clutter into a well-organized gallery.
By understanding these strategies, you can design a vertical storage system that not only doubles your capacity but also enhances the look and feel of your living space. Explore the sections below to master each critical aspect of this spatial transformation.
Summary: Vertical Storage: How to Double Your Capacity Without Losing Floor Space
- Why Floor-Level Storage Shrinks Your Room Visually While Vertical Storage Expands It
- How to Secure Tall Units to Walls to Prevent Dangerous Tipping Accidents
- Built-in vs. Freestanding Shelves: Which Offers Better ROI for Storage?
- The Overloading Mistake That Causes Tall Shelves to Bow or Collapse
- How to Utilize the Wasted Space Above Door Frames for Long-Term Storage
- The Small Furniture Paradox: Why Going Big Makes Your Room Feel Larger
- From Floor Clutter to Living Wall: Using Vertical Space for Your Collections
- The ‘U-Shape’ Hack and Other Secrets to Reclaiming Hidden Space
Why Floor-Level Storage Shrinks Your Room Visually While Vertical Storage Expands It
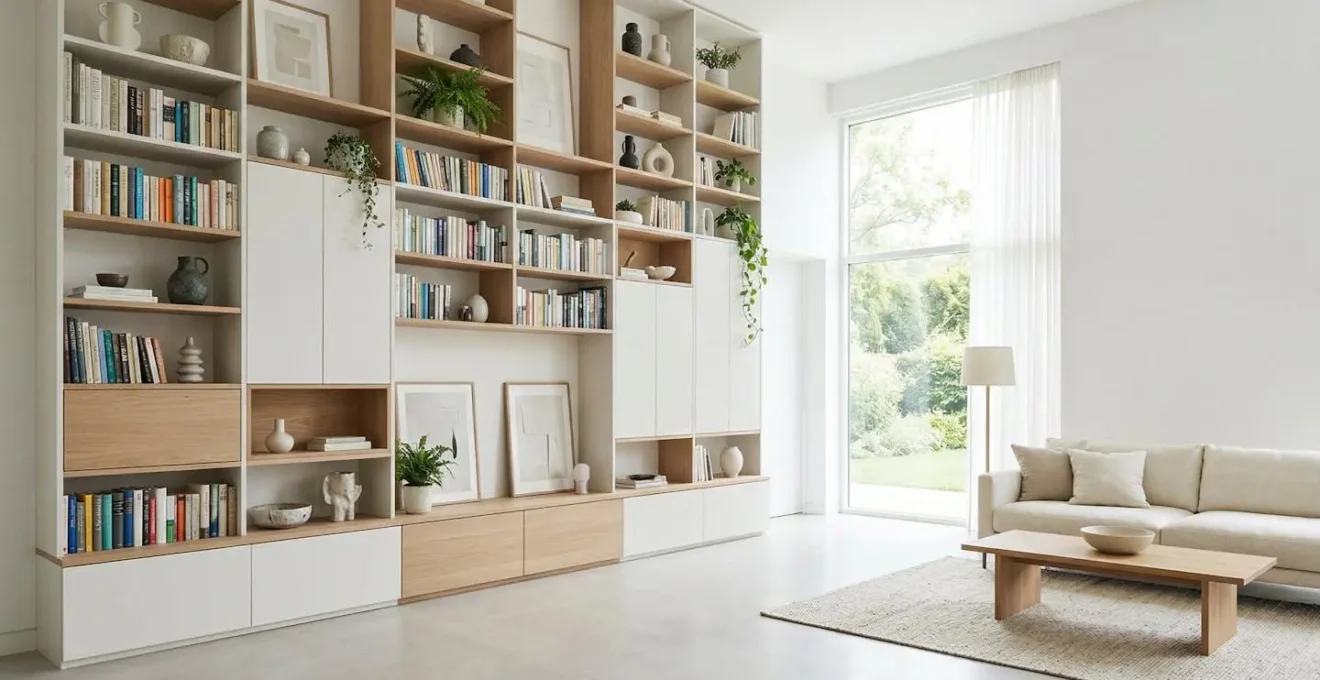
The instinct to keep furniture low to the ground in a small or crowded room is a common design trap. We believe that by preserving the upper half of the room as “empty,” we are creating an illusion of space. However, human visual perception works in the opposite way. Our eyes are naturally drawn to vertical lines to judge the scale of our environment. A room filled with low, wide furniture creates multiple horizontal lines that chop the space up, forcing the eye to stop and start, which the brain interprets as cluttered and confined. Vertical storage, by contrast, draws the eye upward along a single, unbroken line, emphasizing the full height of the room.
This isn’t just a design theory; it’s backed by science. Recent eye-tracking research from 2024 demonstrates that in an indoor environment, vertical surfaces (walls) attract 70% more visual attention than horizontal ones. When you install a floor-to-ceiling bookshelf, you are giving the eye a powerful vertical path to follow, creating a sense of grandeur and openness. This single, tall element unifies the wall and makes the ceiling feel higher. In contrast, multiple small, low units create a distracting “visual noise” near the floor, making the room feel shorter and more cramped.
To leverage this effect, focus on creating strong visual sightlines that lead upward. This can be achieved through several techniques:
- Floor-to-ceiling bookshelves: The ultimate tool for drawing the eye upward and maximizing storage density.
- Vertical mirrors: Positioning a tall, narrow mirror on a wall can create a powerful illusion of doubled ceiling height.
- Pendant lighting: Using hanging lights instead of table or floor lamps frees up horizontal surfaces and adds a vertical element to the room’s composition.
- Tall, narrow furniture: Opting for taller, slimmer pieces over wide, low ones preserves open sightlines across the room and emphasizes its height.
How to Secure Tall Units to Walls to Prevent Dangerous Tipping Accidents
As a storage architect, safety is the foundation upon which any system is built. A tall storage unit, especially one owned by a collector, can quickly become top-heavy and pose a serious tipping hazard if not properly secured. Manufacturer-provided anti-tip kits are a bare minimum, but for heavy-duty applications, a more robust load-bearing strategy is essential. This is not an area for compromise. The forces involved in a toppling bookcase or cabinet are significant and can be lethal, particularly in households with children or in earthquake-prone regions.
The first rule of secure installation is to anchor directly into wall studs. Drywall anchors are designed for light loads and should never be trusted to support the dynamic weight of a tall, filled shelving unit. Use a high-quality electronic stud finder to map the solid wood framing behind your walls before you drill a single hole. As a professional restorer, Max Mattes of Max Paint and Restoration stresses that a dual-anchor system is critical for any unit over six feet tall. This involves using brackets at both the top and a mid-point of the unit to distribute the load forces more effectively and prevent leverage from pulling the top anchor out of the wall.
The image above demonstrates the robust connection that should be your goal: a heavy-duty bracket firmly screwed into the solid structure of your wall. This is what stands between a secure collection and a dangerous accident. Your installation process must be meticulous and methodical to achieve this level of safety.
Action Plan: Securing Your Vertical Storage
- Map Your Studs: Use a quality stud finder to locate and mark all vertical studs where your unit will be placed. This is your structural foundation.
- Select Hardware: Inventory your unit’s weight capacity and choose L-brackets or furniture straps rated for at least twice that weight. Do not rely on included kits for heavy collections.
- Check for Cohesion: Confront your plan with the wall material. Is it drywall, plaster, or masonry? Each requires a specific type of anchor and screw for a secure connection to the stud.
- Assess Your Load: Perform a quick audit of the items you plan to store. Heaviest items (books, ceramics) must be placed on lower shelves, between hip and shoulder height, to lower the center of gravity.
- Create an Installation Plan: Prioritize installing top anchors first, then mid-point anchors for units over 6 feet. Use a level to ensure the unit is not leaning before tightening all screws.
Built-in vs. Freestanding Shelves: Which Offers Better ROI for Storage?
Once you commit to a vertical strategy, a key decision is whether to invest in built-in storage or opt for the flexibility of freestanding units. From a storage architect’s perspective, this isn’t just about aesthetics; it’s a financial and spatial calculation of Return on Investment (ROI). Freestanding units, like a classic BILLY bookcase from IKEA, offer a low initial cost and the flexibility to be moved. However, they are rarely a perfect fit, often leaving awkward gaps at the sides and top that collect dust and represent wasted storage density.
Built-in storage, on the other hand, is custom-crafted to the exact dimensions of your space. It utilizes 100% of the available wall area, from floor to ceiling and wall to wall, creating a seamless, architectural look that feels like an intentional part of the home. While the initial cost is significantly higher, this investment often pays for itself. Professionally installed built-ins can increase a home’s resale value and offer unparalleled space efficiency. For a collector with a specific need, the ability to customize shelf height, depth, and load-bearing capacity is invaluable.
To make an informed decision, it’s crucial to compare the factors beyond the initial price tag. The following analysis breaks down the long-term value proposition of each approach, based on data from home organization experts.
| Factor | Built-in Storage | Freestanding Storage |
|---|---|---|
| Initial Cost | $3,000-$8,000 | $500-$2,000 |
| Home Value Impact | +3-5% resale value | No impact |
| Space Efficiency | 100% wall utilization | 85% (gaps required) |
| Flexibility | Fixed position | Fully moveable |
| Customization | Perfect fit for space | Limited to available sizes |
Case Study: The High-Value Hybrid Approach
A clever compromise exists. One home office project successfully used IKEA’s modular PAX system, extending it to the ceiling with custom trim and molding. This approach achieved the seamless, high-end look of true built-ins for approximately 70% less than the cost of custom cabinetry. The system now efficiently stores office supplies, home decor, and craft materials in a compact footprint, proving that with a little creativity, you can achieve the benefits of built-in storage on a freestanding budget.
The Overloading Mistake That Causes Tall Shelves to Bow or Collapse
The most common point of failure in any vertical storage system is not the wall anchor, but the shelf itself. Many people, especially collectors of heavy items like books or vinyl records, dramatically underestimate the force their collection exerts on a horizontal span. A shelf that seems sturdy when empty can slowly begin to bow and, over time, catastrophically fail. This is a matter of physics, not just material quality. The longer the unsupported span of a shelf, the weaker it becomes. This is a well-understood principle in industrial logistics.
In fact, professional warehouse management data shows that shelf capacity decreases by 40% for every additional 12 inches of unsupported span. This means a 36-inch-wide shelf can hold significantly less than three 12-inch-wide shelves, even if they are made from the same material. Particleboard, the most common material for consumer-grade shelving, is particularly susceptible to bowing. As a rule of thumb, a standard 3/4-inch particleboard shelf should not be loaded with more than 25 lbs per linear foot.
To prevent bowing and collapse, you must adopt a load-bearing strategy for your shelves, not just your walls. This involves distributing weight intelligently and being vigilant for early warning signs of stress. Never wait for a shelf to look visibly bowed; by then, its structural integrity is already compromised. Instead, perform regular checks and adhere to a strict weight distribution protocol:
- The Pyramid Principle: Always place your heaviest items on the lowest shelves and closest to the vertical supports. Progressively lighter items should be placed toward the top and in the middle of long spans.
- Mind the Material: Solid wood is strongest, followed by plywood, then MDF, and finally particleboard. Know what your shelves are made of and respect their limits.
- Look for Warning Signs: Be alert for hairline cracks near the support brackets, fasteners pulling away from the wood, or cabinet doors that no longer close flush. These are all signs of a system under dangerous strain.
- Maintain a Safety Margin: Never load a shelf to 100% of the manufacturer’s stated weight capacity. A good rule of thumb is to stay below 80% to account for environmental factors and uneven loading.
How to Utilize the Wasted Space Above Door Frames for Long-Term Storage
One of the most overlooked storage opportunities in any room is the 12 to 18 inches of empty wall space above every door frame. For items that are not needed daily—such as seasonal decorations, out-of-season clothing, or archival collections—this space is pure gold. However, simply nailing a plank of wood above the door often looks like a clumsy afterthought. The key, from a storage architect’s perspective, is to make this solution feel like intentional architecture, seamlessly integrated into the room’s design.
The secret is to treat the shelf as an extension of the door’s existing trim. By painting the shelf and its support brackets the exact same color as the wall, you create a monolithic look that feels planned and sophisticated. The strongest mounting point is the door’s header, a solid beam of wood that runs across the top of the frame, providing a much more secure anchor than drywall alone. Once installed, using a row of identical, matching storage boxes or baskets creates a clean, organized line that enhances the room’s architecture rather than detracting from it.
As seen in the image, when done correctly, the result is both elegant and highly practical. This is the essence of volumetric design: turning unused vertical volume into functional, beautiful storage. Small apartment dwellers, in particular, have mastered this technique, using these high shelves to store everything from holiday decor to guest linens, keeping them accessible yet completely out of the daily line of sight.
To implement this yourself, follow a few key steps for a professional result:
- Mount to the Header: Always install shelf brackets directly into the solid door header beam for maximum strength.
- Color Match: Paint the shelf and brackets to match the wall color for a built-in, seamless look.
- Uniform Containers: Use identical storage boxes or baskets to create a clean, rhythmic, and intentional visual line.
- Label Clearly: Since these items are not at eye level, clear labeling is essential to avoid having to pull down every box to find what you need.
- Ensure Safe Access: Keep a sturdy, compact step ladder nearby to access items safely. Never climb on a chair.
The Small Furniture Paradox: Why Going Big Makes Your Room Feel Larger
The idea that filling a small room with small furniture will make it feel bigger is one of the most persistent and counter-intuitive myths in interior design. In reality, the opposite is true. A room filled with numerous small pieces of furniture—a small bookshelf here, a little end table there, a short media console—creates a busy, fragmented landscape. This visual chaos breaks up sightlines and forces the eye to jump from object to object, which the brain interprets as a cluttered, and therefore smaller, space. It’s the visual equivalent of a noisy, crowded room.
This is explained perfectly by the Interior Design Research Team in their “Maximize Vertical Space Study”:
Multiple small items create numerous lines and shadows, forcing the eye to stop and start constantly, which the brain interprets as a busy, cluttered, and therefore smaller space.
– Interior Design Research Team, Maximize Vertical Space Study
In contrast, using one or two larger, taller pieces of furniture has a unifying and calming effect. A single tall armoire or a floor-to-ceiling shelving unit consolidates the clutter, provides one clean vertical line for the eye to follow, and leaves more floor space open, which enhances the feeling of spaciousness. Recent research confirms this perceptual trick. A 2024 virtual reality study on spatial perception found that, on average, rooms with one tall storage unit appear 15% larger than rooms with an equivalent amount of storage spread across multiple small pieces.
Therefore, for anyone struggling with a room that feels cramped, the strategy should be to consolidate and elevate. Instead of three small bookcases, invest in one that goes all the way to the ceiling. This approach declutters the floor, simplifies the visual landscape, and leverages the power of verticality to make the entire room feel more expansive and organized.
From Floor Clutter to Living Wall: Using Vertical Space for Your Collections
For collectors, whether of plants, pottery, or vintage toys, the collection itself can become a source of clutter that overtakes every horizontal surface. The solution is to re-frame the collection not as a storage problem, but as a display opportunity. Vertical space offers the perfect canvas to turn a hoard into a “living wall” or a curated gallery. Tiered plant stands, wall-mounted display cases, and ladder shelves can transform floor clutter into a stunning, organized feature that adds personality and depth to a room.
This is especially effective for indoor plant enthusiasts, who can create a “vertical jungle” that purifies the air and provides natural beauty. In dense urban apartments with limited light, these vertical gardens become a vital connection to nature. By using strategic placement, every plant can get the light and space it needs to thrive. The key is to arrange the collection with both aesthetics and function in mind:
- Trailing Plants: Species like Pothos and Philodendrons should be placed on the highest shelves, allowing them to cascade downward and create a lush, curtain-like effect.
- Upright Plants: Structural plants like Snake Plants and ZZ Plants work best at mid-levels, where their strong vertical forms can be appreciated.
- Sun-Lovers: Succulents and cacti that require direct sun should be reserved for shelves at window level.
- Low-Light Solutions: For darker corners, installing discreet LED strip lights under shelves can provide the necessary light spectrum for healthy growth.
- Maintenance: Using self-watering planters for high-placed plants can dramatically reduce the frequency of precarious watering sessions on a step ladder.
Case Study: The Urban Air-Purifying Wall
Urban apartment dwellers are increasingly installing modular vertical garden systems to create “living walls.” These installations go beyond simple decoration; they function as natural air purifiers. Studies show that a well-maintained indoor vertical garden can significantly reduce common indoor pollutants, improving air quality in spaces with poor ventilation. It’s a prime example of a collection providing a tangible health benefit while occupying zero floor space.
This principle applies to any collection. By thinking vertically, you can create a dense, organized, and beautiful display that celebrates your passion instead of letting it consume your living space. The wall becomes your gallery, not just a boundary.
Key takeaways
- Think in 3D: The most significant storage gains come from shifting your focus from the 2D floor plan to the full 3D volume of your room.
- Safety Is Non-Negotiable: Always anchor tall units directly into wall studs. The structural integrity of your system is paramount and protects both your collection and your family.
- Consolidate and Elevate: A single, tall storage unit creates a stronger sense of space and order than multiple small, low-lying pieces of furniture.
The ‘U-Shape’ Hack and Other Secrets to Reclaiming Hidden Space
Even with the most ambitious vertical storage systems, some of the most valuable storage real estate remains hidden and underutilized. These are the awkward, “unusable” spaces we tend to ignore: the void around the sink plumbing, the sliver of space next to the refrigerator, or the toe-kick area under kitchen cabinets. A true storage architect adopts an “embrace the obstacle” philosophy, seeing these challenges not as limitations but as opportunities for clever, custom solutions.
The most brilliant example of this is the U-shaped drawer hack for under-sink cabinets. By building or installing a drawer with a U-shaped cutout in the middle, you can create fully functional storage that wraps perfectly around the plumbing pipes and garbage disposal. This simple modification can reclaim a massive amount of previously dead space, turning a chaotic jumble of cleaning supplies into a neatly organized, slide-out system. DIY enthusiasts and homeowners have reported gaining up to 60% more usable space in their under-sink cabinets using this method.
This mindset can be applied throughout the home to unlock dozens of hidden storage pockets. It’s about looking at every gap and void with a creative eye and asking, “How can I make this work for me?” Once you start looking, you’ll find these opportunities everywhere:
- Next to the Fridge: Install a narrow, slide-out pantry on wheels in the 6-inch gap often found next to a refrigerator, perfect for spices and canned goods.
- Under Cabinets: Add “toe-kick” drawers under your lower kitchen or bathroom cabinets. They are ideal for storing flat items like baking sheets, platters, or spare towels.
- Deep Cabinets: Use vertical dividers inside deep cabinets to store items like cutting boards, pot lids, and serving trays upright, making them easier to see and grab.
- Inside Cabinet Doors: Mount magnetic strips, small shelves, or hooks on the inside of cabinet doors to store small metal items, spices, or measuring cups.
Adopting this volumetric design mindset fundamentally changes your relationship with your home. It’s a shift from being a passive occupant of a defined space to an active architect of its potential. By learning to see and utilize the full three-dimensional volume of your home—from the ceiling to the floor, and in every hidden nook—you can create a space that is not only vastly more efficient but also more organized, expansive, and intentional.
Now, begin the process of auditing your own home. Look at each room not for the floor space it has, but for the vertical volume it offers. Identify the walls that can support a tall, unifying storage element and the hidden pockets waiting to be unlocked. This is the first step to transforming your space.