
In summary:
- Effective studio living is not about static division, but about dynamic, daily transformation of the entire space.
- Maximizing vertical height and using furniture that completely disappears (like a Murphy bed) are the keys to reclaiming floor space.
- Create distinct zones using sensory cues like light, sound, and scent, not just physical barriers.
- Implement a “5-Minute Reset” routine to seamlessly transition your room’s function from bedroom to office to living area.
Living, working, and sleeping within the same four walls is the defining challenge of studio life. The daily reality for many students and young professionals is a space that feels perpetually compromised—a bedroom that’s also an office, a kitchen that bleeds into the living room. The common advice often involves flimsy room dividers or basic multi-use furniture, solutions that partition the clutter but fail to solve the core problem of a cramped, single-function environment.
These conventional approaches treat the studio as a static floor plan to be divided. But what if the solution wasn’t about building more walls, but about embracing the lack of them? The true mastery of micro-living lies in a more radical concept: room choreography. This is the art of transforming a single room’s entire purpose through a series of deliberate, daily rituals. It’s about creating an environment that can fluidly convert from a serene bedroom into a productive workspace, and then into a relaxing social lounge.
This guide moves beyond simple decoration tips to offer a strategic system for extreme multi-functionality. We will explore how to reclaim unused vertical space, make your bed completely disappear, manage sensory overload like cooking smells, and sequence your daily transformations. By treating your studio not as a fixed space but as a transformable stage, you can unlock four distinct living areas within one room.
To navigate this transformative approach, this article is structured to tackle each strategic layer of studio design, from foundational principles to the daily routines that bring them to life. The following summary outlines the key areas we will cover to help you master your space.
Summary: A Guide to Mastering Your Studio Space
- Why ignoring vertical height is the #1 reason studios feel cramped?
- How to hide your bed completely when guests come over?
- Murphy bed vs. loft bed: which space-saving solution creates more usable room?
- The cooking smell risk that permeates your bedding in a studio setup
- How to sequence your daily “room transformation” from bedroom to office?
- How to create distinct zones in a studio without building walls?
- How to style open shelves as a divider without blocking light?
- Modular Sofas: Adapting Your Living Room Seating for Movie Nights and Social Gatherings
Why Ignoring Vertical Height Is the #1 Reason Studios Feel Cramped?
The most common mistake in studio design is thinking only in two dimensions. We obsess over square footage, forgetting the vast, untapped potential of the room’s volume. Ignoring the vertical plane is the primary reason even a decently sized studio can feel suffocating. When every piece of furniture sits on the floor, you create visual and physical congestion at eye level. The solution is to draw the eye upward and move storage and function off the floor, creating an illusion of height and reclaiming precious ground space.
This principle of verticality isn’t just about feeling less cramped; it directly impacts livability. In fact, a 2024 Houzz study found that well-organized small spaces consistently outperform larger homes in both livability and long-term satisfaction. The key is strategic organization, and that starts with looking up. By using floor-to-ceiling elements, you don’t just add storage; you fundamentally alter the perceived dimensions of your room.
To start leveraging your studio’s full volume, consider these transformative actions:
- Install floor-to-ceiling curtains: Hang the curtain rod 6-12 inches above the window frame to create a dramatic sense of height.
- Mount floating shelves high: Start your first shelf 8-12 inches from the ceiling. This draws the eye upward and provides storage for less-frequently used items.
- Use tall, thin floor lamps: These pieces emphasize vertical lines far more effectively than short, wide table lamps.
- Create a raised platform: Elevating your bedroom zone by just 6-12 inches creates powerful dimensional separation and can offer built-in storage underneath.
- Suspend items from the ceiling: Use hanging planters as a living divider, mount a projector for a screen-free entertainment setup, or even store a bicycle as a piece of functional art.
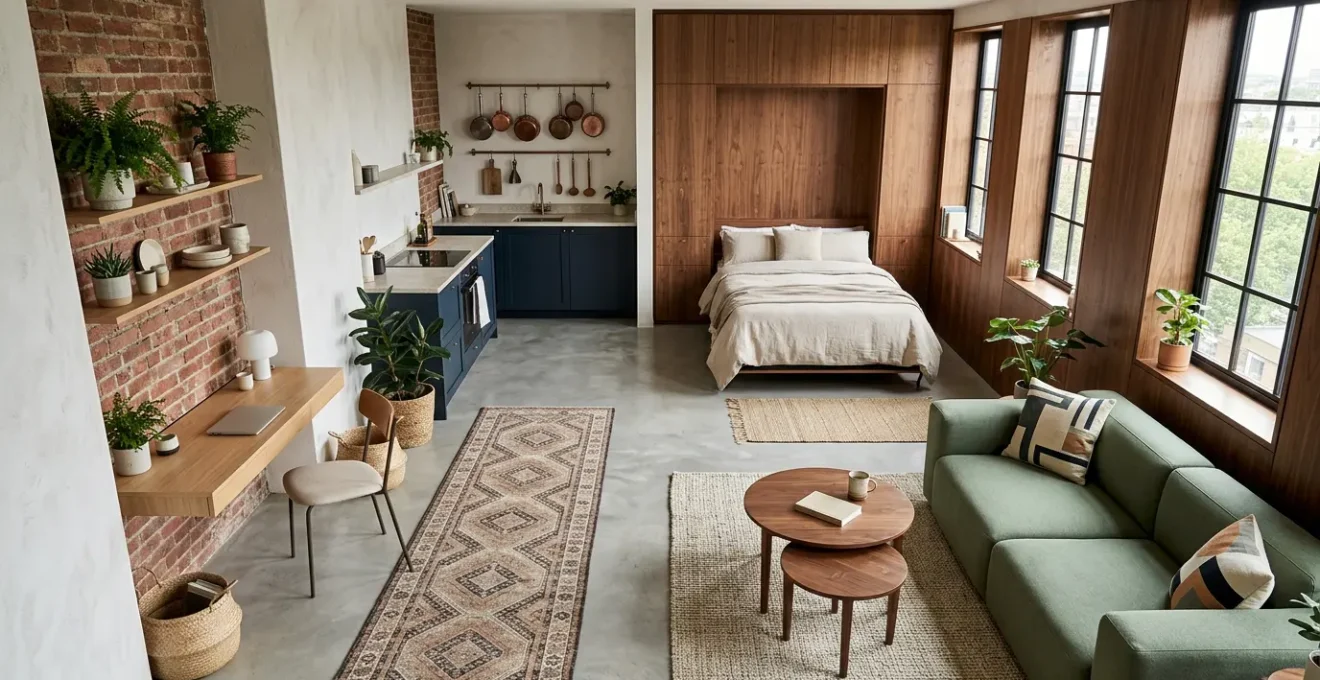
How to Hide Your Bed Completely When Guests Come Over?
The bed is the biggest giveaway that your living room is also your bedroom. Hiding it effectively is the ultimate act of spatial transformation, allowing you to mentally and socially “close” the bedroom for the day. While daybeds and sofa beds are common, they are compromises; they never truly disappear. The goal is complete architectural deception, making your sleeping area vanish into the walls themselves.
This is where integrated solutions like a Murphy bed shine. When closed, a modern Murphy bed doesn’t look like a cabinet; it can appear as a seamless wall of minimalist wood paneling, a feature wall, or even be hidden behind a sliding bookcase. This isn’t just hiding a bed; it’s revealing an entirely new room.
Case Study: Manhattan Studio Transformation
In her 280 sq ft Manhattan studio, designer Kate implemented a bold strategy. As featured in Apartment Therapy, she painted the walls an “essentially black” dark color, which paradoxically created a sense of depth and made the space feel larger. The centerpiece was a custom Murphy bed system that disappears into what looks like seamless wall paneling during the day. To solve the bedding storage issue, she used a stylish trunk as a coffee table, providing a secret home for all her pillows and linens, completing the transformation from bedroom to sophisticated lounge.
The image below showcases how a modern Murphy bed can achieve this level of integration, turning a sleeping area into an elegant architectural feature.
As you can see, the closed bed becomes an intentional part of the decor. This strategy elevates the space from simply “multi-functional” to truly transformative. It allows for a psychological shift, providing a clear boundary between your public living space and your private sleeping space, even when they occupy the exact same footprint.
Murphy Bed vs. Loft Bed: Which Space-Saving Solution Creates More Usable Room?
When it comes to reclaiming the space your bed occupies, the two primary contenders are the Murphy bed and the loft bed. While both are effective, they create fundamentally different types of usable room, and the right choice depends on your lifestyle and how you intend to use the space. The decision isn’t just about square footage, but about whether you need dynamic or static space. This choice is crucial, as recent market research reveals that 68% of millennials prefer multi-functional furniture solutions that can adapt to changing needs.
A loft bed creates a permanent, static zone. It doubles your usable area by creating a fixed space underneath, typically for a desk or a small lounge. This is excellent for those who need a dedicated function (like a permanent home office) and don’t mind the reduced ceiling height below. A Murphy bed, on the other hand, creates dynamic space. It doesn’t create a new zone; it reclaims the entire footprint of the bed, offering a large, open floor area for temporary activities like a morning yoga session, hosting guests, or a clear workspace.
This table breaks down the core differences to help guide your decision, based on a comparative analysis from sources like leading home and decor publications.
| Feature | Murphy Bed | Loft Bed |
|---|---|---|
| Space Type Created | Dynamic (70 sq ft temporary) | Static (70 sq ft permanent) |
| Daily Transformation Time | 60 seconds | None required |
| Ceiling Height Impact | No change | Reduces by 40-50% |
| Daytime Functionality | Full floor space for activities | Fixed desk/lounge underneath |
| Psychological Feel | Adult, formal, versatile | Cozy nook, may feel cave-like below |
Ultimately, a loft bed divides space, while a Murphy bed transforms it. For those seeking the ultimate in flexibility and the ability to completely change a room’s function from day to night, the Murphy bed offers a more versatile, adult solution. The loft bed is a powerful divider, best for creating permanent, distinct zones within your studio.
The Cooking Smell Risk That Permeates Your Bedding in a Studio Setup
In a studio, there are no walls to contain the aromas of last night’s dinner. The risk of cooking smells permeating your bedding, clothes, and soft furnishings is a significant sensory challenge. A lingering scent of garlic or fried food in your sleeping area disrupts the psychological separation between kitchen and bedroom, impacting your ability to rest. Managing this requires a proactive scent management strategy that goes beyond simply opening a window.
The solution involves a three-pronged approach: extraction, filtration, and zoning. First, you must extract odors at the source with a powerful range hood. Second, you must filter any remaining particles from the air before they settle. Finally, you can create “scent zones” to ensure each area of your studio has a distinct and appropriate fragrance, reinforcing its function.
This diagram illustrates the most critical part of this strategy: placing a powerful air filter as a barrier between the kitchen and the rest of your living space.
To build a comprehensive defense against unwanted odors, implement the following measures:
- Install a powerful range hood: Look for a model with a minimum rating of 400 CFM (Cubic Feet per Minute) for effective odor extraction.
- Position a high-CFM air purifier: Place a unit with an activated carbon filter strategically between your kitchen and bed area to act as a scent barrier.
- Choose less porous bedding: Tightly woven fabrics like cotton percale or Tencel are less likely to absorb odors compared to flannel or loose knits.
- Use a non-porous day cover: During cooking, protect your bed with a decorative cover made of faux leather or treated canvas that won’t trap smells.
- Create scent zones: Use a citrus diffuser in the kitchen to neutralize cooking smells, a calming lavender spray for your bedding before sleep, and keep your work area neutral.
How to Sequence Your Daily “Room Transformation” From Bedroom to Office?
A truly functional studio isn’t just about having the right furniture; it’s about having the right routine. The transition from “bedroom mode” to “office mode” should be a quick, seamless ritual—a “room choreography” that mentally and physically resets your space. This isn’t a chore; it’s a powerful psychological trigger that tells your brain it’s time to work. Creating an efficient sequence is key to making this transformation a sustainable daily habit.
The goal is to establish a “kit of parts” where every piece has a designated position for each room mode. This system eliminates decision fatigue and turns the transformation into muscle memory. By linking the routine to an existing daily habit, like finishing your morning coffee, you embed the transition into your natural flow.
Case Study: Ashley’s 5-Minute Transformation System
Living and working in her 470 sq ft studio, Ashley, featured on Apartment Therapy, perfected this concept. She created a system where the entire function of the space could be converted in under five minutes. Her routine is linked to finishing her morning coffee. This habit acts as the trigger to initiate “office mode,” which involves rotating a bookcase divider, folding away her bed, and repositioning modular furniture. This rapid, habit-driven transformation is what makes her work-from-home setup successful and sustainable.
A well-designed sequence can transform your entire studio in just a few minutes. This routine, broken down into timed steps, serves as a blueprint for your own daily reset.
Action Plan: The 5-Minute Studio Reset Routine
- Fold & Store (90 seconds): The first and most impactful step. Fold away your Murphy bed or convert your sofa bed. Immediately store all bedding (pillows, duvet) in a designated ottoman or storage trunk to clear the space completely.
- Reposition Tables (30 seconds): Move your “nightstand,” often a C-table, from the bedside to its daytime position next to the sofa. This small move has a big psychological impact.
- Switch the Lighting (10 seconds): Change your smart bulbs from a warm, relaxing 2700K “sleep mode” to a cool, energizing 5000K “work mode.” This sensory cue signals a shift in the room’s function.
- Deploy the Workspace (60 seconds): Slide a nesting coffee table under your media console to clear floor space. Pull your hidden desk chair out from its corner. Your living area is now an open office.
- Activate the Zone (30 seconds): The final ritual. Turn on a specific “focus” playlist and activate a work-specific scent in your diffuser (e.g., peppermint or citrus). Your office is now open.
How to Create Distinct Zones in a Studio Without Building Walls?
Dividing a studio without erecting walls that block light and shrink the space requires a more subtle approach. The key is to create zones through sensory and visual cues rather than solid physical barriers. This method works because, as research in environmental psychology has shown, our sense of spaciousness is influenced more by layout, lighting, and visual continuity than by actual square footage. You can trick the brain into perceiving separate “rooms” by appealing to multiple senses.
This technique is called sensory zoning. Instead of just using a rug to define the living area, you layer that with a specific type of lighting, a unique texture, and even a subtle background sound. Each zone gets its own multi-sensory identity, creating a clear psychological separation of space. For example, the work zone could be defined by a flat-weave rug, bright task lighting, and a white noise machine, while the lounge area has a high-pile rug, warm ambient light, and soft music.
The HGTV-featured Philadelphia studio is a prime example of this in action. The designer used a combination of tall draperies as semi-permeable dividers, different lighting temperatures for each area, and a mix of organic and metallic textures to psychologically reinforce the function of the bedroom, dining, and living zones without a single permanent wall.
You can apply these sensory zoning techniques to create powerful, invisible divisions in your own space:
- Sound: Place a white noise machine or a small water feature in your work zone to mask household sounds. Keep the sleep zone as silent as possible.
- Touch: Use contrasting textures. A high-pile, soft rug signals comfort in the lounge area, while a hard-wearing, flat rug under your desk chair signals function.
- Light: Install track lighting to create focused “pools” of light that define each zone. Use warm, dimmable light for relaxation areas and bright, cool light for task areas.
- Scent: Assign a subtle, unique fragrance to each area. A hint of citrus in the kitchen, lavender near the bed, and a neutral or energizing scent like mint in the workspace.
- Visual: Employ semi-permeable dividers. Slatted wood panels, metal-frame shelves with glass, or even a row of tall plants can define a space without blocking light or sightlines.
Key takeaways
- Go Vertical: The most underutilized space in a studio is its height. Use floor-to-ceiling shelves and curtains to draw the eye up and free up floor space.
- Embrace “Disappearing” Furniture: A true transformation requires furniture, especially the bed, to vanish completely into the architecture, not just fold up.
- Choreograph Your Day: Develop a quick, repeatable routine to transition your space between its different functions. This makes multi-functionality a sustainable habit.
How to Style Open Shelves as a Divider Without Blocking Light?
Open-back shelving units are a classic studio solution for dividing space while maintaining an open feel. However, they often become cluttered, turning into a solid wall that defeats their purpose. The key to using them effectively is to style them with the primary goal of light preservation. A bookshelf divider should be treated less like storage and more like a permeable screen or an architectural feature.
The strategy is to balance objects with negative space deliberately. By leaving significant portions of the shelves empty, you create windows for light and sightlines to pass through, preventing the room from feeling cut in half. A monochromatic color palette for the objects you do display—sticking to whites, creams, and natural wood tones—also helps the unit feel lighter and less obtrusive.
Case Study: Ashley’s Light-Preserving Bookcase
In her 480 sq ft studio, Ashley created a statement divider using three large IKEA BILLY bookcases. As seen on Apartment Therapy, she painted them a bold “Pink Taffy” color, turning them into an architectural element. Crucially, she styled them with extreme discipline. By maintaining a tight color palette for the decor and strategically leaving large areas of the shelves completely empty, the unit successfully separates her living and sleeping zones while still allowing light to flow through and maintaining a sense of visual connection across the space.
To achieve this balance, apply the “Rule of Thirds” to your styling strategy:
- Leave 1/3 of the shelf space completely empty. This is the most important rule for allowing light to pass through.
- Fill 1/3 with low-profile items. Horizontally stacked books, small trays, or flat decorative boxes keep the visual line low and open.
- Use the final 1/3 for a few medium-height objects. A single vase or a small sculpture here creates visual interest without creating a solid barrier.
- Incorporate plants. Trailing plants like Pothos and upright varieties like Snake Plants add an organic, living element that feels light and airy.
By styling with intention, a simple shelving unit is transformed from a clumsy divider into a sophisticated feature that provides separation, storage, and style without sacrificing the precious natural light that makes a small space feel livable.
Modular Sofas: Adapting Your Living Room Seating for Movie Nights and Social Gatherings
In a studio, the sofa is the heart of the “living room” zone. But a single, static sofa can’t efficiently serve all the functions of modern life, from solo work-from-home days to crowded movie nights. A modular sofa is the transformative solution, allowing you to reconfigure your seating on demand to match the activity. It’s the final piece in the room choreography puzzle, ensuring your social space is as adaptable as the rest of your studio.
The power of a modular system is its ability to shift from a traditional L-shape for daily use, to a massive, comfortable lounge bed for movie nights, to separate individual seats for a conversational party setting. This adaptability means your living area can genuinely support different social scenarios, rather than forcing everyone to cram onto one fixed couch. The transformation is typically quick, taking only a few minutes to completely change the room’s dynamic.
Here are the three core configurations that a modular sofa unlocks, turning your single living space into a multi-purpose social hub.
| Configuration | Setup | Best For | Time to Reconfigure |
|---|---|---|---|
| Solo Mode | Traditional L-shape | Daily use, reading, working | N/A (default) |
| Cinema Mode | Two chaise lounges pushed together | Movie nights, couples | 2 minutes |
| Social Mode | Four individual pieces spread out | Parties, conversation circles | 3-4 minutes |
Choosing a modular sofa completes the vision of a truly transformable space. It acknowledges that “living” isn’t a single activity, but a range of experiences. By allowing your seating to adapt, you ensure that your one-room home can comfortably and effectively host them all, proving that the limitations of square footage can be overcome with smart, flexible design.
Start implementing these strategies today to reclaim your space and redefine what your studio can be. By thinking vertically, embracing transformation, and choreographing your daily routines, you can convert one room into four distinct, functional, and beautiful living zones.