
The secret to a true spa bathroom isn’t adding luxury items; it’s meticulously engineering your environment to shift your mind from a state of hurried routine to restorative ritual.
- Eliminating “visual noise” from branded products is the most impactful first step to creating cognitive calm.
- Layering sensory inputs—from therapeutic water flow and ambient warmth to curated scents and adaptable light—is essential for a five-star experience.
Recommendation: Begin by treating your bathroom as a sensory canvas, focusing first on what you can remove before considering what to add.
Imagine the moment you step into the bathroom of a five-star hotel. The air is still, the light is soft, and a sense of calm envelops you. There are no garish shampoo bottles, no harsh overhead glare, just an immediate feeling of decompression. Now, contrast that with your typical morning: a rushed, functional routine in a space designed for efficiency, not tranquility. For many stressed professionals, the bathroom is another task on the checklist, not a sanctuary for recovery. The common advice—add a plant, buy new towels—scratches the surface but fails to address the core issue.
The transformation from a functional bathroom to a personal spa is not about simple decoration. It’s about a fundamental shift in philosophy, from hygiene as a chore to wellness as a ritual. The key lies in a concept we call sensory engineering: the conscious and deliberate design of light, sound, scent, and touch to guide your mind into a state of relaxation. It requires moving beyond aesthetics to understand the psychological impact of your environment, from the shock of a cold floor on your nervous system to the cognitive load created by visual clutter.
But what if the most profound change wasn’t about installing a new tub, but about the strategic removal of distractions? This guide will deconstruct the elements of a true spa experience, revealing how to transform your space into a daily wellness retreat. We will explore how to master lighting, select therapeutic fixtures, and leverage materials to create an environment that doesn’t just look luxurious, but actively works to restore your peace of mind. This is your blueprint for turning a daily routine into a deeply personal and restorative ritual.
To guide you through this transformation, we’ve structured this article to address every sensory layer of a true spa-like bathroom. Explore the sections below to master each element of your personal wellness sanctuary.
Summary: Your Guide to Designing a Personal Wellness Sanctuary
- Why removing branded bottles is the #1 step to a spa atmosphere?
- How to safely integrate aromatherapy into your shower routine?
- Rain shower vs. Handheld: which fixture offers better therapeutic value?
- The cold tile shock and how heated floors change your morning mood
- How to circuit your lights to switch from bright makeup mode to dim bath mode?
- Porcelain vs. Ceramic: why is porcelain the only choice for heavy water zones?
- How to configure drawer dividers so makeup doesn’t slide around?
- Dimmer Switches: Transforming Room Atmosphere and Saving Energy
Why Removing Branded Bottles Is the #1 Step to a Spa Atmosphere?
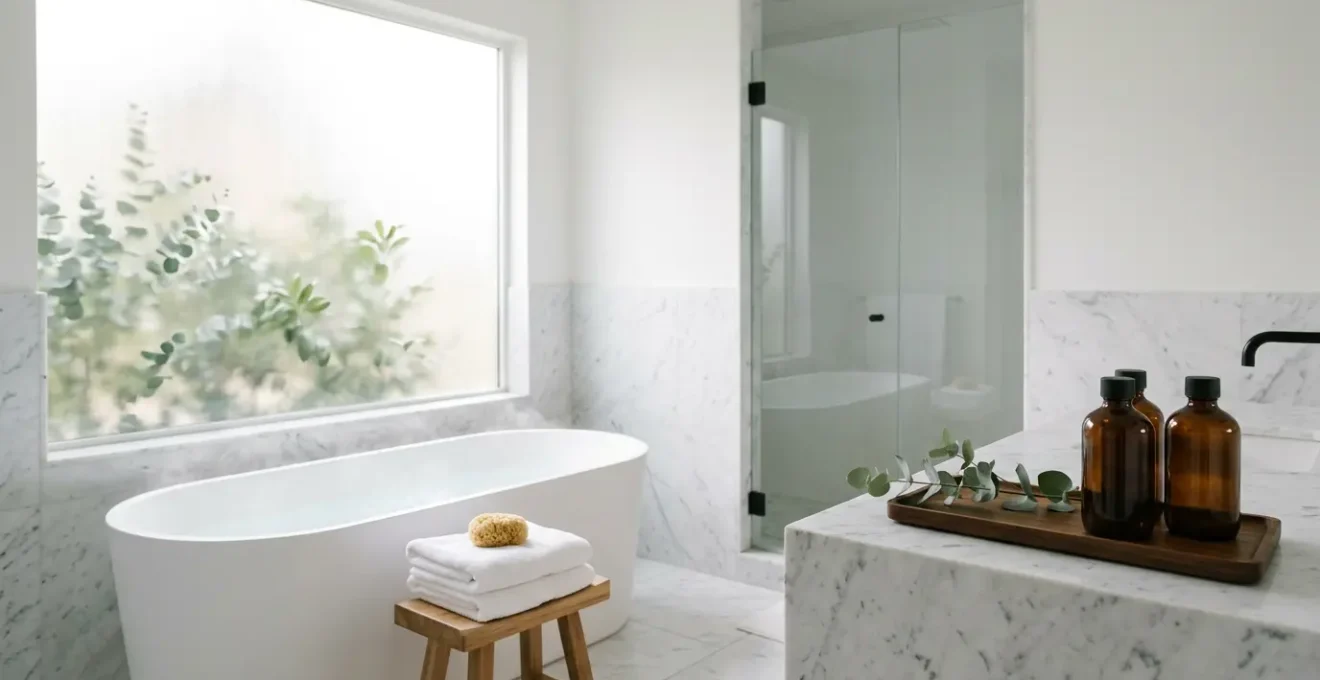
The journey to a spa-like sanctuary begins not with a purchase, but with an act of subtraction. Your countertop, shower niche, and bath edge are likely crowded with a cacophony of branded bottles, each screaming for attention with different colors, logos, and fonts. This isn’t just clutter; it’s visual noise. Every time your eye scans these items, your brain must process conflicting information, creating a low-level cognitive load that actively works against relaxation. A true luxury experience is defined by what is absent, and the primary element to remove is this chaotic marketing landscape.
The goal is to achieve visual silence, creating a serene, uniform canvas that allows the mind to rest. By decanting your shampoos, conditioners, and lotions into a matched set of amber glass or minimalist ceramic dispensers, you replace commercial chaos with intentional harmony. This single change does more to elevate the space than almost any other. It signals a shift from a consumer space to a curated one. Furthermore, research on bathroom design psychology shows that hidden storage removes visual noise, which directly supports emotional balance and a state of calm.
This principle of “less but better” is the foundation of a tranquil environment. Once the visual noise is gone, the remaining elements—a single candle, a stack of folded towels, a small plant—can finally be appreciated. Their quiet beauty is no longer in competition with a dozen plastic bottles. You’ve created a space where the mind isn’t constantly processing, but is free to simply be. This is the first and most critical step in transforming your bathroom from a storage room for products into a retreat for your soul.
How to Safely Integrate Aromatherapy Into Your Shower Routine?
With visual noise silenced, the next layer of sensory engineering is scent. Aromatherapy can transform a mundane shower into an immersive, therapeutic ritual, using steam as a natural diffuser to envelop you in healing fragrances. A bundle of fresh eucalyptus tied to the showerhead releases its invigorating oils when heated, clearing the mind and airways. A few drops of lavender oil on a washcloth placed on the shower floor can turn a quick rinse into a calming end-of-day ceremony. The experience is deeply personal and powerfully effective.
As you can see, the steam activates the natural oils, creating an ethereal and fragrant atmosphere. However, this powerful sensory tool demands respect and knowledge. Essential oils are highly concentrated botanical compounds and can be dangerous if misused. The allure of their benefits should never overshadow the need for caution, especially when heat and water are involved, as they can increase skin absorption and sensitivity.
A stark reminder of this danger comes from a documented incident involving phototoxicity, a reaction where certain essential oils make the skin extremely sensitive to UV light. A misapplication can lead to severe consequences. For this reason, understanding proper dilution and application is not just a recommendation; it is a critical safety requirement for any home spa ritual.
Case Study: The Dangers of Undiluted Bergamot Oil
In a cautionary case reported by the Tisserand Institute, a woman applied undiluted Bergamot essential oil to her skin before entering a steam bath and then using a tanning bed. The combination was disastrous. The steam enhanced the oil’s penetration into her skin, and the subsequent UV radiation triggered a severe phototoxic reaction. She was hospitalized for extensive second-degree burns, a painful lesson demonstrating that the timing and dilution of essential oils are not negotiable for safety.
To safely enjoy aromatherapy, always use essential oils in a “wash-off” product like a shower gel or dilute them heavily in a carrier oil (like jojoba or almond oil) before allowing any contact with skin. For diffusion, placing drops on the floor away from direct water flow is safest. Never apply citrus oils, like bergamot, lemon, or lime, to the skin less than 12-18 hours before sun exposure.
Rain Shower vs. Handheld: Which Fixture Offers Better Therapeutic Value?
The sensation of water is central to the spa experience. Your choice of shower fixture is not merely a functional decision; it’s a choice between different forms of hydrotherapy. The two primary options, the overhead rain shower and the versatile handheld fixture, offer distinct and complementary therapeutic benefits. Understanding their differences is key to engineering a shower that caters to your specific wellness needs, whether you seek mental escape or targeted physical relief. The ultimate luxury, of course, is having both.
A rain shower is designed for mental relaxation. It creates a complete water envelope, a consistent, gentle downpour that minimizes external stimuli. The sound and feel of the water are uniform, encouraging a meditative state. By fully immersing you, it helps dissolve stress and quiet a racing mind. It’s the aquatic equivalent of a weighted blanket. A handheld fixture, by contrast, is a tool for physical therapy. It allows you to direct a concentrated stream of water to specific areas, massaging sore muscles, easing tension in the neck and shoulders, and providing a more vigorous, focused hydro-massage. It offers control, precision, and efficiency.
The decision between them involves a trade-off between immersive experience and targeted application. The following comparison breaks down the key differences to help you determine which fixture best aligns with your vision of a home spa.
| Feature | Rain Shower | Handheld Fixture |
|---|---|---|
| Immersion Experience | Complete water envelope minimizes stimuli | Targeted application |
| Therapeutic Use | Meditative, stress reduction | Hydrotherapy for sore muscles |
| Water Efficiency | Higher consumption | More control, less waste |
| Installation Cost | Higher ($800-2000) | Lower ($150-500) |
| Best For | Mental relaxation | Physical therapy |
Ultimately, as a designer, the ideal solution is a combination system that offers the best of both worlds. An overhead rain shower for meditative escape, supplemented by a handheld unit on a slide bar for practical tasks and targeted therapy. This dual approach ensures your shower is a versatile wellness tool, capable of delivering exactly the experience you need at any given moment, a hallmark of true luxury design.
The Cold Tile Shock and How Heated Floors Change Your Morning Mood
The first physical contact you have with your bathroom each morning sets the tone for your entire day. For most, it’s the “cold tile shock”—a jarring, unpleasant jolt to the nervous system as bare feet meet an ice-cold floor. This abrupt sensation is the antithesis of a gentle awakening and a stark departure from the cocoon of warmth you just left. It’s a moment of physical stress that immediately puts the body and mind on high alert, forcing a transition from rest to function that is anything but graceful.
Now, imagine an alternative. You step out of bed and your feet land on a surface that is not just neutral, but gently, luxuriously warm. This is the experience of radiant floor heating. Instead of a shock, you receive a subtle, comforting embrace. This single sensory input changes everything. It’s a ritual transition, a physical cue that you are entering a space of comfort and care, not a functional cold zone. The warmth radiates up, relaxing muscles and creating a stable, pleasant ambient temperature that makes you want to linger.
This technology transforms the floor from a passive surface into an active wellness feature. A heated floor, set to an optimal 72-75°F (22-24°C), turns the entire room into a comfortable envelope of warmth. It creates a perfect spot for morning stretches on a yoga mat or a moment of meditation on a floor cushion, extending the bathroom’s function beyond simple hygiene. By timing the system to activate 30 minutes before you wake, you ensure the ritual begins the instant your feet touch the ground. This isn’t just an amenity; it’s a profound investment in your morning mood and a foundational element of a truly sensory-engineered sanctuary.
How to Circuit Your Lights to Switch From Bright Makeup Mode to Dim Bath Mode?
Light is arguably the most powerful tool for shaping the atmosphere of a room. A bathroom has dual, often conflicting, lighting needs: bright, clear, shadow-free light for functional tasks like applying makeup or shaving, and soft, warm, dim light for a relaxing soak in the tub. A single overhead light on a simple switch can’t possibly serve both purposes. Achieving a true spa-like feel requires a layered lighting scheme, with different circuits for different moods, allowing you to switch from “task mode” to “relax mode” at the touch of a button.
As this image evokes, a layered approach creates depth, warmth, and an emotional atmosphere. This is achieved by thinking of your bathroom lighting in three distinct layers, each on its own circuit and, ideally, its own dimmer. This separation gives you complete control over the sensory experience, transforming the room’s character instantly. The key is to select the right color temperature for each layer, measured in Kelvin (K). Lower Kelvin values (around 2700K) produce a warm, golden, candle-like glow, while higher values (4000K-5000K) produce a cool, bright, daylight-like light.
Setting up this system is a matter of strategic planning with your electrician. By separating the layers and using smart switches, you can program “scenes” for one-touch activation. For instance, a “Makeup” scene would activate bright task lights and ambient overheads, while a “Bath” scene would turn off the overheads and activate only the warm, low-level accent lights. This is the essence of luxury: technology that works seamlessly in the background to serve your well-being.
- Layer 1 – Ambient: This is your general, room-filling light. Install dimmable overhead fixtures (like recessed cans) with a warm color temperature of 2700K. This provides a soft, welcoming base layer.
- Layer 2 – Task: This is your functional light. Place vertical sconces on either side of the vanity mirror or a backlit mirror to provide bright, even light on the face. This circuit should use a cooler temperature of 4000K-5000K and be on a separate switch.
- Layer 3 – Accent: This is your “mood” lighting. Use waterproof LED strips under a vanity, behind a tub, or in a shower niche. Set this to a very warm 2200K to mimic candlelight. This layer should be on its own dimmer and is the star of your “bath mode.”
Porcelain vs. Ceramic: Why Is Porcelain the Only Choice for Heavy Water Zones?
The foundational materials of your bathroom are not just a backdrop; they are active participants in its performance and feel. When it comes to tile in heavy water zones like shower floors and walls, the choice between porcelain and ceramic may seem purely aesthetic, but it has profound implications for durability, maintenance, and the long-term integrity of your sanctuary. While both are clay-based products, their manufacturing process creates crucial differences, making one of them the undisputed champion for wet environments.
Porcelain is forged under higher pressure and fired at a much higher temperature than ceramic. This process creates a tile that is significantly denser and less porous. The critical metric here is the water absorption rate. For a tile to be certified as porcelain, it must have an absorption rate of 0.5% or less. Ceramic tiles, by contrast, can have absorption rates of 3% to 7% or even higher. In a shower, where water is a constant, this difference is paramount. A less porous tile is far more resistant to water infiltration, which prevents mold growth within the tile body and protects the substrate behind it.
Another key distinction is the “through-body” color of most porcelain tiles. The color and pattern run all the way through the tile, meaning if it ever chips, the damage is nearly invisible. Ceramic tiles typically have a glazed surface over a different-colored base, so a chip reveals an obvious flaw. This durability makes porcelain the superior long-term investment for a space designed to be a lasting retreat.
The following table, based on a comparison of material properties, highlights why porcelain is the only truly professional choice for the demanding conditions of a spa-like shower.
| Property | Porcelain | Ceramic |
|---|---|---|
| Water Absorption | <0.5% | 3-7% |
| Through-body Color | Yes – chips invisible | No – chips show base |
| Density | Higher – solid feel | Lower – lighter feel |
| Mold Resistance | Excellent | Moderate |
| Long-term Cost | Higher initial, lower maintenance | Lower initial, higher maintenance |
Choosing porcelain is an investment in peace of mind. It ensures your beautiful, serene shower remains that way for years to come, free from the worries of water damage, mold, or unsightly chips. It’s a choice for permanence and quality, the very cornerstones of luxury design.
How to Configure Drawer Dividers So Makeup Doesn’t Slide Around?
The calm established on your countertops must extend into your drawers. Opening a drawer to a jumbled mess of cosmetics sliding around is another form of hidden chaos, a moment of friction that disrupts the flow of your ritual. The solution is inspired by the world of haute cuisine: mise en place, or “everything in its place.” This philosophy is about creating a system of perfect organization so that every tool and ingredient is exactly where you need it, when you need it. Applying this to your vanity drawers transforms the act of getting ready from a frantic search into a graceful, efficient sequence.
The goal is to create a custom-fit home for every item, eliminating movement and decision fatigue. This is achieved with a system of high-quality drawer dividers. Forget flimsy plastic trays. Opt for materials that add a sensory pleasure of their own, like expandable bamboo dividers with cork lining. The cork provides a soft, non-slip grip that holds items in place, and the bamboo adds a touch of natural warmth. Silicone-gripped acrylic dividers are another excellent option, offering a clean, modern look while ensuring stability.
Implementing a ‘mise en place’ system is about more than just containment; it’s about curating your personal ritual. As luxury design consultant Jeff Boico notes, this approach is a form of self-care:
Everything in its place minimizes decision fatigue. Order is a form of care, not just for the home, but for the self. Think of it as the visual equivalent of a deep breath.
– Jeff Boico, The Psychology of Relaxation: How Bathroom Design Affects Your Mind
This organized tranquility turns your vanity drawer into a personal toolkit for your daily ritual. Every item has a purpose and a place, allowing you to move through your routine with mindful intention rather than chaotic haste. Follow this plan to bring the philosophy of ‘mise en place’ to your personal sanctuary.
Action Plan: The ‘Mise en Place’ Method for Serene Drawers
- Identify Contact Points: Designate specific drawers for daily makeup, skincare, and hair tools. Avoid mixing categories.
- Collect and Curate: Empty the drawers and inventory every item. Group them into ‘daily use’, ‘special occasion’, and ‘rarely used’ categories.
- Ensure Coherence: Focus on the ‘daily use’ items. Do these 5-7 core products truly represent your essential daily ritual? Refine this kit to its purest form.
- Create Emotional Order: Assign the most accessible front sections of your drawer to your daily kit. Use high-grip dividers (bamboo/cork or acrylic/silicone) to create a specific slot for each item.
- Implement the Plan: Place special occasion items in back sections or separate drawers. Line the drawer bottom for extra stability and a finished feel. Commit to returning each item to its home after use.
Key Takeaways
- Visual Silence is Paramount: The most crucial step is eliminating the “visual noise” of branded products to create a foundation of cognitive calm.
- Engineer a Sensory Symphony: A true spa experience is built by layering and controlling sensory inputs: therapeutic water, ambient warmth, curated scents, and adaptable, layered lighting.
- Prioritize Material Integrity: Choosing high-performance materials like dense, non-porous porcelain tile is a non-negotiable investment in the longevity and maintenance-free luxury of your sanctuary.
Dimmer Switches: Transforming Room Atmosphere and Saving Energy
If layered lighting is the orchestra, then the dimmer switch is the conductor’s baton. It is the single most important control element that unlocks the full potential of your sensory-engineered bathroom. A simple on/off switch is a binary, all-or-nothing proposition. A dimmer, however, provides a full spectrum of possibilities, allowing you to fine-tune the intensity of each lighting layer to perfectly match your mood and need. It is the final, crucial piece that allows you to be the master of your environment’s atmosphere.
The ability to dim your lights is what facilitates the seamless transition from bright, functional “task mode” to a subdued, restorative “bath mode.” Imagine fading the bright vanity lights down while bringing up the warm glow of the accent LED strips under the tub. The room’s entire character shifts in an instant, signaling to your brain that it’s time to unwind. For the ultimate in sophistication, “warm dim” technology is a must. These specialized LED bulbs not only get dimmer but also get warmer in color temperature as they dim—perfectly mimicking the natural, calming glow of a setting sun or a candle flame, shifting from a neutral 3000K to a cozy 2200K.
However, not all dimmers are created equal, especially when paired with modern LED bulbs. Using an incompatible dimmer can result in frustrating flickering, an audible buzzing noise, or a limited dimming range—all of which destroy the serene atmosphere you’ve worked so hard to create. Selecting the right hardware is essential for a smooth, silent, and fully responsive system. Follow these guidelines to ensure flawless performance.
- Choose C.L. Dimmers: Look for dimmers with the “C.L.” certification, which are specifically designed and tested for compatibility with the complex circuitry of dimmable CFL and LED bulbs.
- Test for Flicker: When testing a dimmer and bulb combination, dim it to various levels, especially around 50% capacity. The light output should be perfectly smooth and stable, with no visible flicker or strobing.
- Listen for Buzzing: In a quiet room, listen closely as you operate the dimmer. A high-quality, compatible dimmer should be completely silent. Any buzzing or humming indicates an incompatibility or a low-quality device.
- Use Separate Dimmers: Install a dedicated dimmer for each of your lighting layers (ambient, task, accent) to give you maximum control and flexibility in creating custom light scenes.
Now that you are equipped with the principles of sensory engineering, the next step is to begin envisioning how these layers will come together in your own space. Start not with a catalogue, but with a piece of paper, mapping out the sensory journey you wish to create for yourself each day.