
For renters and roommates, creating privacy without permanent construction feels like a constant challenge. This guide moves beyond simply listing options and instead offers a strategic approach. By focusing on principles like light, airflow, and multi-functionality, you can transform any temporary divider into a stylish, space-enhancing feature that provides seclusion while adding value and personality to your home.
Living with others or in a compact studio apartment often means compromising on personal space. The default solution seems to be carving out a corner for yourself, but the desire for true privacy—a space to decompress, work, or simply be alone—is a fundamental need. The immediate thought might be to build a wall, but for renters, this is an impossibility fraught with lease violations and lost security deposits. This leaves many feeling stuck in a permanently open-plan existence.
The common advice often circles around a few generic ideas: put up a bookshelf, hang a curtain. While not wrong, these suggestions barely scratch the surface of what’s possible. Flexible living is an art. It’s about seeing dividers not as crude barriers, but as opportunities for style, storage, and even sanctuary. It’s understanding the difference between a divider that suffocates a room and one that enhances it with texture, light, and function.
But what if the key wasn’t just to divide space, but to define it with intent? This is the perspective of a flexible living consultant. We will explore how to move past the idea of simple partitions and embrace strategic, non-permanent solutions. This guide will walk you through the critical questions: how to maintain light and airflow, when to choose a screen over a curtain, and how to make your divider a beautiful, functional centerpiece. You’ll learn to think about your space in terms of visual permeability and functional density, turning a challenge into a design statement.
This article provides a comprehensive overview of the strategies and options available. Explore the sections below to find the perfect non-permanent solution for your living situation.
Summary: A Strategic Guide to Flexible Privacy Solutions
- Why building a permanent wall isn’t always the best answer for privacy?
- How to style open shelves as a divider without blocking light?
- Folding screens vs. curtains: which divider offers better acoustic privacy?
- The airflow risk of blocking a room completely with solid dividers
- How to choose a divider that doubles as a vertical garden?
- Paint blocking vs. physical dividers: which zoning method saves more space?
- How to create distinct zones in a studio without building walls?
- How to mix heavy ceramics with light books for a balanced bookshelf?
Why building a permanent wall isn’t always the best answer for privacy?
For anyone living in a rental, the idea of building a permanent wall is a non-starter. It’s costly, violates most lease agreements, and is utterly inflexible. But beyond these practical barriers lies a more strategic truth: a solid wall is often a crude tool for a nuanced problem. It kills light, obstructs airflow, and makes a small space feel even more cramped. The beauty of non-permanent solutions is their adaptability; they can evolve with your needs, your furniture, and your next apartment.
The goal is not to crudely bisect a room, but to choreograph the experience within it. Flexible dividers allow you to create suggestions of separation that the eye and mind readily accept. In fact, surveys show that over 75% of individuals residing in compact dwellings have found room dividers effective for creating distinct functional zones without the drawbacks of construction. You can use tall bookcases placed perpendicular to a wall, install curtains on ceiling tracks for a soft and adjustable barrier, or strategically arrange your existing furniture to define separate living areas.
These methods provide the necessary visual privacy while preserving the sense of openness that makes a shared space feel livable. A folding screen can be deployed for a video call and then stored away. A well-placed sofa can create a “soft wall” that separates the living area from a workspace. This approach is about working with the space you have, not fighting against it—a philosophy perfectly suited to the modern, mobile lifestyle.
How to style open shelves as a divider without blocking light?
Using an open bookshelf as a room divider is a classic move, but the difference between a stylish, light-filtering feature and a cluttered, light-blocking monster lies in the execution. The key principle is to maximize visual permeability. You are not building a wall of books; you are curating a vertical display that provides separation while allowing light and sightlines to pass through. Think of the shelf as a frame for the room beyond it, not a barrier to it.
Start by choosing the right unit. Etagere-style or cube shelving with a significant amount of open space (aim for at least 40% negative space) is ideal. As graphic designer Timothy Goodman’s own studio solution shows, a unit that tapers or has a high-to-low profile is key because it “maintain[s] an open and airy feel” while still offering storage and disguising part of a bed. This creates a psychological boundary without a hard physical one.
When styling, resist the urge to fill every void. Group items together, leaving entire cubes or sections empty. Mix vertical book stacks with horizontal ones. Integrate items that light can pass through, like glass vases or delicate sculptures. Incorporate small, low-maintenance plants like pothos or succulents to add life and texture. The goal is to create a balanced composition that feels intentional and curated, providing privacy through suggestion rather than brute force.
Folding screens vs. curtains: which divider offers better acoustic privacy?
When choosing between a folding screen and a curtain, a common question arises: which one is better for blocking sound? The honest answer is neither is a substitute for a real wall. However, they interact with sound in fundamentally different ways. Understanding the distinction between acoustic blocking and acoustic absorption is crucial for setting realistic expectations and making the right choice for your needs.
A folding screen, especially one made of solid wood, rattan, or upholstered panels, does a better job of blocking direct sound waves. It creates a physical barrier that can deflect the path of sound, making it a slightly better choice if you need to muffle the direct sound of a conversation or a TV. Curtains, on the other hand, are masters of absorption. Heavy, thick fabrics like velvet or specialized acoustic curtains excel at soaking up high-frequency sounds and reducing echo (reverberation) in a room. This can make a space feel quieter and more intimate, even if it doesn’t completely block noise from the other side.
The This Old House Editorial Team puts it succinctly: “Open-and-close room dividers allow for simple transitions between sectioned-off and open spaces. They offer visual privacy, but do not block sound.” This is the critical takeaway. Your choice should be based on other factors, which this comparative table illustrates.
| Feature | Folding Screens | Curtains |
|---|---|---|
| Sound Blocking | Better for direct sound waves | Absorbs high-frequency echoes |
| Installation | No installation needed | Requires ceiling track or rod |
| Flexibility | Easily moved and stored | Can be drawn open/closed |
| Cost Range | $20-$50 for basic 4-panel | Varies based on fabric quality |
| Visual Privacy | Complete when unfolded | Depends on fabric opacity |
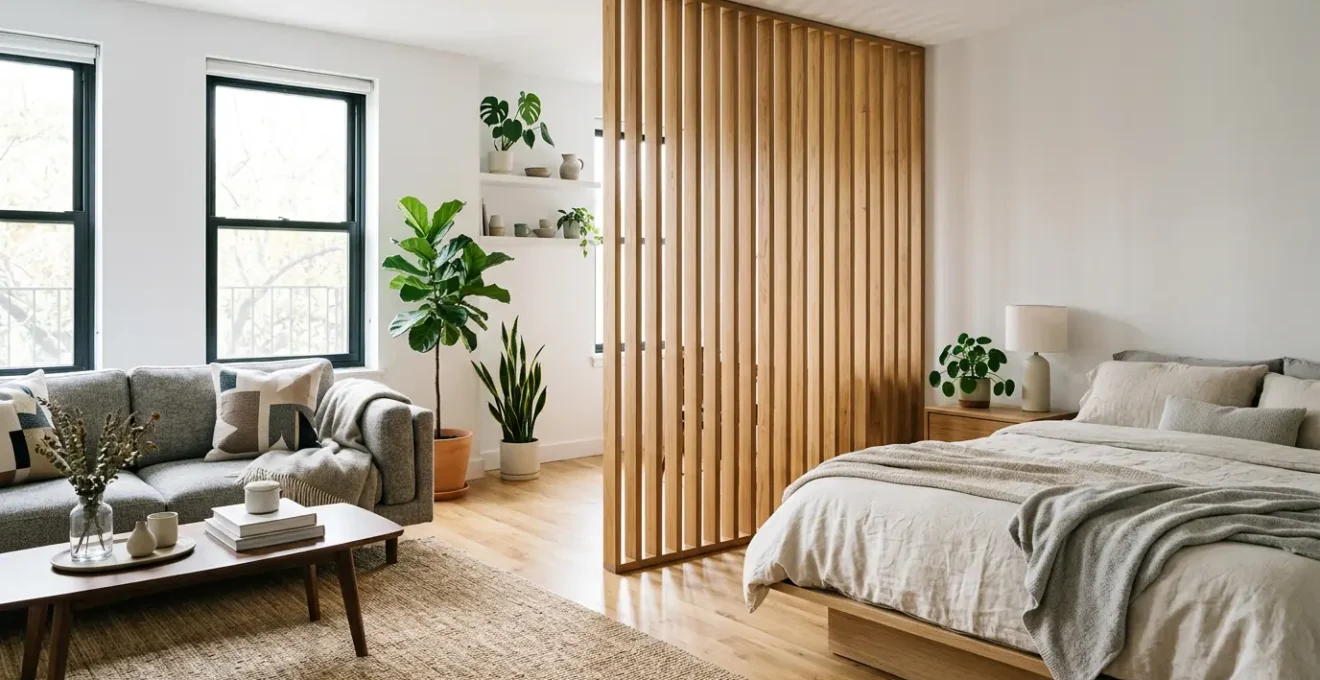
The airflow risk of blocking a room completely with solid dividers
In the quest for privacy, it’s easy to overlook a critical, invisible element: airflow. Placing a solid, floor-to-ceiling divider in a room can inadvertently create a stagnant air zone, block crucial HVAC vents, and disrupt the natural circulation of your home. This can lead to stuffy, uncomfortable spaces and even impact air quality. A well-designed flexible living solution must account for this choreographed flow, guiding not just movement but also air.
The solution is not to abandon dividers but to choose them with ventilation in mind. Opt for materials and placements that allow air to move freely. A perforated metal screen, for instance, can provide a strong sense of visual separation while remaining almost entirely permeable to air. As one case study shows, a couple used such a screen to “filter the rays but separate stair traffic from dinnertime,” achieving both privacy and flow. Slatted wood dividers, hanging ropes or macrame panels, or even simple lattice screens offer similar benefits.
If you opt for a more solid divider like a bookshelf or folding screen, strategic placement is key. Never position it in a way that blocks a heating or cooling vent. Furthermore, ensuring the divider doesn’t reach the ceiling creates a vital channel for air circulation. A gap of just a few inches can make a significant difference. Your divider should work in harmony with your home’s systems, not against them.
Actionable plan: Maintaining Proper Ventilation with Dividers
- Check placement: Identify all HVAC vents, windows, and primary airflow paths in the room before positioning your divider.
- Mind the gap: Intentionally leave a 4-6 inch gap between the top of your divider and the ceiling to allow for cross-room air circulation.
- Choose permeable materials: Prioritize semi-transparent or open-structure materials like slatted wood, perforated metal, lattice, or hanging textiles.
- Consider height: Use dividers that are significantly shorter than your ceiling height (e.g., a 6-foot screen in a 9-foot room) to encourage airflow over the top.
- Assess impact: After installation, spend time in the space to check for stuffiness or changes in temperature, and be prepared to adjust placement.
How to choose a divider that doubles as a vertical garden?
What if your room divider could not only grant you privacy but also purify your air and boost your mood? This is the promise of a “living wall” divider. By integrating plants into your partition, you tap into the principles of biophilic design, bringing the restorative qualities of nature indoors. This approach elevates the divider from a purely functional object to a dynamic, life-giving centerpiece.
Choosing the right structure is the first step. A simple wooden trellis or a section of mesh rebar mounted in a frame can serve as the perfect skeleton. These structures provide support for climbing plants like pothos, philodendron, or ivy, which will naturally weave their way through the openings to create a lush, semi-private screen over time. Alternatively, many open-shelving units can be transformed into vertical gardens by placing potted plants at various heights.
The beauty of this solution lies in its versatility and inherent connection to wellness. As one designer notes about a rustic plant wall made from rebar and wood, it’s a “versatile way to divide indoor or outdoor spaces… to separate rooms and add lush liveliness.” Don’t be intimidated by the upkeep. Many of the best plants for this purpose are famously low-maintenance. The result is a partition that changes with the seasons, offers dappled privacy, and actively contributes to a healthier, more serene home environment.
Paint blocking vs. physical dividers: which zoning method saves more space?
When dividing a small space, every inch counts. This often leads to a debate between two popular zoning methods: paint blocking and physical dividers. Paint blocking—using a block of color on a wall and/or floor to visually demarcate a zone—is the undisputed champion of saving physical space. It uses exactly zero square feet of floor space. However, this efficiency comes at a cost: it offers zero additional functionality.
Physical dividers, while they do occupy a footprint, introduce the powerful concept of functional density. A well-chosen divider does more than just divide; it adds storage, display space, or even a vertical garden. According to some design experts, dividers with built-in storage can increase functional density by up to 40% in studio apartments. That 12-inch deep bookshelf isn’t just taking up a square foot of floor; it’s providing several cubic feet of invaluable storage, effectively making the entire room more efficient.
The choice depends entirely on your primary goal. If your space is extremely tight and your only aim is to create a purely visual cue for a zone (like a dining nook), paint blocking is an elegant, space-free solution. But if you need to add function as well as division, the modest footprint of a physical divider pays for itself many times over. The table below breaks down the trade-offs.
| Method | Floor Space Used | Visual Impact | Functionality |
|---|---|---|---|
| Paint Blocking | 0% – purely visual | Creates color zones | Decorative only |
| Bookshelf Divider | 12-18 inches depth | Partial visual barrier | Adds storage space |
| Curtain Divider | Minimal – track only | Flexible open/closed | Easy to change |
| Folding Screen | When folded: 6-12 inches | Portable barrier | Temporary solution |
How to create distinct zones in a studio without building walls?
The challenge of a studio apartment is to create the feeling of multiple “rooms” within a single four-walled space. The secret is not to think in terms of walls, but in terms of layers. A powerful strategy is the concept of volumetric zoning—using elements at different heights to define spaces from the floor to the ceiling. This creates clear, intuitive zones for sleeping, living, and working without a single permanent partition.
This method can be broken down into three essential layers:
- Layer 1 – The Floor: This is your foundation. Use area rugs of different textures, colors, or patterns to anchor each zone. A plush, high-pile rug can define a cozy living area, while a flat-weave rug might delineate a workspace. This simple act tells your brain, “This is a separate place.”
- Layer 2 – Furniture: Your furniture can act as “soft walls.” The back of a sofa is a powerful, low-slung barrier that clearly separates a living space from what’s behind it. A low credenza or a console table can perform the same function, creating division without blocking light or sightlines.
- Layer 3 – Vertical Elements: This is where you add height and a stronger sense of privacy. It can be a tall, open bookshelf, a strategically hung piece of art, a cluster of hanging plants, or a pendant light that visually “drops” the ceiling over a specific area.
As a case study from a Miami apartment demonstrates, “A desk, bookshelf, and area rug… can make a studio feel like it actually has rooms.” By combining these three layers, you create a rich, textured environment where each zone has its own distinct identity. It’s a sophisticated approach that brings order and calm to an open-plan layout, making it feel both spacious and segmented at the same time.
Key takeaways
- Flexibility is Key: Non-permanent dividers offer adaptability that solid walls lack, preserving light, airflow, and your security deposit.
- Function Over Form: The best dividers are multi-functional, adding storage (bookshelves) or life (plant walls) to increase the “functional density” of your space.
- Think in Layers: Combine floor coverings (rugs), mid-height furniture, and vertical elements (screens, plants) to create distinct zones without enclosing the space.
How to mix heavy ceramics with light books for a balanced bookshelf?
Once you’ve chosen an open bookshelf as your divider, the final challenge is styling it. A well-styled shelf is a masterclass in balance, particularly when mixing objects of different visual weights, like heavy ceramic vases and light paperback books. The goal is to create a composition that is both visually stable and aesthetically pleasing. The secret lies in a principle used by interior stylists: the “Anchor & Float” method.
This principle is simple yet effective. You “anchor” the composition by placing your heaviest and largest items—think large art books, solid ceramic pots, or heavy sculptures—on the bottom third of the shelving unit. This creates a strong visual and physical base, preventing the entire arrangement from feeling top-heavy or precarious. It grounds the entire piece and makes it feel substantial.
Next, you allow the lighter items to “float” on the upper shelves. This is where you place your smaller paperbacks, delicate decorative objects, and trailing plants. Distribute these items with plenty of negative space around them. Create visual interest by arranging items in triangular compositions—a tall vase on one side, a horizontal stack of books in the middle, and a small plant on the other. This creates a dynamic rhythm that leads the eye across the shelves, resulting in a display that feels balanced, curated, and effortlessly stylish.
By applying these strategic principles, you can move beyond simple division and begin to truly design your shared space, creating privacy that is both functional and beautiful. The next step is to assess your own space and decide which flexible solution best fits your needs and style.