
Forget adding fuzzy pillows. True industrial warmth comes not from covering things up, but from mastering the raw materials themselves through a kind of material alchemy.
- Transforming hard surfaces like concrete into comfortable, heated elements is more effective than simply adding a rug.
- Understanding how real metals age (patina) creates a living finish that faux materials can’t replicate.
Recommendation: Shift your focus from adding soft accessories to manipulating the core textures, light, and acoustics of your space to unlock its innate warmth and soul.
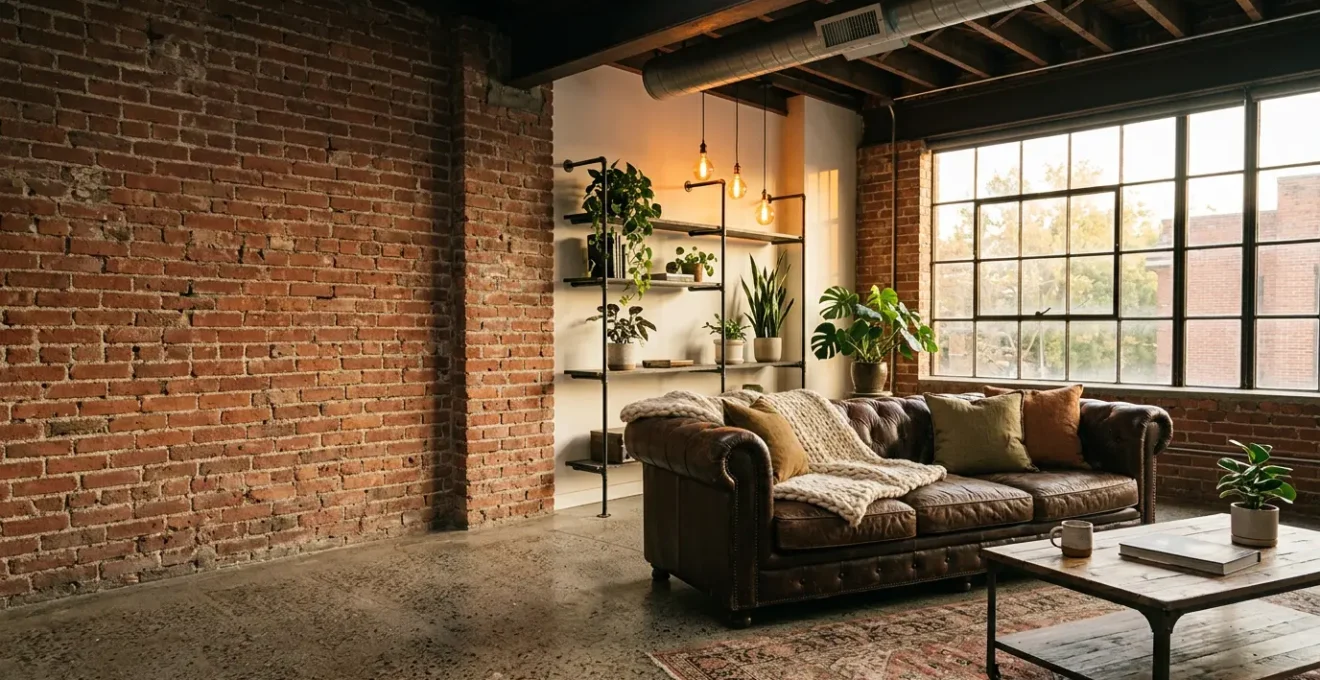
The soul of a loft is its honesty. Exposed brick, sweeping concrete floors, raw metal ducts—these aren’t flaws to be hidden; they are the structural bones of the building, telling a story of utility and strength. Yet, living within this raw honesty can feel like residing in a beautiful, but cold, machine. The conventional wisdom is to fight back with softness: plush rugs, velvet cushions, and thick throws. While these elements have their place, they often act as mere bandages, creating a superficial layer of comfort without ever addressing the core character of the space.
This approach misses the point. It treats the industrial shell as an adversary to be tamed rather than a canvas to be enhanced. What if the secret to a warm, inviting industrial space wasn’t about covering up its rawness, but about unlocking its hidden potential? This is the art of material alchemy. It’s a design philosophy that leans into the perceived “coldness” of raw materials and, through intentional manipulation of texture, light, and patina, transforms them into sources of sophisticated comfort and visual warmth. It’s about making brick feel like a historical tapestry and concrete feel like a heated stone beach underfoot.
This guide will deconstruct the process of material alchemy. We will explore how to reveal the value in your walls, transform your floors into sources of comfort, and choreograph the dialogue between different metals. We’ll move beyond simple decoration to understand how to sculpt with light, engineer acoustics, and restore historical details to turn your industrial space from a cold shell into a deeply personal and impossibly chic home.
Contents: Industrial Textures and the Art of the Cozy Loft
- Why exposing your brick walls can increase your property value by 10%?
- How to soften concrete floors to make them comfortable for barefoot living?
- Real metal vs. faux finishes: which patinas age beautifully over time?
- The lighting mistake that makes industrial rooms look like dark dungeons
- How to dampen echoes in a room full of brick, glass, and metal?
- How to restore plaster cornices that have been painted over 10 times?
- How to mix brass and chrome fixtures without it looking like a mistake?
- Open-Concept Areas: How to Define Zones Without Building Walls?
Why exposing your brick walls can increase your property value by 10%?
Exposing a brick wall is more than a style choice; it’s a strategic investment in your property’s character and financial worth. The raw, textural quality of brick introduces a sense of history and authenticity that modern drywall simply cannot replicate. This isn’t just an aesthetic opinion; it’s backed by market data. For urban dwellers and loft owners, an original brick feature is a mark of prestige, signaling a connection to the building’s industrial past. It provides a rich, complex backdrop that elevates everything around it, from minimalist furniture to bold art.
The financial argument is compelling. The perceived value of authenticity translates directly into real-world dollars at appraisal and resale. While the “10%” figure is a common benchmark, the core principle holds true: unique architectural features drive value. In fact, data shows that since 2017, homes with brick exteriors have seen a 6% higher appraisal value on average compared to those with other finishes. This premium is often even more pronounced for interior features in desirable urban markets. A study by the National Association of Realtors further supports this, finding that brick facades can return a significant portion of their cost at resale, outperforming many interior upgrades.
Embracing your brick wall is an act of celebrating the building’s soul. It’s a commitment to texture and history over sterile uniformity. This decision not only enriches your daily living experience but also positions your property as a more desirable, valuable asset in a market that craves character. The honesty of the material itself becomes a selling point, a testament to the quality and history of the space you inhabit.
How to soften concrete floors to make them comfortable for barefoot living?
Concrete floors are the epitome of industrial chic—durable, seamless, and brutally honest. But their notorious coldness and hardness can make a space feel more like a warehouse than a home. The typical solution is to cover them with large area rugs, but this fights against the minimalist aesthetic. The true alchemical solution is not to hide the concrete, but to transform its very nature, making it a source of surprising comfort. The most sophisticated way to achieve this is by pairing a microcement finish with underfloor radiant heating.
Microcement is a thin, polymer-modified cement coating that can be applied over existing concrete. It provides a warmer, slightly softer finish than raw polished concrete, but the real magic happens when it’s installed over a radiant heating system. This combination turns the entire floor into a gentle, monolithic radiator. The thermal mass of the concrete, once a source of cold, becomes a battery for warmth, radiating heat evenly throughout the day. It’s an incredibly efficient method, with some systems claiming up to 50% less energy consumption than conventional heating.
The installation is a precise process that requires patience. The heating must be run for weeks before application to stabilize the slab, then turned off. After the microcement is applied and cured, the heat is brought back up gradually. This meticulous process ensures the finish doesn’t crack, resulting in a seamless, beautiful floor that is a genuine pleasure to walk on barefoot, even in the middle of winter. You haven’t just covered the cold; you have transformed the material itself into an element of pure comfort.
Real metal vs. faux finishes: which patinas age beautifully over time?
In an industrial space, metal is not just an accent; it’s a primary material. From plumbing fixtures to lighting and window frames, its presence is unavoidable. The temptation to use faux finishes—paints or coatings that mimic metal—is strong, especially for budget reasons. However, this is where the philosophy of material alchemy draws a hard line. Faux finishes are static. They look their best on day one and degrade from there, chipping, fading, or peeling. Real, unlacquered metals, on the other hand, are alive. They engage in a slow, elegant dialogue with their environment, developing a unique engineered patina that tells a story over time.
This patina is the metal’s response to oxygen, moisture, and use. It is not a sign of decay but of maturation. Unlacquered brass shifts from a bright, flashy gold to a deep, moody bronze with hints of green. Raw copper evolves from a salmon-pink shine to a rich dark brown and, eventually, the iconic turquoise verdigris. Corten steel, designed for this very purpose, develops a stable, rust-orange layer that protects the steel beneath it. These finishes are impossible to fake because their beauty lies in their subtle, non-uniform evolution. They add a layer of organic complexity and visual texture that is the hallmark of a sophisticated, lived-in space.
As the visual comparison shows, the depth and character of natural aging are unparalleled. Faux finishes remain one-dimensional, a flat imitation of a dynamic process. Choosing real metal is a commitment to authenticity and a celebration of imperfection. It’s an understanding that the most beautiful things are not those that resist change, but those that wear their history with grace.
To make an informed choice, a direct comparison of how these materials evolve is essential. The following table breaks down the aging process and maintenance needs of key real metals versus their faux counterparts, a crucial guide from a recent analysis of industrial materials.
| Metal Type | Initial Appearance | 1 Year Patina | 5+ Years Patina | Maintenance Required |
|---|---|---|---|---|
| Unlacquered Brass | Bright golden | Honey tones | Deep bronze with green | None for patina |
| Raw Copper | Salmon pink | Dark brown | Turquoise verdigris | None for patina |
| Corten Steel | Dark gray | Orange rust layer | Stable rust patina | Initial sealing only |
| Faux Metal Paint | Uniform color | Same appearance | May chip or fade | Regular touch-ups |
The lighting mistake that makes industrial rooms look like dark dungeons
The single biggest lighting error in an industrial space is relying on a single, central overhead fixture. This “lone bulb” approach, often a dramatic pendant over a dining table, creates a harsh pool of light in one area and plunges the rest of the room into dramatic, unwelcoming shadow. It turns high ceilings and large volumes from an asset into a liability, making the space feel like a gloomy, cavernous dungeon rather than an expansive, airy loft. This approach completely fails to appreciate light as a sculptural tool.
The solution is not more light, but more strategic light. A successful industrial lighting scheme is a choreographed play of light across three distinct layers. This approach treats light as an architectural element that defines zones, highlights textures, and creates mood.
- Ambient Layer: This is the general, foundational illumination. Instead of one central fixture, think track lighting or a series of subtle recessed lights that wash the walls and ceilings, raising the overall light level without being the main focus. It eliminates the deep, cavernous shadows.
- Task Layer: This is focused, functional light. This is where your iconic pendant over the dining table belongs. It also includes under-cabinet lighting in the kitchen, a floor lamp next to a reading chair, or an articulated desk lamp. This light is direct, purposeful, and defines activity zones.
- Accent Layer: This is the magic layer. It’s the light that brings the room to life. Use wall-washers to graze your exposed brick, revealing its rough texture. Use a spotlight to highlight a piece of art or an architectural detail. This is the light that creates drama, depth, and visual interest.
By layering light, you transform the space. You move from a single, stark statement to a rich, dynamic environment. The light no longer just illuminates; it sculpts the room, guides the eye, and makes the raw materials of the loft—the brick, the concrete, the metal—perform.
How to dampen echoes in a room full of brick, glass, and metal?
A room defined by hard surfaces—brick, glass, metal, concrete—is an acoustic nightmare. Sound waves bounce uncontrollably, turning conversations into a cacophony and music into a muddled mess. This constant reverberation, or echo, is physically and mentally taxing. The obvious solution, carpeting and heavy drapes, can feel out of place and compromise the raw, minimalist aesthetic. The more intelligent approach is to integrate acoustic solutions so seamlessly that they become part of the design itself. This is the practice of acoustic architecture.
The goal is to introduce soft, porous materials strategically to absorb sound without cluttering the space. You don’t need to swaddle the room in fabric. Instead, you target key reflective surfaces with materials that have high acoustic ratings. Modern acoustic panels are no longer the ugly foam squares of a recording studio. They come in felt, wood, and fabric finishes that can be arranged as geometric wall art. A large, stretched canvas painting (especially one without a glass front) acts as a beautiful and effective sound absorber. Even the strategic placement of a large, open-backed bookshelf, filled with books of varying sizes, can break up sound waves effectively.
As this re-imagined space shows, acoustic solutions can enhance, not detract from, the industrial vibe. Heavy linen or wool curtains, even if kept open, provide significant absorption. Large-scale plants like fiddle leaf figs not only add life but their leaves act as natural sound diffusers. And under your area rugs—which are still valuable—use the thickest possible felt pad. This doubles the rug’s sound-absorbing capacity without changing its look. By treating sound as a design problem to be solved with elegance, you can achieve acoustic comfort while sharpening your aesthetic.
Action Plan: Executing Your Acoustic Architecture
- Identify Surfaces: List all major hard surfaces (concrete floors, brick walls, large windows) that are causing sound to reflect.
- Integrate Absorption: Choose solutions that double as decor. Consider acoustic felt panels as wall art, a large textile hanging, or upholstered sections on a feature wall.
- Treat Floors & Windows: Place area rugs with thick, high-density felt pads in conversation areas. Use heavyweight linen or wool curtains to absorb sound bouncing off glass.
- Diffuse with Objects: Incorporate large, open-backed bookshelves and large-scale plants. Their irregular shapes will break up and scatter sound waves, reducing harsh echoes.
- Target the Ceiling: For severe echo in high-ceilinged spaces, install discreet acoustic baffles or perforated wood slats to absorb sound at its source without cluttering your living area.
How to restore plaster cornices that have been painted over 10 times?
In older lofts and industrial conversions, intricate plaster cornices are often hidden treasures, entombed under a century’s worth of paint. Each layer of paint clogs the fine details, turning crisp acanthus leaves and sharp dentils into a lumpy, indistinct mess. Restoring them is a painstaking act of architectural archaeology, but one that returns an unparalleled level of historic character and sophistication to a room. It’s the ultimate expression of honoring the building’s original craftsmanship.
Forget aggressive sanding or scraping, which will inevitably destroy the delicate plasterwork beneath. The two primary professional methods are chemical stripping and infrared heat stripping. Chemical strippers (poultice-based systems are often best) are applied as a paste, covered, and left to dissolve the paint layers, which are then peeled or scraped away. This method is effective but can be messy and requires significant ventilation. The infrared heat method is often preferred for its precision. A specialized tool heats the paint to a soft, pliable state, allowing it to be gently scraped away layer by layer without harsh chemicals or damaging the plaster profile.
Regardless of the method, the key is patience. You must work in small, manageable sections. As the layers come off, the original sharp lines of the cornice will begin to re-emerge. It is critical to know when to stop; over-stripping can damage the plaster’s original “skim coat” surface. The final stage involves delicate cleaning and, if necessary, patching any damaged sections with fresh plaster, a task often best left to a specialist. The result is a stunning return to form, a crisp architectural detail that provides a powerful, elegant contrast to the rawer industrial elements of the space.
How to mix brass and chrome fixtures without it looking like a mistake?
The old rule of “one metal finish per room” is dead. In a modern industrial space, a sophisticated mix of metals creates depth, interest, and a curated-over-time feel. However, there’s a fine line between a deliberate, artful mix and a chaotic, accidental jumble. The key to successfully mixing warm metals like brass with cool metals like chrome is to create a clear and intentional textural dialogue. This isn’t about random placement; it’s about establishing a set of rules for your space.
There are several proven strategies for achieving this. The simplest is the 80/20 rule: choose one metal as your dominant finish (80%) and use the other as a deliberate accent (20%). For example, all your lighting and cabinet hardware could be a warm, unlacquered brass, while your plumbing fixtures (faucets, showerhead) are polished chrome. This creates a cohesive base with a pop of planned contrast. Another powerful technique is zone separation, where you assign a metal to a function. For instance, everything water-related is chrome, while everything electrical (light fixtures, switch plates) is brass.
For a more advanced look, you can introduce a “bridge” element. Matte black is the perfect intermediary. Using matte black fixtures alongside both brass and chrome helps to unify the two, making the combination feel more layered and intentional. Finally, play with texture. Pairing a brushed or aged brass with a highly polished chrome creates a dynamic contrast not just in color but in finish, adding another layer of visual complexity.
The following table, based on established designer guidelines, breaks down these strategies for creating a sophisticated and intentional metal mix.
| Mixing Strategy | Example Application | Visual Impact | Difficulty Level |
|---|---|---|---|
| 80/20 Rule | 80% brass lighting, 20% chrome accents | Cohesive with subtle contrast | Easy |
| Zone Separation | All faucets chrome, all cabinet pulls brass | Organized and intentional | Moderate |
| Bridge Element | Add matte black to connect brass and chrome | Sophisticated layering | Advanced |
| Texture Variation | Brushed brass with polished chrome | Dynamic visual interest | Moderate |
Key Takeaways
- Industrial warmth is achieved by transforming raw materials, not just covering them with soft accessories.
- Authenticity is key: Real, unlacquered metals and exposed original brick add more value and character than any faux finish.
- Control the invisible elements: A layered lighting plan and integrated acoustic solutions are as crucial as physical materials for creating comfort.
Open-Concept Areas: How to Define Zones Without Building Walls?
The expansive, open-concept layout is the hallmark of a true loft. It offers a liberating sense of space and light, but it also presents a significant design challenge: how do you create distinct, functional “rooms” without resorting to walls that would destroy the open feel? The answer lies in using subtle architectural and decorative cues to create psychological boundaries. It’s about defining zones through changes in volume, light, and furnishing, creating rooms without walls.
One of the most effective but underutilized techniques is manipulating the ceiling plane. Installing a dropped soffit or painting a section of the ceiling a different color over a dining or seating area creates a powerful visual container. This “room within a room” effect is immediate and defines the space without a single physical barrier. Another powerful tool is light. Create distinct “pools of light” with pendant fixtures or focused track lighting. A dramatic pendant hung low over a dining table instantly designates that area for eating, separating it from the adjacent living space. As one design guide notes, the key to the industrial style is accentuating the expansive allure, and a core tenet of this is ensuring that major furniture pieces have a ton of distance between them.
Furniture itself is your most flexible tool. A large sectional sofa can be positioned with its back to another area, creating an intimate conversation zone. Large, open-backed bookshelves act as permeable screens, defining a boundary between a living area and a home office while still allowing light and views to pass through. Finally, consider creating a change in floor level. Even a single-step platform to elevate a lounge or sleeping area can psychologically separate it from the main traffic flow, creating a distinct and private-feeling zone. These strategies allow you to maintain the open, airy integrity of the loft while bringing order, function, and intimacy to the vast space.
By embracing these strategies, you move beyond mere decoration and into the realm of spatial design. The next logical step is to analyze your own space and begin applying this alchemical mindset to transform its raw potential into a refined, comfortable, and deeply personal home.
Frequently Asked Questions on Restoring Industrial Features
What’s the safest method to strip multiple paint layers from plaster?
The infrared heat method is often preferred over chemical stripping for delicate plaster, as it allows more control and reduces the risk of damaging fine details. This is crucial for preserving the integrity of historical elements.
How do I know when to stop stripping paint?
You should stop stripping when you see the original plaster profile emerging clearly. If the surface begins to feel soft or crumbly under your tools, you’ve gone too far. At this point, it’s better to stop and consider having a professional apply a fine skim coat to consolidate the surface rather than risk more damage.
Is it mandatory to test for lead paint before restoration?
Yes, absolutely. In any home built before 1978, it is critical to test for lead before disturbing old paint layers through scraping, sanding, or heating. A positive test means you must follow specific safety protocols for removal to protect yourself and the inhabitants, such as those outlined by the EPA’s Renovation, Repair, and Painting (RRP) rules. This is a non-negotiable step for a safe and responsible renovation.