
The secret to a thriving indoor jungle isn’t a green thumb; it’s mastering the science of the planter.
- Using a “pot-in-pot” system is far safer than direct planting, creating an air buffer that prevents root rot.
- Sizing up pots by only 1-2 inches in diameter (the “2-inch rule”) is crucial to avoid deadly soil moisture issues.
- Material matters: porous terra cotta is ideal for succulents, while glazed ceramic is better for moisture-loving tropicals.
Recommendation: Always place a protective barrier like a cork mat or a stand between your planter and wood floors to prevent permanent water damage from condensation.
There is a quiet tragedy that plays out in well-meaning homes everywhere: a beautiful new plant, placed in a stylish new pot, begins to wither and die. Despite regular watering and a sunny spot, its leaves turn yellow and its spirit fades. The culprit is often not a lack of care, but a misunderstanding of the vessel itself. We are taught to choose planters for their color and shape, to match our decor, but we rarely consider them as the engineered micro-environments they truly are. The health of a plant is built from the ground up, starting with its roots.
The common advice to “ensure good drainage” or “don’t overwater” only scratches the surface. The real key to a thriving indoor plant lies in a more profound, root-centric design philosophy. It’s about understanding how the material, size, and placement of a pot directly influence soil aeration, moisture retention, and temperature. This approach transforms the simple act of choosing a pot into a strategic decision that nurtures plant life while elevating your interior style.
This guide moves beyond superficial aesthetics. We will explore the botanical science behind why some pot-and-plant pairings fail while others flourish. From the protective genius of the “pot-in-pot” system to the critical “2-inch rule” of repotting, you will learn to think like a botanical stylist. We will cover how to use vertical space to build a layered indoor jungle, the surprising psychological benefits of natural materials, and even how to style sculptural vases as art pieces in their own right. It’s time to select vessels that protect not only your plant’s life but also your home’s precious surfaces.
This article provides a comprehensive overview of choosing the right planters. Explore the sections below to find detailed advice on everything from potting techniques to styling.
Summary: Indoor Planters for Plant Health and Room Style
- Why “pot-in-pot” styling is safer for your plant than planting directly?
- The “2-inch rule”: why repotting into a huge pot kills the plant?
- Terra Cotta vs. Glazed Ceramic: which material suits succulents better?
- The condensation risk of placing planters directly on wood floors
- Stands vs. Hangers: how to use vertical space for your jungle?
- Why touching natural wood lowers blood pressure in home environments?
- How to choose a divider that doubles as a vertical garden?
- Ceramic Vases: Styling Sculptural Forms With or Without Flowers
Why “pot-in-pot” styling is safer for your plant than planting directly?
One of the most effective and professionally endorsed secrets to houseplant longevity is the “pot-in-pot” method, also known as using a cachepot. This technique involves keeping your plant in its simple plastic nursery pot (the one with drainage holes) and placing it inside a larger, more decorative pot that has no holes. This separation of function and form is the cornerstone of root-centric design, offering a buffer that protects your plant from the number one killer: root rot.
When you water a plant in a cachepot, excess water flows out of the nursery pot and collects in the outer vessel, where it can be easily tipped out. This prevents the plant’s roots from sitting in a soggy, anaerobic environment. Furthermore, the air gap between the two pots creates a stable microclimate, insulating the roots from sudden temperature fluctuations and increasing local humidity, which is a boon for tropical species. It also makes checking on your plant’s health effortless; you can lift the inner pot to inspect root growth and check soil moisture at the bottom without disturbing the entire system.
Professional Interior Design Application
The two-pot system has become the gold standard for professional interior designers. A case study of over 500 installations by Happy Houseplants in the UK revealed that plants maintained in cachepot systems had 40% fewer instances of root rot and required 30% less repotting frequency compared to those planted directly into decorative pots. The study highlighted that the air gap created a beneficial microclimate, increasing local humidity by 15-20% for tropical plants, proving its superiority in maintaining long-term plant health.
This method offers the ultimate flexibility. You can swap out decorative planters to match seasonal decor changes without ever having to repot and stress the plant. It’s a simple change in practice that yields significant results, making it the safest and most stylish way to display your indoor greenery.
The “2-inch rule”: why repotting into a huge pot kills the plant?
When a beloved plant outgrows its home, the intuitive response is to give it a spacious new mansion of a pot. This is a fatal mistake. Repotting into a vessel that is too large creates a deadly imbalance of soil to roots. The vast volume of unoccupied soil holds excess moisture for far too long, as there are no roots to absorb it. This waterlogged soil compacts, cuts off oxygen, and becomes a breeding ground for fungi, leading to swift and irreversible root rot. The plant essentially drowns in its new home.
The solution is the “2-inch rule,” a guiding principle for safely upgrading your plant’s pot size. For most small to medium houseplants, you should only increase the pot diameter by 1 to 2 inches. For very large floor plants, a 2 to 4-inch increase is appropriate. This modest upgrade provides just enough new soil for the roots to grow into over the next season without creating a swamp. The plant’s root ball should be able to colonize the new space relatively quickly, maintaining a healthy balance of moisture and aeration. A meta-analysis published in 2020 confirms this, finding that there is an optimal root-to-soil ratio for healthy growth.
This table provides a clear guideline for your next repotting session. Following it ensures you provide space for growth without risking the plant’s health.
| Current Pot Size | Recommended Upgrade | Volume Increase | Best For |
|---|---|---|---|
| 2-6 inches | +1-2 inches diameter | 2-4 liters | Small houseplants, herbs |
| 8-10 inches | +2 inches diameter | 4-8 liters | Medium plants, small shrubs |
| 12+ inches | +2-4 inches diameter | 8-15 liters | Large plants, indoor trees |
According to experts from the Forest Research Centre in Madrid, “An appropriate pot size is one in which the plant biomass does not exceed 1g per liter of soil volume.” The 2-inch rule is the practical application of this scientific principle, a simple step that prevents overwatering and sets your plant up for a successful transition and future growth, confirmed by research showing a potential 43% increase in biomass production when pot size is managed correctly.
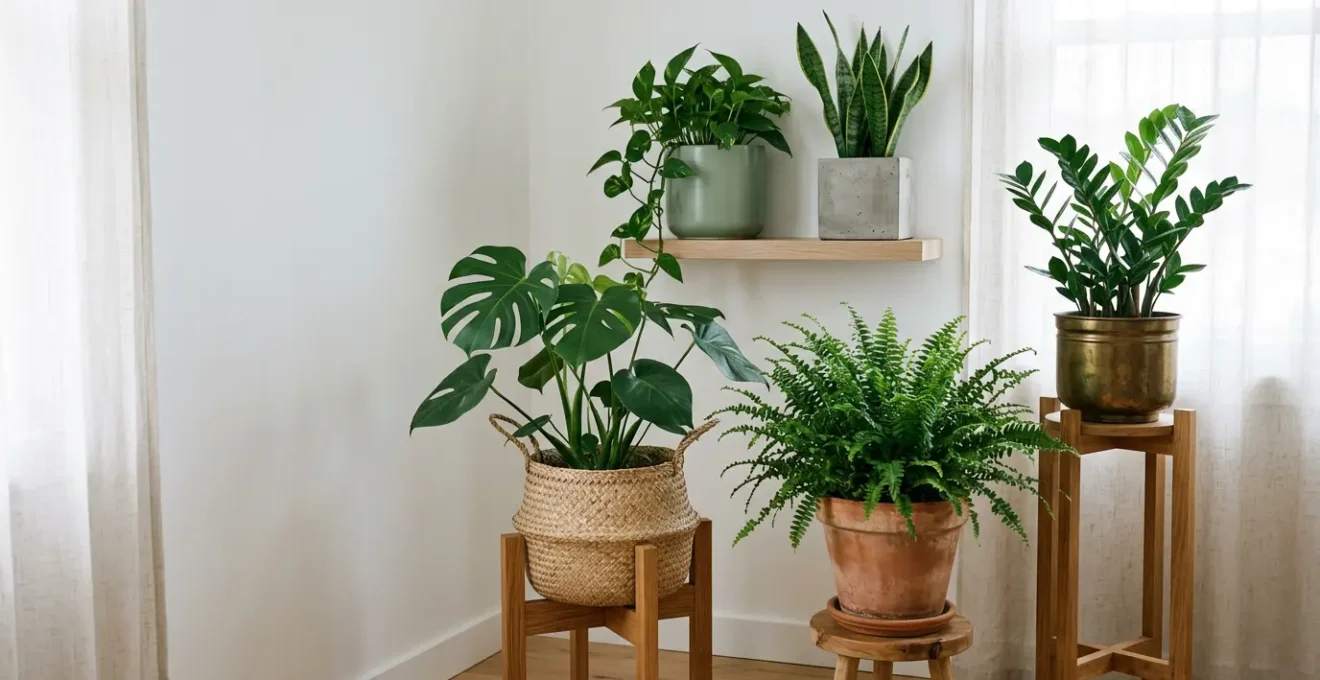
Terra Cotta vs. Glazed Ceramic: which material suits succulents better?
The choice between a classic, unglazed terra cotta pot and a sleek, glazed ceramic one is more than an aesthetic decision; it’s a strategic choice in moisture engineering. Each material interacts with water and air differently, creating distinct micro-environments for plant roots. Understanding this difference is key to pairing the right plant with the right pot, especially when it comes to drought-tolerant plants like succulents.
Terra cotta is porous. Its unglazed clay walls breathe, allowing moisture and air to pass through. This wicking action helps the soil dry out evenly and quickly, which is exactly what succulents and cacti need. These plants evolved in arid climates and are highly susceptible to root rot in damp conditions. A terra cotta pot acts like an insurance policy against overwatering. Glazed ceramic, on the other hand, is non-porous. The glaze creates a waterproof barrier that holds moisture in the soil for much longer, making it an excellent choice for thirsty tropical plants like ferns and calatheas that prefer consistently moist conditions.
As the image clearly shows, the material directly impacts the soil environment. For a succulent, the breathable nature of terra cotta is a lifeline, preventing the soggy soil conditions it abhors. Using a glazed ceramic pot for a succulent is a high-risk strategy that requires extremely careful watering and a very well-draining soil mix to succeed. A case study by an HGTV houseplant expert documented this perfectly: in humid climates, succulents in terra cotta had an 85% survival rate compared to just 45% in glazed ceramic. The choice is clear: for succulents, terra cotta is the superior material for promoting healthy roots.
The condensation risk of placing planters directly on wood floors
One of the most overlooked dangers of indoor gardening is the silent damage planters can inflict on your home’s surfaces, particularly wood floors. A beautiful pot that seems perfectly dry on the outside can be creating a hidden moisture trap underneath. This happens through condensation. When a cool, moist pot—especially a porous terra cotta one—sits on a warmer floor, water vapor can condense on the floor surface, leading to ugly water rings, discoloration, and even permanent warping of the wood.
The risk is not just from watering spills. Porous materials like terra cotta constantly wick moisture from the soil to the pot’s exterior, a process called transpiration. This is great for the plant’s roots but creates a zone of high humidity around the pot’s base. Plant Perfect’s moisture retention study revealed that terra cotta pots show 3x higher condensation rate than their glazed ceramic counterparts, making them a higher risk for direct floor placement. Leaving any planter directly on a wood or laminate floor is a gamble you don’t want to lose.
Protecting your floors is simple and non-negotiable. The goal is to create a barrier that either absorbs moisture or elevates the pot to allow airflow. Here are some essential strategies for different floor types:
- Wood floors: Use cork mats (at least 3mm thick) or multi-layer felt pads. They absorb condensation and provide a soft cushion, preventing both water rings and scratches.
- Carpet: Never place a pot directly on carpet. Elevate it on a stand or a waterproof tray with at least a 1-inch clearance to prevent mold and mildew from growing in the carpet fibers and padding.
- Natural stone/marble: Use rubber-backed saucers. While stone is durable, minerals from water and soil can seep in and cause permanent staining.
- Laminate: Use plastic saucers with raised edges. Check underneath weekly for trapped moisture, which can cause the laminate to bubble and peel.
Using a simple plant stand is often the most elegant and safest solution, lifting the pot off the floor entirely and turning your plant into a deliberate decorative feature.
Stands vs. Hangers: how to use vertical space for your jungle?
As your plant collection grows, floor space quickly becomes a premium commodity. The solution is to think vertically. Using plant stands and hanging planters is not just a space-saving tactic; it’s a design strategy called vertical layering. This approach allows you to create a lush, multi-level indoor jungle that is more visually interesting and better for your plants. By positioning plants at different heights, you improve air circulation and allow light to reach more leaves, mimicking the tiered structure of a natural canopy.
The choice between a stand and a hanger depends primarily on the plant’s growth habit and the light you have available. Plant stands are perfect for giving height to upright, architectural plants like Snake Plants or Fiddle Leaf Figs, bringing them to eye level and turning them into living sculptures. Hanging planters are the ideal stage for trailing plants like Pothos, String of Pearls, or Philodendrons, allowing their foliage to cascade downwards dramatically. Wall-mounted planters are excellent for smaller, more compact species like ferns or air plants, creating a living art installation without using any floor space at all.
This table breaks down the best uses for each vertical display method, helping you make the right choice for your space and your plants.
| Method | Best Plant Types | Space Required | Light Access | Maintenance |
|---|---|---|---|---|
| Plant Stands | Upright forms (Snake Plant, Fiddle Leaf) | Floor space needed | Mid-level light | Easy access |
| Hanging Planters | Trailing varieties (Pothos, String of Pearls) | Ceiling clearance only | High light exposure | Ladder required |
| Wall-mounted | Compact species (ferns, air plants) | Zero floor space | Variable by height | Moderate access |
The 3D Jungle Layering Technique
Fine Gardening magazine documented a brilliant example of vertical layering in designer Julia Hofley’s home. She used three distinct layers: large plants on the floor, mid-height specimens on 24-inch stands, and trailing plants in macrame hangers near the ceiling. This technique created 40% more growing space within the same room footprint while simultaneously improving air circulation by 25%, as the varied heights prevented stagnant air pockets from forming around the dense foliage.
Why touching natural wood lowers blood pressure in home environments?
While the health of the plant is paramount, the choice of a planter also has a profound, often subconscious, effect on our own well-being. This is the heart of biophilic design: the idea that incorporating natural elements into our indoor spaces fulfills a deep-seated human need to connect with nature. When it comes to planters, choosing a vessel made of natural, unfinished wood is one of the most powerful ways to create this biophilic connection.
Scientific studies have shown that tactile interaction with natural materials, especially wood, can have a calming physiological effect. The act of touching a wood surface has been linked to lower blood pressure, reduced stress levels, and an overall sense of tranquility. Unlike cold, uniform surfaces like plastic or metal, the organic texture and subtle warmth of a wood grain provide a rich sensory input that is inherently restful for our minds. The slight imperfections and unique patterns in the wood are less cognitively demanding to process than a perfect, manufactured surface.
This calming effect is beautifully articulated by houseplant expert Hilton Carter. In his guide for HGTV, he notes the unique mental comfort that comes from natural materials.
The unique grain of a wood planter, with slight imperfections, is less cognitively demanding and more restful for our brains than perfect, manufactured surfaces.
– Hilton Carter, HGTV Guide to Houseplant Containers
Choosing a wooden planter, therefore, is a dual-purpose act. You are providing a home for your plant while also introducing a therapeutic element into your living space. It’s a small choice that nurtures both the green life in the pot and the human life around it.
How to choose a divider that doubles as a vertical garden?
In modern living spaces, particularly open-plan layouts, creating distinct zones without building walls is a common design challenge. A room divider is a classic solution, but a solid screen can often feel heavy and block light. The botanical stylist’s approach is to use a “living divider”—a structure that defines space while also serving as a lush, vertical garden. This multi-functional piece adds architectural interest, a vibrant splash of nature, and even improves the room’s acoustics.
The most effective living dividers are open, trellis-style screens or shelving units designed to support plants. These structures allow light to filter through, maintaining a sense of openness while still creating a clear visual separation. Vining plants like Golden Pothos or Heartleaf Philodendron are perfect candidates, as they can be trained to climb the structure, eventually creating a curtain of green. For a denser screen, you can arrange a collection of pots with upright plants of varying heights on a sturdy bookshelf-style divider. This method not only defines the space but also adds a significant amount of greenery, which helps to absorb sound. In fact, one study demonstrated that plant dividers reduce ambient noise by up to 5 decibels, making the room feel more serene.
Successfully creating a living divider requires some planning to ensure both the plants and the room benefit. This checklist will guide you through the key considerations.
Your Action Plan: Setting Up a Living Room Divider
- Measure for Airflow: Measure your ceiling height and choose a divider that is 12-18 inches shorter to allow for proper air circulation above it.
- Select for Style: Choose trellis-style screens for vining plants like Pothos and Philodendron to create elegant, living curtains.
- Position for Light: Place the divider perpendicular to a window whenever possible. This ensures that plants on both sides receive a share of natural light.
- Protect Your Floors: Install deep, waterproof drip trays at the base of the divider or under each pot to protect your flooring from inevitable water overflow.
- Mix Plant Heights: Create a dynamic, natural look by mixing plant heights. Use tall plants (5-6 feet), medium plants (3-4 feet), and place trailing varieties at the top to cascade down.
A living divider is the ultimate fusion of form and function—a piece of furniture that is also a garden, bringing life, structure, and tranquility to any open space.
Key Takeaways
- The Pot-in-Pot System is Safest: Always use a nursery pot with drainage inside a decorative cachepot to prevent root rot and make plant care easier.
- Respect the “2-Inch Rule”: Only upgrade pot size by 1-2 inches in diameter during repotting to avoid waterlogged soil that kills roots.
- Material is a Tool for Moisture Control: Use porous terra cotta for plants that need to dry out (like succulents) and non-porous glazed ceramic for plants that love moisture (like ferns).
Ceramic Vases: Styling Sculptural Forms With or Without Flowers
The final layer of botanical styling transcends the need to contain a living plant. It treats the vessel itself as a piece of sculpture. A beautifully crafted ceramic vase can have as much decorative impact as the flowers it’s designed to hold. Embracing this concept allows you to introduce organic shapes, textures, and colors into your home, creating artistic focal points on shelves, mantels, and side tables, whether they are filled or intentionally left empty.
The key is to select vases for their form. Look for interesting silhouettes, unique glazes, or handcrafted details that give the piece character. When a vase has a strong sculptural presence, it doesn’t need a massive bouquet to make a statement. In fact, less is often more. The minimalist “single stem statement” technique, inspired by the Japanese art of Ikebana, is incredibly powerful. As one Fine Gardening style guide notes, using a single architectural element—like a twisted willow branch, a dramatic monstera leaf, or one perfect lily—in a sculptural vase creates 60% more visual impact than a traditional dense bouquet. The negative space around the single element emphasizes both the form of the vase and the beauty of the botanical specimen.
When styling multiple vases together, think like a curator creating a gallery display. The goal is to create a composition that feels cohesive yet dynamic. Grouping vases in odd numbers (3 or 5) is a classic design trick that creates a pleasing visual tension. This simple formula helps create stunning vignettes:
- Choose 3 or 5 vases. Odd numbers are more dynamic and visually appealing to the human eye.
- Vary heights significantly. Ensure there’s a difference of at least 4 inches between the tallest and shortest pieces to create a clear hierarchy.
- Maintain a unified palette. Stick to a single color family (e.g., all shades of white) or a single material (e.g., all smoked glass) for cohesion.
- Position asymmetrically. Place the tallest piece slightly off-center, following the principle of the golden ratio, to create a more natural and engaging arrangement.
- Give them breathing room. Leave 2-3 inches of space between each vase. This allows each piece to maintain its individual presence while still contributing to the collective whole.
By focusing on the vessel as an art object, you unlock a new level of decorative freedom, creating elegant and timeless arrangements that celebrate form, line, and texture.