
A truly functional floor plan is not about demolition; it is a precisely choreographed script for your daily life.
- Analyze movement patterns and daily routines before considering any layout changes.
- Prioritize structural honesty and psychological comfort over the simplistic trend of ‘open-concept everything’.
- Mastering micro-functional details, like landing zones and corner utility, is what separates a beautiful space from a usable one.
Recommendation: Before you even speak to a contractor, audit your daily life from morning coffee to unloading groceries. This ‘functional script’ is the blueprint your new layout must follow.
For many homeowners embarking on a renovation, the dream is a radical transformation. The impulse is to knock down walls, chasing a vision of bright, open-plan modernity seen in magazines. We imagine vast, light-filled spaces where life flows seamlessly. Yet, as an architect, I’ve seen the unfortunate aftermath of this approach: stunning homes that are functionally frustrating, noisy, and devoid of personal sanctuary. The common advice focuses on aesthetics and maximizing square footage, but often misses the fundamental purpose of a home’s architecture.
The prevailing belief is that a modern home must be an open one. But what if the true key to modern living isn’t a lack of walls, but a smarter use of them? What if the goal wasn’t just creating space, but choreographing movement and designing for psychological well-being? A successful floor plan is a functional script for your daily life. It anticipates your needs, streamlines your routines, and provides both spaces for connection and havens for retreat. It’s about structural honesty, understanding the ‘bones’ of your house and working with them, not just against them.
This guide moves beyond the open-plan debate. We will explore how to read a blueprint with a critical eye, analyze the engine of the home—the kitchen—for peak efficiency, and respect the structural realities that ensure your home’s integrity. We will delve into transforming wasted corners into functional assets and, most importantly, consider how a layout can reduce stress rather than amplify it. By the end, you’ll learn to see your home’s layout not as a collection of rooms, but as an integrated system designed to support your life.
To guide you through this architectural rethinking, this article is structured to build your expertise from the ground up. You will learn to deconstruct common myths, master practical analysis, and appreciate the small details that make a layout truly livable.
Summary: A Guide to Functional Home Architecture
- Myth: is knocking down every wall really the best way to modernize a home?
- How to read a floor plan blueprint like a pro to spot issues early?
- L-shape vs. U-shape kitchen: which layout maximizes efficiency for your square footage?
- The dangerous error of ignoring load-bearing walls during DIY planning
- How to add utility to dead corners and awkward alcoves in your plan?
- Open plan vs. segmented rooms: which layout reduces anxiety better?
- In what order should you restore features before starting wall decoration?
- The lack of surface space error that makes reading nooks unusable for tea drinkers
Myth: is knocking down every wall really the best way to modernize a home?
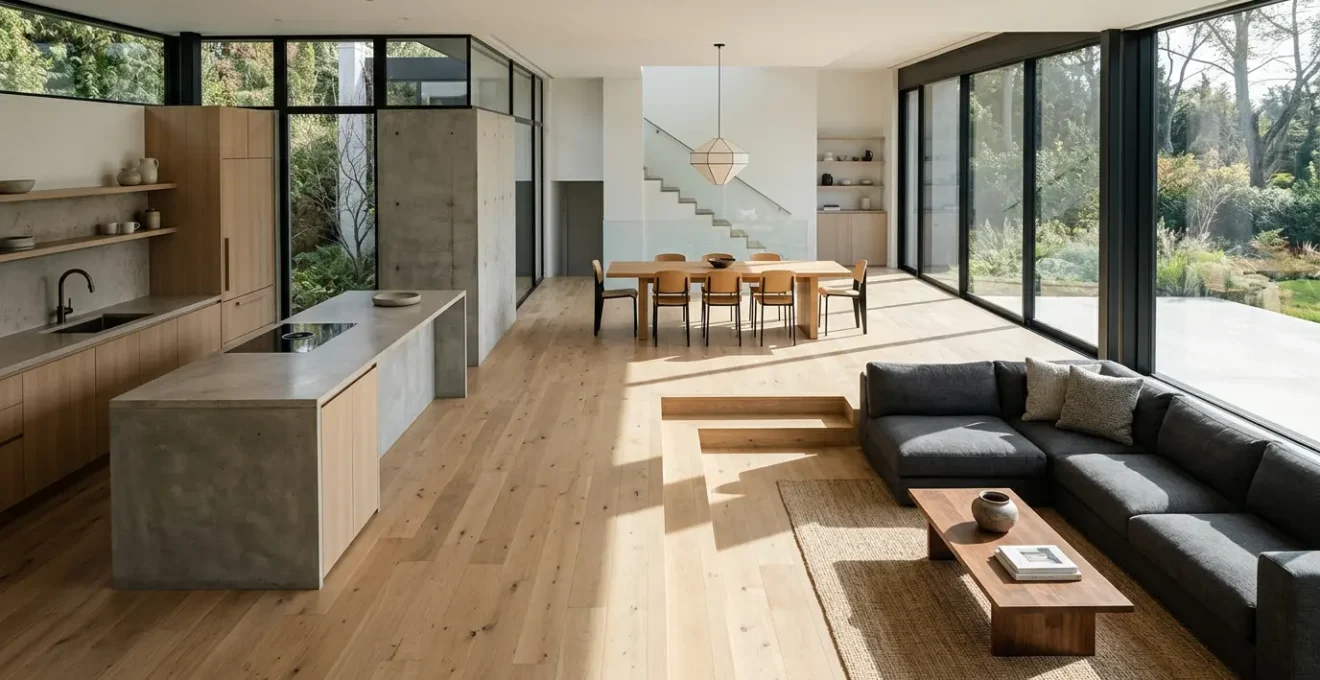
The sledgehammer-swinging reveal on renovation shows is a powerful image. It equates modernization with demolition, suggesting that the only path to a contemporary home is through the creation of a single, cavernous living space. This is the great myth of modern design. While open plans can foster a sense of spaciousness and light, they are not a universal solution. In reality, a more nuanced approach, often called a ‘broken-plan’ layout, is gaining traction in modern architecture for its ability to blend openness with function.
A broken-plan design maintains the visual connection and light flow of an open concept but uses subtle architectural cues to define zones. This creates a home that feels both connected and orderly. Instead of removing all walls, we use other tools to choreograph the space and create functional separation. This approach acknowledges that a family needs different zones for different activities—a noisy, active area for cooking and socializing, and a quiet corner for reading or working.
These dividers aren’t always solid walls. Consider these elegant and practical alternatives to full open-plan living:
- Install glass partitions to maintain light flow while creating crucial acoustic separation.
- Use different ceiling heights to visually define a dining area from a living area without a physical wall.
- Add architectural screens or slatted wood dividers for visual separation that still allows for conversation.
- Create level changes with sunken living areas or raised kitchen platforms.
- Incorporate sliding pocket doors or barn doors that offer the flexibility to open up or close off a space as needed.
The goal isn’t to recreate a maze of small, dark rooms. It’s about designing a ‘functional script’ for your home, where each area has a clear purpose, and the transition between them is both logical and beautiful. This method provides the airiness of an open plan with the privacy and utility that modern life demands.
How to read a floor plan blueprint like a pro to spot issues early?
A floor plan is more than a drawing; it’s the architectural DNA of your home. Learning to read it effectively is the single most important skill you can develop before a renovation. It allows you to spot costly and frustrating design flaws before a single wall is touched. Professionals don’t just see lines; they visualize movement, circulation, and daily life. They analyze blueprints to identify poor traffic patterns, awkward door swings, and inadequate ‘landing zones’—the critical counter space next to appliances.
To start thinking like an architect, you must mentally walk through the space. Trace your daily routines on the plan. Where do you enter with groceries? Is there a clear, unobstructed path to the kitchen counter, or do you have to navigate around an island or a sofa? Imagine the morning rush: can two people move through the main hallway without bumping into each other? These circulation paths are the arteries of your home, and any bottleneck will cause daily friction. Pay close attention to door swings; a poorly placed door can render a corner useless or create a constant obstruction.
The following illustration highlights the tools and focus required for a professional plan analysis. It’s a process of annotation, measurement, and visualization, not just a casual glance.
As you can see, this is an active process. By marking up your plans, you turn an abstract drawing into a dynamic model of your future life. This proactive analysis is your best defense against a layout that looks good on paper but fails the test of daily living.
Your Action Plan: Blueprint Reading Checklist
- Verify Dimensions: Start from the exterior walls and verify the overall dimensions match your space and requirements.
- Trace Movement: Trace daily movement patterns (like the morning routine or unloading groceries) to identify potential bottlenecks.
- Check Door Swings: Ensure door swings do not conflict with planned furniture placement or obstruct key traffic flows.
- Assess Landing Zones: Verify there is adequate counter space (landing zones) near each major appliance like the refrigerator and oven.
- Identify Mechanicals: Identify symbols for HVAC, plumbing, and electrical systems to assess their impact on room usage and potential relocation costs.
L-shape vs. U-shape kitchen: which layout maximizes efficiency for your square footage?
The kitchen is the engine of the home, and its layout dictates the efficiency of your daily routines. Among the most common configurations, the L-shape and U-shape layouts present two distinct approaches to organizing this critical space. The choice between them is not merely aesthetic; it’s a strategic decision based on your available square footage, cooking style, and desire for social interaction. Understanding the fundamental geometry of each will help you design a kitchen that works for you, not against you.
The core principle of kitchen efficiency is the ‘work triangle,’ the conceptual path between the refrigerator, sink, and stove. An ideal layout minimizes the steps between these three points. According to 2024 kitchen design standards, the triangle should be unobstructed, and each leg should measure between 4 and 9 feet, with a total perimeter of 13 to 26 feet. The L-shape and U-shape layouts achieve this in different ways, each with its own set of strengths and weaknesses related to storage, counter space, and traffic flow.
To help you decide, the following table breaks down the key differences between these two powerhouse layouts, based on a detailed comparative analysis.
| Feature | L-Shaped Kitchen | U-Shaped Kitchen |
|---|---|---|
| Work Triangle Efficiency | Creates diagonal paths that reduce walking distance | Perfect triangle with stations on three walls |
| Storage Capacity | Two walls of cabinets (moderate storage) | Three walls of cabinets (maximum storage) |
| Multiple Cooks | Open design allows easy movement for 2+ people | Can feel cramped with multiple cooks |
| Counter Space | Good with island addition | Excellent – continuous on three sides |
| Best For Space Size | Small to medium kitchens | Medium to large kitchens |
| Social Interaction | Excellent – open to other rooms | Limited – more enclosed feel |
Ultimately, the L-shape excels in smaller spaces and for households that value an open, social connection to adjacent rooms. The U-shape is a storage and counter-space champion, ideal for larger kitchens and serious cooks who prioritize a focused, highly efficient workspace over social interaction.
The dangerous error of ignoring load-bearing walls during DIY planning
In the excitement of reimagining a floor plan, it’s tempting to see every interior wall as a mere suggestion—a barrier waiting to be removed. This is the single most dangerous assumption in DIY renovation. Mistaking a load-bearing wall for a simple partition can have catastrophic consequences for the structural integrity of your entire home. These walls are not just dividers; they are integral parts of your home’s skeleton, transferring the weight from the roof and upper floors all the way down to the foundation.
Ignoring or improperly removing one can lead to sagging ceilings, cracked drywall, uneven floors, and, in the worst-case scenario, structural collapse. This is not an area for guesswork. While final confirmation must always come from a qualified structural engineer or architect, you can learn to spot the likely suspects. As the team at Balanced Architecture notes, an architectural eye is key to transforming a dysfunctional space. They state in their project analysis, “Since I’m an architect, I started with how we can fix the layout of the house to make it function better. There were awkward and unusable spaces all over the house.” This professional approach begins with understanding, not ignoring, the home’s structure.
Since I’m an architect, I started with how we can fix the layout of the house to make it function better. There were awkward and unusable spaces all over the house.
– Balanced Architecture, From Awkward Floor Plan to Functional Home
Identifying these critical walls is a process of deduction. Here are key indicators to look for:
- Check for Perpendicular Joists: In your basement or attic, look at the direction of the floor joists (the horizontal beams). Walls that run perpendicular to the joists are often load-bearing.
- Look for Stacked Walls: If a wall on the main floor has another wall directly above it on the second floor, it’s very likely part of the structural system.
- Identify Central Walls: Walls located near the center of the house are frequently responsible for supporting a significant portion of the roof and floor loads.
- Spot Columns and Beams: Any wall that connects to a substantial beam in the ceiling or a support column in the basement is almost certainly structural.
- Consult Original Plans: The surest preliminary check is to locate your home’s original building plans. If any doubt remains, the only safe course of action is to hire a structural engineer for a definitive assessment.
Treating every wall with suspicion until proven otherwise is the hallmark of a smart renovator. Structural honesty is the foundation of a safe and successful project.
How to add utility to dead corners and awkward alcoves in your plan?
A great floor plan leaves no space behind. Those awkward corners, forgotten alcoves, and strange nooks created by previous renovations are not liabilities; they are opportunities. With strategic design, these ‘dead zones’ can be transformed into some of the most functional and charming features of your home. The key is to stop seeing them as leftover space and start seeing them as blank canvases for ‘micro-functionality’—small, dedicated solutions that serve a specific purpose.
Instead of trying to force a standard piece of furniture into a non-standard space, think custom. Built-in solutions are your most powerful tool. A deep, awkward corner in a living room can become a floor-to-ceiling library with a diagonal bookshelf. The space under a staircase, often a dark void, can be converted into a compact home office, a wine cellar, or a series of pull-out storage drawers. An unused alcove in a hallway is the perfect spot for a built-in bench with hidden storage below for shoes and a charging station for devices above.
The visual below demonstrates how a once-awkward corner can be reclaimed with smart, integrated design, adding both storage and a new layer of utility to the room.
This kind of thinking, which is central to optimizing smaller homes, involves ‘zoning’ spaces through thoughtful furniture placement, lighting, and built-in features rather than just walls. The goal is to optimize every square inch so your home feels expansive and functional, regardless of its actual footprint. By scripting a purpose for every corner, you write a more efficient story for your daily life.
Open plan vs. segmented rooms: which layout reduces anxiety better?
The conversation about floor plans usually revolves around aesthetics and flow, but the psychological impact of a layout is just as critical. The decision between an open plan and segmented rooms has profound implications for our mental well-being, particularly regarding anxiety and the need for privacy. While open layouts are celebrated for promoting social connection, they can also become a source of constant, low-level stress. The lack of acoustic and visual separation means there is often no escape from household noise, activity, and clutter.
This sensory overload is not just a minor annoyance. A World Economic Forum study, referenced by House Digest, found that noise amplified negative mood in open-plan offices by 25%, and the same principle applies to our homes. For family members needing quiet to focus, or for anyone who is sensitive to their environment, a single large chamber can feel chaotic and draining. Privacy is not a luxury; it’s a necessary component of mental health. The constant ‘on-stage’ feeling of an open plan can prevent us from fully relaxing and recharging.
This is where the ‘broken-plan’ concept becomes essential not just for function, but for mental health. It advocates for a home that provides a spectrum of spaces. The architecture itself should offer options for retreat. This can be achieved through:
- A ‘soft room’ or quiet nook: A dedicated space, no matter how small, with soft materiality, comfortable seating, and dimmable light, designed for decompression.
- Sound-buffering surfaces: Intentionally using materials like area rugs, plush curtains, upholstered furniture, and well-stocked bookcases to absorb sound and reduce echo.
- Semi-private zones: Using partial walls, screens, or large furniture to create a sense of enclosure and psychological safety without completely closing off a room.
A well-designed home supports all facets of life—the social and the solitary. It offers a bustling, connected hub for family life, but also respects each individual’s need for a quiet sanctuary. The best layout is one that gives you a choice.
In what order should you restore features before starting wall decoration?
A successful renovation is built on a logical sequence of operations. Jumping ahead to the exciting finishes, like painting and decorating, before completing the foundational work is a recipe for disaster. Any architect or seasoned contractor will tell you that the project’s success and budget depend on doing things in the right order. Restoring the core features of a home must follow a “deepest first” principle, moving from the hidden structural elements outward to the visible surfaces.
This structured approach prevents you from having to undo expensive finish work to fix a deeper issue. Imagine installing and painting beautiful new drywall, only to realize you need to run new plumbing or electrical wiring behind it. The cost, mess, and delay are entirely avoidable. The proper sequence ensures that each trade builds upon a solid, completed foundation laid by the previous one. This is especially critical when integrating modern systems like smart home infrastructure into an older structure.
Before a single can of paint is opened, you must follow a professional restoration sequence. The following order of operations is critical for a smooth, efficient, and cost-effective project:
- Phase 1: Structural Work. This always comes first. Address any issues with the foundation, support beams, subfloor repairs, or framing. This is the skeleton of your house.
- Phase 2: In-Wall Systems (Rough-in). With the walls open, this is the time to update plumbing, electrical wiring, and HVAC ductwork.
- Phase 3: Smart Home Infrastructure. Before the walls are closed, run all low-voltage wiring. This includes ethernet cables for reliable internet, speaker wires, and conduits for future technologies.
- Phase 4: Insulation and Wall Surfaces. Once all in-wall work is inspected and approved, install insulation and then hang, tape, and finish the drywall or plaster.
- Phase 5: Flooring Installation. With the messy wall work complete, you can now install your finished flooring. Some contractors prefer to do this after painting to avoid spills, but this sequence protects the floor from ladder scuffs.
- Phase 6: Final Wall Preparation. Only now should you prime and apply the final coats of paint or wallpaper.
Following this sequence is not just best practice; it is the only way to ensure quality and avoid the costly process of re-doing work. It respects the logic of construction and provides a clear roadmap for your project.
Key Takeaways
- A functional floor plan is a ‘script’ for daily life; choreograph movement and routines before you ever consider removing a wall.
- Structural honesty is non-negotiable. Learn to identify and design with your home’s load-bearing elements, not against them.
- The ultimate usability of a space is defined by its micro-functional details, like having a ‘landing zone’ for keys or a surface for a cup of tea in a reading nook.
The lack of surface space error that makes reading nooks unusable for tea drinkers
We’ve discussed grand architectural concepts—flow, zoning, and structure. But often, the success or failure of a floor plan hinges on the smallest details. There is no better example of this than the “unusable reading nook.” Many designs feature a beautifully upholstered bench tucked into a sunny window—a perfect picture. But when someone actually tries to use it with a book and a cup of tea, the flaw becomes immediately apparent: there is nowhere to put the cup. This seemingly minor oversight renders the entire feature dysfunctional.
This is the ‘lack of surface space’ error, and it extends to every part of the home. A functional entryway needs a ‘landing strip’—a console or shelf for keys and mail. A luxurious bathtub is frustrating without a ledge for soap and a book. A bedroom feels incomplete without a nightstand large enough for a lamp, a phone, and a glass of water. These small surfaces are the unsung heroes of a functional home. They are the practical touchpoints that support our daily actions.
Thinking in zones—a quiet zone for bedrooms, an active zone for the kitchen and living areas, and a service zone for utilities—helps organize the macro layout. But within each zone, you must plan for this micro-functionality. Here are some minimum surface requirements to consider in your plan:
- Reading nook: A side table or built-in ledge at least 12-18 inches wide.
- Entryway: A console table or floating shelf 10-12 inches deep.
- Bathtub area: A corner shelf or integrated ledge at least 8-10 inches deep.
- Home gym space: A small wall-mounted shelf for a water bottle and phone.
- Bedroom: A nightstand with a minimum surface of 16×16 inches and access to power.
This attention to detail is what elevates a floor plan from a simple drawing to a thoughtful design. It demonstrates an understanding not just of space, but of the people who will live in it. It’s the final, crucial step in writing a functional script for your home—ensuring every scene has the props it needs.
To bring these architectural principles into your own project, the next step is to begin drafting the functional script for your own life. Start by observing and documenting your daily routines, identifying friction points in your current layout, and applying these structural and functional insights to your planning.