
Achieving true 100% blackout is an engineering challenge, not a shopping one; the curtain itself is only one component of a complete light and thermal control system.
- Standard installations fail because they ignore the physics of light leakage at the edges, top, and bottom.
- The highest thermal and acoustic benefits are only unlocked when the curtain creates a sealed air pocket against the window.
Recommendation: Stop thinking about buying a “blackout curtain” and start designing a “blackout system” by mastering rod placement, curtain dimensions, and edge sealing techniques.
For shift workers trying to sleep during the day or parents creating an optimal nap environment for an infant, the need for darkness is absolute. It’s not about reducing glare; it’s about eliminating light as a biological signal that disrupts deep, restorative sleep. Many assume that any product labeled “blackout” will suffice, leading to frustrating installations that still allow persistent slivers of light to penetrate the room. This common failure stems from a fundamental misunderstanding: a high-performance blackout curtain is not merely a piece of fabric, but the core of a precisely engineered system.
The market offers countless options, from simple panels to complex layered treatments, often focusing on color and style. However, true effectiveness has little to do with the decorative face fabric—a white curtain can be a better blackout tool than a black one if engineered correctly. The technology lies in the dense core weave or the impermeable backing. But even the most advanced fabric is rendered ineffective by poor installation. Gaps at the sides, top, or bottom create channels for light and compromise the thermal barrier, negating the investment. The goal is to create a complete seal, transforming a simple window covering into a high-performance environmental shield.
This guide moves beyond generic advice. We will deconstruct the common failure points from a textile engineering perspective, focusing on the principles of light and heat transfer. We will analyze the critical decisions in system design—from rod placement and curtain dimensions to the choice between integrated curtains and separate liners. By understanding the science behind total darkness, you can build a sleep sanctuary that delivers quantifiable improvements in both sleep quality and home energy efficiency, ensuring your investment performs as intended.
This article provides a detailed breakdown of the technical considerations for creating a true blackout environment. Explore the sections below to master each component of your window treatment system.
Summary: The Complete Guide to Blackout System Engineering
- Why standard width curtains always leave light gaps at the edges?
- How much heat loss can thermal blackout curtains prevent in winter?
- Curtains vs. Liners: should you buy 2-in-1 or add a liner to existing drapes?
- The rod placement mistake that lets light bleed over the top
- How to wash blackout curtains without destroying the rubber backing?
- The “blue light” mistake: why charging phones near the bed destroys deep sleep
- Sheer curtains vs. blinds: which maximizes light while keeping privacy?
- Dimmer Switches: Transforming Room Atmosphere and Saving Energy
Why standard width curtains always leave light gaps at the edges?
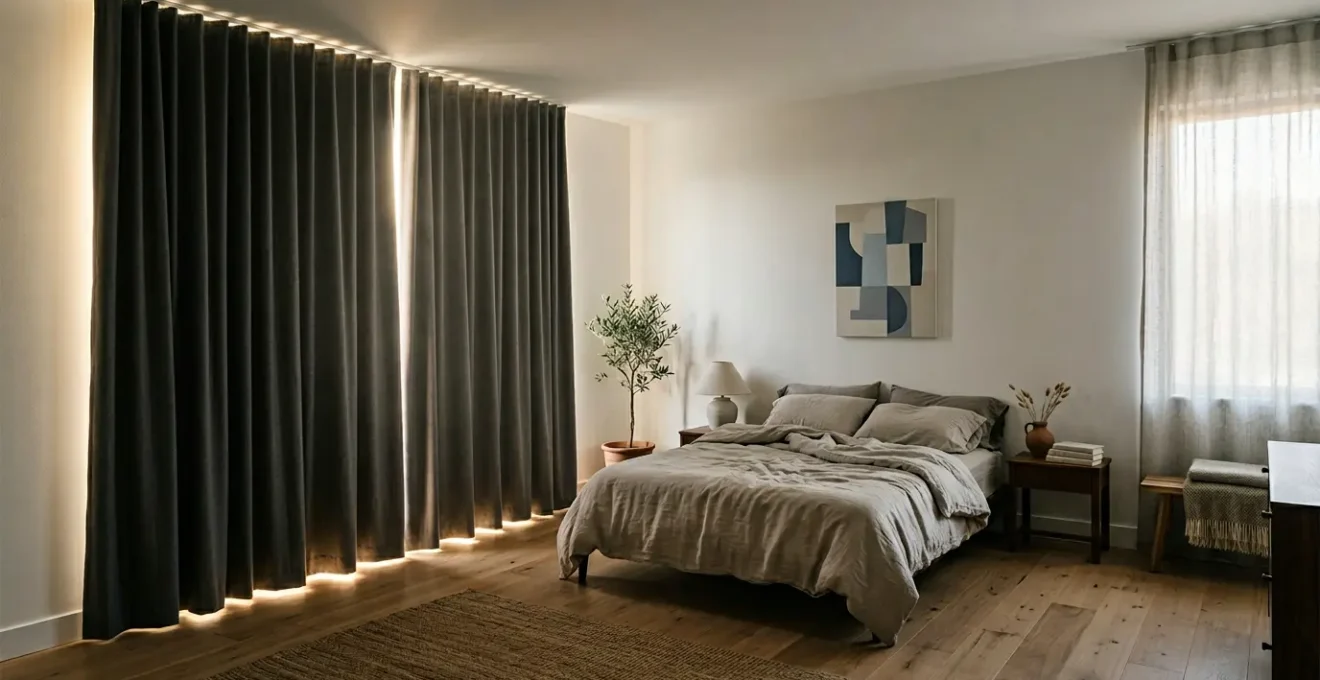
The most common failure in a blackout setup is the persistent vertical line of light that bleeds from the curtain’s edges. This isn’t a product defect; it’s a predictable outcome of physics and improper sizing. Light doesn’t just travel in straight lines; it diffracts, or bends, around obstacles. When a curtain hangs even half an inch from the wall, light from outside will bend around the fabric edge and into the room, creating what’s known as a “pillar of light” effect. Standard-width curtains are designed for decorative coverage, not for creating a hermetic seal.
To defeat this, the curtain must be wide enough to wrap around the window frame and press against the wall, creating a physical barrier. The industry formula for true blackout coverage is to specify a curtain width that is at least 1.5 times the width of the window it’s covering. This provides the necessary fullness to eliminate gaps. Furthermore, the material properties play a role. Heavier fabrics with triple-weave construction or foam backings, especially those with weighted hems, are less susceptible to billowing from air currents and naturally hang more flush against the wall, improving the integrity of the seal.
This principle of creating a complete seal is not just for light blocking; it’s fundamental to thermal performance. A technical paper from the Masdar City project documented that properly installed blackout curtains with sealed edges were a key factor in a 38% reduction in residential cooling demand. The study highlighted that even minor light leaks indicated a breach in the thermal barrier, significantly reducing its effectiveness.
As this detailed image shows, the texture of the fabric and its proximity to the wall are critical variables. Achieving a perfect seal often requires going beyond just hanging the curtain. Techniques like using adhesive magnetic or Velcro strips along the curtain edge and the wall can create a fully light-proof, damage-free seal that completes the system and delivers total darkness.
How much heat loss can thermal blackout curtains prevent in winter?
While known for blocking light, the thermal performance of blackout curtains is a significant and often underestimated benefit. Windows are a primary source of thermal exchange in a home, responsible for up to 30% of residential heating and cooling energy loss. A correctly installed thermal blackout curtain acts as an insulated barrier, creating a pocket of dead air between the curtain and the window pane. This air pocket is a poor conductor of heat, dramatically slowing the rate at which warmth escapes during winter and heat enters during summer.
The effectiveness of this barrier is quantifiable. Research from credible sources confirms the significant impact these window treatments can have on energy consumption. For instance, some studies indicate that medium-colored draperies with a white-plastic backing can reduce heat loss by up to 60% in winter. This level of performance is contingent on creating the sealed air gap discussed previously; a curtain that billows or has gaps offers minimal thermal resistance.
The R-value, a measure of thermal resistance, varies based on the curtain’s material and, more importantly, its installation. A simple, off-the-shelf blackout panel might offer a negligible R-value of 1. However, by creating a comprehensive system, you can achieve performance comparable to specialized insulation products. The following table illustrates how layering and sealing components directly impacts thermal efficiency.
| Configuration | Heat Loss Reduction | R-Value Range | Annual Savings |
|---|---|---|---|
| Good: Standard Blackout Curtain | 10% | R-1 | $50-75 |
| Better: Floor-to-Ceiling Thermal Curtain | 25% | R-2 to R-3 | $100-150 |
| Best: Thermal Curtain + Magnetic Edge Seals + Cornice | 40% | R-3 to R-6 | $200-300 |
As the data shows, moving from a “Good” to a “Best” configuration involves system-level thinking. Adding a cornice box at the top prevents air from circulating over the curtain rod (convection), while magnetic edge seals stop drafts. This transforms the curtain from a simple shade into a dynamic insulation component of your home’s building envelope, yielding substantial energy savings over its lifespan.
Curtains vs. Liners: should you buy 2-in-1 or add a liner to existing drapes?
When implementing a blackout solution, a key architectural decision is whether to use an integrated (2-in-1) blackout curtain or to add a separate blackout liner to your existing or new decorative curtains. While 2-in-1 curtains offer simplicity, a separate liner system provides superior long-term flexibility, maintenance, and even performance in certain areas. An integrated curtain marries the decorative fabric to the blackout backing permanently. This means your style choice is locked in, and the entire heavy unit must be washed together, which can be cumbersome and stressful on the materials.
A separate liner, hung on a second track or a double rod, decouples the function from the aesthetic. This allows you to change your decorative curtains with the seasons or as your interior design evolves, without sacrificing the high-performance blackout and thermal core. This modular approach also simplifies maintenance, as the lighter decorative curtain and the robust liner can be washed separately according to their specific material requirements. Furthermore, the air gap created between the two layers of fabric enhances both thermal insulation and acoustic dampening, often providing better sound reduction than a single, thick 2-in-1 panel.
This strategy is championed by design professionals for its practicality. As interior design expert Sarah Johnson notes:
Separating the blackout liner from the decorative curtain is a superior long-term strategy. This allows for seasonal style changes without sacrificing the high-performance blackout and thermal core.
– Sarah Johnson, Mix and Match Design Blog
The following decision matrix breaks down the trade-offs to help you determine the best engineering choice for your specific needs and budget.
| Criteria | 2-in-1 Blackout Curtains | Separate Blackout Liner |
|---|---|---|
| Initial Cost | Higher ($100-200) | Lower ($30-60) |
| Long-term Flexibility | Limited (fixed style) | High (change decor anytime) |
| Washing & Maintenance | Difficult (heavy single unit) | Easy (wash separately) |
| Acoustic Dampening | Good | Better (air gap between layers) |
| Light Blocking | Excellent | Excellent if properly installed |
The rod placement mistake that lets light bleed over the top
Even with perfectly sized curtains and sealed edges, many installations are defeated by a halo of light bleeding from the top. This failure is almost always due to one critical error: incorrect curtain rod placement. The common DIY approach is to mount the rod just an inch or two above the window frame. This is insufficient. Light from the sky will stream downwards, hit the top of the window, and pour into the room over the top of the curtain.
To prevent this, the rod must be mounted significantly higher. The professional standard is to place the rod 4-6 inches above the window frame. This creates a “light dam,” where the extra curtain fabric above the window physically blocks the downward path of light. This “sweet spot” is a balance; mounting it too high can create operational difficulties or an awkward aesthetic, but this 4-6 inch range is optimal for light blocking. It also has the added benefit of making the window appear larger and the ceiling higher.
The type of rod is also a critical system component. Standard decorative rods with finials leave a large gap between the wall and the first grommet or hook, creating side light leakage. A wraparound or return rod, which curves at the ends to allow the curtain to be pulled flush against the wall, is a superior engineering choice. For the ultimate solution, a ceiling-mounted track or the use of a pelmet or cornice box completely conceals the top of the curtain and rod, creating a 100% light-proof canopy.
Professional Rod Installation Checklist for Zero Light Bleed
- Mount rod 4-6 inches above window frame (the optimal ‘sweet spot’ for light blocking without operational issues).
- Choose wraparound or return rods over standard decorative rods to eliminate side gaps.
- For grommet curtains, install a pelmet or cornice box to conceal the inevitable light ‘scallops’ at the top.
- Use ceiling-mounted tracks for the ultimate architectural solution, creating a light-proof canopy.
- Apply the ‘Drapery Pin Trick’: Use special pins to push rod-pocket curtains flush against the rod, closing tiny gaps.
Getting this installation right from the start is paramount because, for most households, window coverings are a “set it and forget it” feature. A U.S. Department of Energy study found that 75% of residential window coverings remain in the same position day after day. This statistic underscores the importance of perfecting the initial setup to ensure passive, continuous performance.
How to wash blackout curtains without destroying the rubber backing?
The high-performance backing on many blackout curtains—typically a layer of acrylic or synthetic foam—is the technology responsible for their light and thermal insulation properties. It is also their greatest vulnerability. Improper washing can cause this backing to crack, become sticky, or peel away from the face fabric, permanently destroying the curtain’s effectiveness. This is not a manufacturing defect but a chemical reaction caused by heat and harsh detergents.
The backing is a polymer-based coating. Heat from hot water or a standard tumble dryer cycle causes polymer plasticization, a process where the material softens, loses its structure, and can fuse to itself or other surfaces. Standard laundry detergents, especially those containing enzymes or “optical brighteners,” are formulated to break down organic stains but can also aggressively degrade the synthetic polymers in the backing. Consumer reports show that this deterioration can occur in as few as 2-3 wash cycles, turning a significant investment into a complete loss.
To preserve the integrity of the backing, a precise, low-impact cleaning protocol is required. The primary goal is to avoid heat and harsh chemicals at all costs. Gentle, infrequent cleaning is key. For minor stains, spot-cleaning with a soft cloth, cool water, and a drop of clear, pH-neutral dish soap is always the preferred first line of defense. When a full wash is unavoidable, the following professional protocol must be followed to prevent irreversible damage.
- Use cold water only on a delicate or hand-wash cycle to prevent any form of heat damage.
- Select a pH-neutral, enzyme-free detergent specifically designed for delicates. Avoid all products with optical brighteners.
- Run an extra rinse cycle to ensure all detergent residue, which can cause stickiness over time, is completely removed.
- Never use a heated dry cycle. Tumble dry on an “air fluff” or “no heat” setting, ideally with wool dryer balls to soften the fabric and prevent clumping.
- The safest method is to hang-dry the curtains away from direct sunlight, as intense UV exposure can also degrade the backing over time.
- For routine maintenance, vacuum curtains weekly with a soft brush attachment to remove dust and allergens, minimizing the need for full washing.
The “blue light” mistake: why charging phones near the bed destroys deep sleep
After engineering a perfect blackout system to eliminate external light, the final step is to audit the sleep environment itself for sources of internal light pollution. A common mistake is to overlook the seemingly insignificant glow from electronic devices within the bedroom. The pinprick of light from a phone charger, a television’s standby LED, or a digital alarm clock can be enough to disrupt the body’s production of melatonin, the hormone that regulates sleep-wake cycles.
The human eye is exquisitely sensitive to light, especially blue-spectrum light emitted by most LEDs. This is a vestige of our evolutionary history, where even the faintest moonlight could signal the brain that it wasn’t time for deep sleep. Modern science confirms this sensitivity; research on melatonin suppression shows that light levels as low as 1-2 lux—the equivalent of a single charger LED in a dark room—can interfere with circadian rhythms and prevent you from reaching the most restorative stages of sleep.
For a shift worker or a light-sensitive individual, achieving true darkness means going beyond the window. Once the macro problem of external light is solved with blackout curtains, a micro-audit of the room is necessary to eliminate these tiny but potent sources of sleep disruption. The goal is to create a “sleep sanctuary” that is devoid of any artificial light. The true test of a successfully blacked-out room is simple: after your eyes have adjusted for a few minutes, you should not be able to see your hand in front of your face.
Your Action Plan: The Post-Blackout Sleep Sanctuary Audit
- External Light: Install a complete blackout curtain system as the primary shield against all external light pollution.
- Device LEDs: Cover all indicator lights on televisions, power strips, and chargers with black electrical tape or specialized light-blocking stickers.
- Alarm Clocks: Turn the clock to face the wall, move it to floor level, or switch to a model with a red-light display, which is the least disruptive to melatonin.
- Charging Station: Create a designated charging area for all phones, tablets, and smartwatches outside of the bedroom.
- Nightlights: If a nightlight is essential, use only a dim, red-light version and place it low to the ground.
Sheer curtains vs. blinds: which maximizes light while keeping privacy?
A complete light management system addresses the full 24-hour cycle. While total darkness is the goal for sleep, maximizing natural light during waking hours is crucial for well-being and energy savings. The challenge is to do so without sacrificing daytime privacy, especially in urban or overlooked settings. This is where a layered window treatment, combining a daytime privacy solution with your nighttime blackout curtain, becomes essential.
The two most common options for daytime use are sheer curtains and blinds. Sheer curtains excel at diffusing light, bathing a room in a soft, even glow while obscuring the view from the outside. They offer high light transmission but only a medium level of privacy. Blinds, such as Venetian or top-down/bottom-up models, provide superior privacy control, allowing you to precisely angle the slats or position the shade to block sightlines while still letting in light. However, they can create harsh lines of light and shadow and may conflict visually with the soft drapery of the blackout curtains.
For a seamless system, the combination of sheer curtains on an inner track and blackout curtains on an outer track is often the most effective and elegant solution. This “Double Rod System” is a key enabler for 24-hour light control. As noted in the HGTV Design Guide:
The Double Rod System is the key enabler: hang sheers on the inner track for daytime privacy and blackout curtains on the outer track for nighttime and insulation.
– Window Treatment Specialist, HGTV Design Guide 2025
This approach gives you the best of both worlds: soft, private, natural light during the day and absolute, insulated darkness at night. The table below compares the performance of different daytime privacy options when used in concert with a blackout system.
| Option | Light Transmission | Privacy Level | View-Through Quality | Works with Blackout |
|---|---|---|---|---|
| Sheer Curtains | High (70-80%) | Medium | Soft-focus view | Excellent (double rod) |
| Linen Curtains | Medium (40-50%) | High | Obscured | Good |
| Top-Down Blinds | Adjustable | High | Horizontal lines | Fair (visual conflict) |
| Frosted Film | Medium (50%) | Very High | None | Excellent (permanent) |
Key Takeaways
- True blackout performance is an engineered system, not a single product; every gap defeats the purpose.
- Correct rod placement (4-6 inches above the frame) and curtain width (1.5x window width) are non-negotiable for blocking light.
- The air pocket created by a sealed curtain is what provides significant thermal insulation (R-value) and energy savings.
Dimmer Switches: Transforming Room Atmosphere and Saving Energy
The final evolution of a light management system is to integrate active controls with the passive solution of blackout curtains. While curtains provide the essential binary state—total darkness—dimmer switches offer nuanced control over artificial light, allowing you to fine-tune the room’s atmosphere and support your body’s natural circadian rhythms. This combination transforms the bedroom from a simple sleeping space into a highly optimized environment for both rest and waking.
Smart dimmers, in particular, can be programmed to work in concert with your sleep schedule. A powerful application of this synergy is the “Budget Sunrise Simulation.” By keeping the blackout curtains closed to ensure total darkness during sleep, a smart dimmer connected to a bedside lamp can be programmed to begin gradually increasing light intensity 20-30 minutes before your alarm time. This gentle, progressive awakening mimics a natural sunrise, signaling your body to suppress melatonin and begin producing cortisol, the hormone associated with alertness. This helps to reduce sleep inertia, the grogginess and disorientation felt upon waking abruptly in a dark room.
Case Study: Smart Dimmer + Blackout Curtain Sleep System Implementation
A home automation study tracked households implementing a “Budget Sunrise Simulation” system. This involved combining total-blackout curtains with smart dimmers programmed for gradual morning light. Participants reported a 40% improvement in subjective morning alertness and a 25% reduction in sleep inertia compared to waking with a standard alarm in a dark room. The system’s success relies on the curtains providing the absolute darkness needed for deep sleep, which then allows the simulated sunrise to have maximum biological effect.
This integrated approach also yields further energy savings. Blackout curtains reduce the load on HVAC systems, while dimmers reduce electricity consumption from lighting—dimming a light by 25% can save about 20% in electricity. In fact, studies on combined passive and active energy management show a potential for up to a 25% reduction in overall energy consumption for a given room. By combining these two technologies, you create a holistic system that enhances well-being, improves sleep quality, and delivers maximum energy efficiency.
By approaching your window treatments as an engineered system, you can move beyond the common frustrations of inadequate light blocking and unlock the full potential of your investment. This method ensures not only perfect darkness for restorative sleep but also significant gains in thermal and acoustic comfort, creating a true sanctuary in your home. Take the next step by methodically assessing your windows and designing a system that addresses every potential point of failure.