
The flat, uninspired feeling of your room at night isn’t a design flaw—it’s an over-reliance on a single, harsh overhead light.
- True atmosphere is achieved not by adding light, but by strategically layering it to create pools of warmth and intentional shadows.
- Combining floor lamps, table lamps, and accent lights at different heights sculpts the room, adding perceived depth and visual interest.
Recommendation: Turn off the “big light” for a week. Instead, use at least three smaller lamps to create a visual triangle and see how your perception of the space transforms.
There’s a universally shared, slightly jarring experience: entering a room at night and flipping the switch. The “big light” floods the space with a flat, uniform glare, instantly erasing all nuance, shadow, and intimacy. Every corner is exposed, every surface rendered in stark, unforgiving detail. We accept this as a necessary utility, the price of vision after dusk. Many try to solve this by adding more lamps, hoping that quantity will somehow create quality. But this often just adds more chaotic brightness.
But what if the true key to a beautifully atmospheric room isn’t about illumination, but about its opposite? What if the secret lies in sculpting the space with carefully placed pools of light and embracing the shadows they create? This isn’t about just seeing; it’s about feeling. It’s about treating light as a tangible material, one that can be layered, shaped, and directed to fundamentally alter the perception of a room’s size, depth, and mood. By moving away from a single point of failure—the overhead light—we can start designing our evening environment with intention.
This guide will walk you through the optical and psychological principles of light layering. We will explore how to use ambient floor lamps not just as light sources, but as tools to craft cozy corners, expand visual height, and create a dynamic, inviting atmosphere that shifts and evolves with your needs throughout the evening.
Summary: A Designer’s Guide to Ambient Lighting
- Why reliance on overhead lights kills the intimate atmosphere of a room?
- How to layer light at different heights to add depth to your room?
- Arc lamps vs. torchiere: which style expands visual height better?
- The positioning error that causes annoying glare on your TV screen
- How to use smart bulbs in floor lamps to shift from work mode to relax mode?
- How to position mirrors to double the natural light in deep rooms?
- 3000K vs. 4000K: which bulb temperature flatters your interior finishes best?
- Dimmer Switches: Transforming Room Atmosphere and Saving Energy
Why reliance on overhead lights kills the intimate atmosphere of a room?
The single overhead fixture, often called the “big light,” is the antithesis of atmosphere. It casts light downward from a high angle, creating harsh shadows and a flat, monotonous wash of illumination. This creates what lighting designers call the “interrogation effect”—an environment devoid of mystery or softness. Because the light source is above our natural eye line, it fails to create the pools of warm light at human scale that foster a sense of intimacy and comfort. Our eyes are drawn to brightness, and when the only source is above, the lower half of the room—where we live, sit, and connect—is left in a comparative, uninviting gloom.
The effect is almost psychological. A room bathed in this uniform brightness feels exposed and static. There is no visual journey for the eye to take, no gentle gradient from light to shadow. One social media influencer, Ben Nelson, demonstrated this by transforming his living room with a small “sunset lamp.” He showed how the “jump-scare inducing overhead light” created a harsh environment, which was completely softened by the warm, layered glow of the small accent lamp, proving that the scale of the effect is far greater than the size of the fixture.
The goal is to replace this single point of failure with multiple ambient sources. By placing floor and table lamps in corners and on surfaces, you create illumination at or below eye level. This simple shift breaks the monotony, introduces gentle shadows, and invites people into a space rather than putting them on display. It’s the foundational step in moving from merely lighting a room to consciously crafting its mood.
How to layer light at different heights to add depth to your room?
Layering light is the art of using multiple light sources to build a rich, three-dimensional environment. Instead of one light doing all the work, you combine ambient, task, and accent lighting to create a balanced and visually interesting space. The key is to position these lights at varying heights to force the eye to move through the room, which creates a powerful illusion of depth. A well-layered room feels larger, more dynamic, and infinitely more sophisticated. This isn’t just an aesthetic preference; there’s a science to it. To achieve a comfortable ambient feel, lighting experts recommend approximately 20 lumens per square foot, a target best met by combining multiple sources.
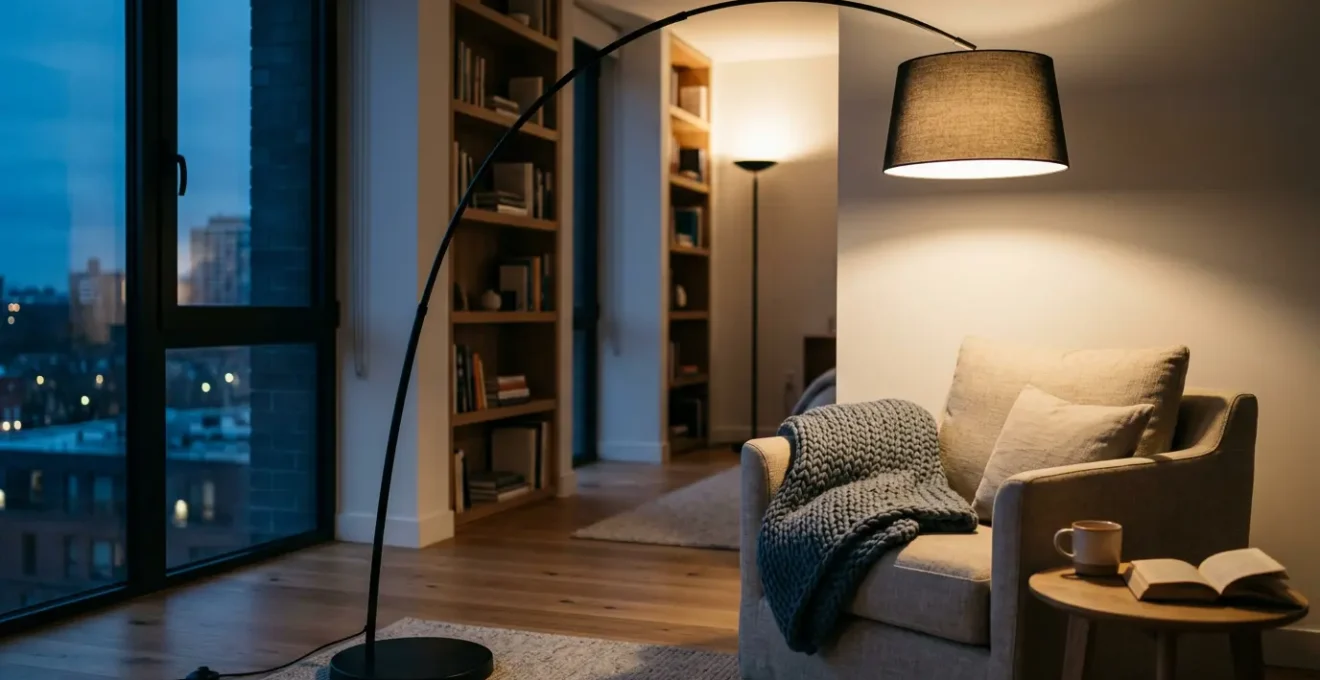
The most effective technique for this is creating a “visual triangle.” Imagine your three main light sources—perhaps a tall floor lamp, a medium-height table lamp, and a low-slung accent light—forming the points of a triangle. This arrangement naturally guides the viewer’s gaze around the space, taking in the different illuminated zones and the soft shadows between them. This deliberate composition prevents the eye from settling in one spot and makes the entire room feel more engaging and expansive.
As the image demonstrates, this isn’t about flooding the room with brightness but about creating an interplay of light. Each source carves out its own space: the floor lamp washes the ceiling and a corner, the table lamp creates an intimate reading spot, and the accent light highlights a piece of art. The overlapping pools of light create soft transitions and a sense of calculated depth, turning a simple room into a composed scene. This is the essence of sculpting with light—using it to define and enhance the architectural space.
Arc lamps vs. torchiere: which style expands visual height better?
When selecting a floor lamp, the style has a dramatic impact on the perception of space. The two dominant forms, the torchiere and the arc lamp, sculpt light in fundamentally different ways. A torchiere, with its upward-facing bowl shade, casts light onto the ceiling, which then reflects it downward. This technique is excellent for expanding a room’s perceived verticality. By illuminating the ceiling plane, it draws the eye upward, making ceilings feel higher and the entire space feel more open and airy. However, they are best used in rooms with ceilings of 9 feet or higher; in low-ceilinged rooms, they can create an oppressive “hot spot” of intense light directly overhead.
In contrast, an arc lamp reaches out into the room, directing light downward in a focused pool. Its genius lies in its ability to create a “room within a room.” By extending over a sofa or a seating group, it defines an intimate zone, perfect for conversation or reading. While it doesn’t expand the overall ceiling height like a torchiere, its dramatic curve adds a strong sculptural element that draws the eye across the horizontal plane. This creates a different kind of visual expansion, one focused on creating functional, cozy destinations within a larger space. For optimal use, the base should be kept against a wall to maximize floor space.
The choice ultimately depends on your goal. To make a room feel taller and more expansive, the torchiere is the superior tool. To create intimate, functional zones and add a strong design statement, the arc lamp excels. Both are powerful instruments for sculpting space, but they operate on different visual axes. Regardless of style, interior design experts recommend a general height of 58-64 inches for living room floor lamps to provide optimal ambient light at a comfortable human scale.
Your placement guide for arc vs. torchiere lamps
- Positioning a Torchiere: Place it 2-3 feet away from walls to create an even ceiling wash without harsh hot spots. This is most effective for ceilings 9 feet and higher.
- Placing an Arc Lamp: Extend the arc over your main seating area from behind or beside the furniture. This creates an intimate ‘room within a room’ feeling while keeping the base out of traffic flow.
- Adjusting Arc Lamp Height: Ensure the bottom of the arc lamp’s shade hovers about 40-42 inches above the floor when over a chair or sofa. This provides focused light for tasks like reading without causing glare.
- Adapting to Low Ceilings: In rooms with ceilings under 8 feet, opt for a slim arc lamp with more horizontal reach than vertical height. Avoid torchieres, which will only emphasize the low ceiling.
- Creating Balance: Don’t let your chosen lamp work alone. Pair a tall torchiere with lower-level table lamps to balance the vertical light with horizontal pools of warmth.
The positioning error that causes annoying glare on your TV screen
One of the most common and frustrating lighting mistakes in a modern living room is the dreaded screen glare. You settle in for a movie, turn on a lamp for atmosphere, and are immediately met with a bright, distracting reflection on the television. This error almost always stems from a single positioning mistake: placing a light source either directly opposite the screen or in the viewer’s line of sight to the screen. Your TV acts like a dark mirror; any light hitting it directly will bounce straight back into your eyes, causing glare and significant eye strain.
The solution is to think about light placement in relation to your seating, not the TV. The ideal position for a floor or table lamp is to the side of, and slightly behind, your primary seating area. This ensures the light falls on you and your immediate surroundings—illuminating a book, a drink, or the remote—without ever having a direct path to the screen. Using lamps with opaque or drum-style shades is also crucial, as they direct light up and down rather than blasting it horizontally across the room.
For an even more comfortable viewing experience, consider adding “bias lighting”—a soft, neutral light source placed behind the TV itself. This can be a simple LED strip. Bias lighting creates a gentle halo on the wall, which reduces the harsh contrast between a bright screen and a dark room. According to lighting experts, every room should have at least two to three different light sources to create balanced levels and eliminate the high contrast that leads to eye strain. In a media room, this combination of indirect ambient light and subtle bias lighting creates a perfectly immersive, glare-free atmosphere.
How to use smart bulbs in floor lamps to shift from work mode to relax mode?
The modern home is often a multipurpose space, with the living room doubling as a home office. Smart bulbs are a revolutionary tool for managing this transition, allowing you to fundamentally shift a room’s atmosphere with a single tap or voice command. The key lies in their ability to control not just brightness (intensity) but also color temperature, measured in Kelvin (K). This allows your floor lamps to support your body’s natural circadian rhythms, signaling when it’s time to be alert and when it’s time to wind down.
During the day or when focus is required, setting your smart bulbs to a cooler temperature of around 4000K provides a crisp, neutral-to-cool white light. This mimics daylight and has been shown to boost focus and concentration, making it ideal for work or tasks. It keeps you alert and productive. However, as evening approaches, maintaining this cool light can disrupt your ability to relax. This is where the magic of smart lighting comes in. By programming a “relax mode,” you can transition the bulbs to a much warmer temperature, between 2200K and 3000K.
This shift to a warm, amber, or soft white glow emulates the natural light of a sunset or candlelight. This warm light is intrinsically linked to relaxation and signals to your brain that the day is ending. You can create different “scenes” in your smart home app:
- Afternoon Focus (12-5 PM): 3500K neutral white at 70% brightness.
- Evening Wind-Down (6-8 PM): 3000K warm white at 60% brightness.
- Night Mode (9 PM onwards): 2200K amber glow at 20-30% brightness.
This allows a single floor lamp to serve multiple functions, transforming from a functional task light into a source of atmospheric, mood-setting glow. It’s the most dynamic way to ensure your lighting is always working for you, not against you.
How to position mirrors to double the natural light in deep rooms?
Mirrors are the lighting designer’s secret weapon. They are not just decorative objects; they are passive light-sculpting tools. When positioned correctly, a mirror can effectively double the light from a lamp or window, bounce it deeper into a room, and create the illusion of a new light source where none exists. This is especially critical in deep, narrow rooms or dark corners that artificial light struggles to reach effectively. The trick is to think of a mirror not as a reflection of the room, but as a portal for light.
The most effective placement strategy depends on your goal. To lengthen a room and draw light inward, place a large mirror on a wall perpendicular to your main window. The light will hit the mirror at an angle and bounce down the length of the room. To create the illusion of a second window and make a small space feel larger, place the mirror on the wall directly opposite a window. The reflection will create a sense of symmetry and double the perceived amount of natural and artificial light.
But the most powerful technique for ambient lighting is placing a mirror behind a light source. By positioning a mirror 6-12 inches behind a table or floor lamp in a dark corner, you achieve two things: you double the light output of the bulb, and you create a “false” light source in the reflection. This makes the corner feel brighter, deeper, and more intentionally designed. For maximum effect, interior designers recommend positioning the center of mirrors at eye level when seated, approximately 40-42 inches from the floor, to maximize both light reflection and visual comfort.
| Mirror Position | Light Effect | Best Room Type | Placement Note |
|---|---|---|---|
| Perpendicular to Window | Bounces light deeper into room length | Deep, narrow rooms | On adjacent wall, any height |
| Opposite Window | Creates illusion of second window | Small, square rooms | Directly across from the light source |
| Behind Floor Lamp | Doubles lamp output, creates false light source | Dark corners | 6-12 inches behind the lamp |
| Angled from Corner | Reflects both natural and artificial light | L-shaped rooms | At a 45-degree angle from the corner |
3000K vs. 4000K: which bulb temperature flatters your interior finishes best?
The choice between a 3000K and a 4000K bulb is more than a technical decision; it’s a choice about the soul of your room. Color temperature, measured in Kelvin (K), dictates whether the light appears warm (yellowish) or cool (bluish-white), and it has a profound impact on how the colors and textures of your finishes are perceived. Getting it wrong can make beautiful wood look sickly, sophisticated gray paint feel sterile, or warm beige feel dingy. As a rule, 3000K is the sweet spot for most residential living spaces.
A 3000K bulb produces a soft, warm white light. It’s cozy without being overly yellow like a 2700K bulb can be. This temperature is exceptionally flattering to a wide range of materials. It enhances the natural grain and red/yellow undertones in wood finishes like oak and walnut, making them feel rich and alive. For cool-toned paints, like popular grays and blues, 3000K light adds a necessary touch of warmth, preventing the space from feeling clinical or cold. It creates a sophisticated, balanced atmosphere that feels inviting and comfortable.
In contrast, 4000K produces a cool, neutral white light that is closer to daylight. While excellent for task-oriented spaces like kitchens, garages, or home offices where clarity and focus are paramount, it can be harsh and unflattering in a living room. It tends to wash out warm colors and can make wood tones appear flat and lifeless. A 4000K light in a cozy setting can feel sterile, like a gallery or a retail space. The key is always to prioritize a high Color Rendering Index (CRI) of 90+ to ensure colors appear true, but for mood and atmosphere, the warmth of 3000K is almost always the superior choice for flattering your home’s carefully chosen finishes.
Key Takeaways
- Sculpt with Shadows: True atmosphere comes from the interplay of light and shadow, not from flooding a room with uniform brightness. Use lamps to create intentional pools of light.
- Layer for Depth: Combine light sources at different heights (floor, table, accent) to create a visual triangle. This guides the eye and makes a room feel larger and more dynamic.
- Temperature is Mood: The color temperature of your bulb is critical. Use warm light (2700K-3000K) to foster relaxation and cool light (4000K) for focus. Match the light to the desired mood.
Dimmer Switches: Transforming Room Atmosphere and Saving Energy
If layering is the strategy, then the dimmer switch is the master control. It is perhaps the single most impactful and cost-effective upgrade for transforming a room’s atmosphere. A dimmer provides the granular control that static, on/off lighting lacks. It allows you to modulate the intensity of your floor lamps to match the time of day, the activity, or the desired mood. A brightly lit room for a lively gathering can seamlessly transition into a softly glowing space for quiet conversation, all with a simple adjustment.
This control is not just about mood; it’s also about visual comfort. Our lighting needs are not constant. The ability to dial down the brightness prevents overwhelming glare and reduces eye strain, creating a more comfortable and responsive environment. Furthermore, this has tangible benefits for both your wallet and the planet. Modern LED bulbs, which already use 85% less energy than incandescent bulbs, become even more efficient when dimmed. Running a dimmable floor lamp at 80% of its maximum brightness can significantly extend the bulb’s lifespan while consuming less power.
The advent of smart plugs and smart dimmers has made this control more accessible than ever. Even if your floor lamp doesn’t have a built-in dimmer, a smart plug can provide full dimming capabilities controlled via a phone app or voice command. You can automate your lighting to dim automatically in the evening, creating a warm and welcoming atmosphere as you arrive home without touching a single switch. A dimmer elevates a simple lamp from a static object to a dynamic tool, giving you the power to paint with light and fine-tune your home’s atmosphere in real time.
Begin tonight. Turn off the overhead glare, turn on your chosen lamps, and start sculpting the atmosphere you deserve. Observe how the pools of light create new spaces, how shadows add depth and mystery, and how a simple change in intensity can transform the entire feeling of a room. Your most beautiful space is waiting to be revealed.